Plugin Not Working in WordPress? 12 Fixes That Work (2026)
Published: 2 Nov 2026
Quick Answer: Plugin Not Working in WordPress
If a WordPress plugin is not working, the problem may be caused by plugin conflicts, outdated software, PHP compatibility issues, caching, or corrupted plugin files. Check recent updates, clear your website cache, and test for plugin or theme conflicts to find the cause. Updating, reinstalling, or rolling back the affected plugin can often restore its functionality. Always back up your website before troubleshooting.
You install a WordPress plugin, activate it, and expect everything to work. But nothing happens. Perhaps a button stops responding, a form disappears, or your website suddenly displays an error.
Even worse, the error message may not explain what went wrong.
When a plugin not working in WordPress causes trouble, you don’t always need a developer or coding skills to fix it. Many plugin problems come from outdated files, caching, compatibility issues, or conflicts with other plugins and themes.
This guide walks you through 12 practical fixes, starting with simple checks and moving towards more advanced troubleshooting. Follow them in order, and you’ll have a much clearer idea of what’s causing the problem.
Key Takeaways: Plugin Not Working in WordPress
- A plugin usually stops working because of a conflict, an outdated version, cached files, a PHP error, or a missing activation or license key.
- Fix it in order. Check activation, clear every cache layer, pause JavaScript optimization, then test for conflicts.
- Use Health Check & Troubleshooting mode to find a plugin or theme conflict without affecting your visitors.
- Turn on the debug log to see the exact error. Turn it off when you finish.
- Locked out? Use the Recovery Mode email, or rename the plugin folder in File Manager.
- Back up first and test big updates on a staging site, so a bad update never reaches your visitors.
Why Is My WordPress Plugin Not Working?
A WordPress plugin may stop working because it isn’t activated, its settings are incomplete, or it conflicts with another plugin, your theme, or your PHP version. Cached files, JavaScript errors, security restrictions, and outdated plugin code can also prevent it from working correctly. The best approach is to identify what changed and test one possible cause at a time.
Here are the common reasons your WordPress plugin may not work and where to find the corresponding fix.
| Reason | What you see | Fix |
| Plugin isn’t activated or configured | Installed but does nothing | Step 1 |
| Recent update caused an issue | Plugin worked before an update | Steps 2 and 11 |
| Cached files | Old version appears, or visitors see something different | Step 3 |
| JavaScript optimization | Buttons, sliders, or forms stop responding | Step 4 |
| JavaScript error | Front-end features fail | Step 5 |
| Plugin conflict | Problem starts after installing another plugin | Step 6 |
| Theme conflict | Plugin works with a default theme | Step 7 |
| PHP version or memory limit | Errors, timeouts, or blank screen | Step 8 |
| Fatal PHP error | Critical error or inaccessible dashboard | Step 9 and recovery section |
| Security plugin or firewall | Settings won’t save, or requests get blocked | Step 10 |
| Corrupted or abandoned plugin | Missing features, files, or updates | Steps 11 and 12 |
| Incorrect usage | Shortcode appears as plain text or nothing happens | Common Problems |
Get These Ready Before You Fix Anything
Before changing plugin settings or editing website files, prepare a few things. Some troubleshooting steps can temporarily affect your website, so having a way to restore it will save you trouble. Five minutes of preparation makes every fix safer. If you are new to the dashboard, my complete WordPress guide for beginners explains the basics. Then gather these items.
Use this checklist:
- A full website backup: Back up your WordPress files and database through your hosting account or a backup plugin. A backup gives you a restore point if troubleshooting causes another problem. Check that the backup completed successfully.
- WordPress administrator login: You need access to your dashboard to activate plugins, check settings, and review Site Health.
- Hosting panel access: Keep your hPanel or equivalent hosting account login available. You may need it to check PHP settings or access website files.
- File Manager or FTP access: These tools let you rename plugin folders, edit wp-config.php, and inspect error logs if the dashboard stops working.
- A staging website: If your hosting provider offers staging, use it to test updates and plugin conflicts without affecting your visitors.
- A note of recent changes: Write down which plugin, theme, WordPress version, or PHP setting changed before the issue appeared. This information can help narrow down the cause.
My recommendation: Don’t delete plugins, edit configuration files, or change PHP versions before creating a backup. If you have a staging environment, perform risky tests there first.
How to Fix a WordPress Plugin That Is Not Working
You don’t need to try every possible solution at once. Follow these 12 steps in order, checking your website after each change.
This approach helps you identify the actual cause instead of making several changes that could create additional problems.
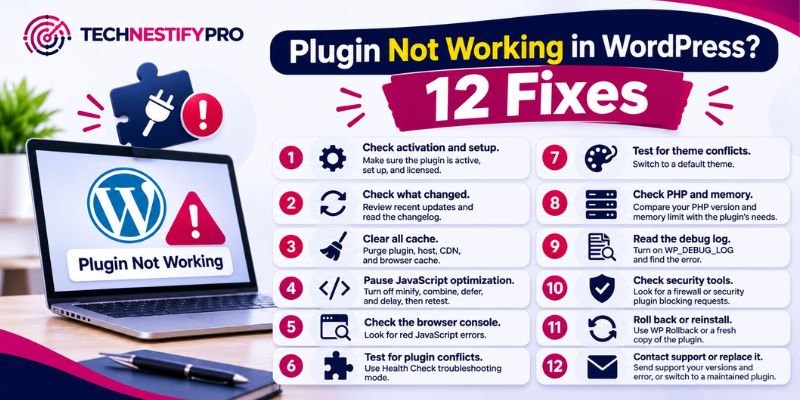
Step 1: Check Plugin Activation, Setup, and License
Start with the simplest possibility: the plugin may be installed but not properly activated or configured.
Installing a plugin doesn’t automatically enable every feature. Some plugins require additional setup, a license key, or another plugin before they work.
Follow these steps:
- Log in to your WordPress dashboard.
- Navigate to Plugins → Installed Plugins.
- Find the plugin you’re troubleshooting.
- Check whether its status says Deactivate or Activate.
- If you see Activate, click it.
- Open the plugin’s settings page and review its configuration.
Next, check these things:
- Setup requirements: Does the plugin require you to complete a setup wizard?
- License key: Does it need an active license to enable premium features?
- Required plugins: Does it depend on another plugin or a free base version?
- Permissions: Does it need access to an external service or API?
- Shortcode or block: Have you added its required shortcode or block to the correct page?
For example, a form plugin may install successfully but display nothing until you create a form and insert its shortcode into a page.
Similarly, a premium plugin may activate but keep certain features disabled until you enter a valid license key.
Test: Open the page where you expect the feature to appear. If it works, you don’t need to continue troubleshooting.
Step 2: Check What Changed and Update in the Right Order
Did your plugin stop working after a WordPress, theme, or plugin update?
If it worked yesterday and stopped today, check your recent update history before changing anything else.
Compatibility problems can occur when a plugin uses code that no longer works correctly with a newer WordPress version, another plugin, or your active theme.
Here’s how to investigate:
- Go to Dashboard → Updates.
- Check whether WordPress core, your theme, or any plugins have pending updates.
- Visit Plugins → Installed Plugins and note the versions of recently updated plugins.
- Check the plugin’s changelog or release notes.
- Compare the update date with the time your problem started.
Should you update WordPress, themes, or plugins first?
There isn’t one universal update order that guarantees compatibility. Follow the plugin and theme developers’ compatibility instructions when available.
For routine maintenance, use this safer approach:
- Create a full backup.
- Test pending updates on staging.
- Update WordPress core, themes, and plugins according to their compatibility requirements.
- Apply updates individually or in small groups.
- Check the website after each update.
Avoid updating everything simultaneously on a live website when you’re already experiencing a problem. Otherwise, you may struggle to identify which update caused it.
If you discover that a particular update introduced the problem, check whether the developer has released a compatibility patch. If not, consider rolling back to the previous working version using Step 11.
Step 3: Clear Every Cache Layer and Test While Logged Out
Sometimes your plugin works correctly, but your browser or caching system keeps showing an older version of your website.
This happens when cached HTML, CSS, or JavaScript files don’t reflect your latest changes.
If a plugin feature works for you while logged in but not for visitors, caching should be one of your first checks.
Clear these cache layers:
1. Clear your WordPress caching plugin
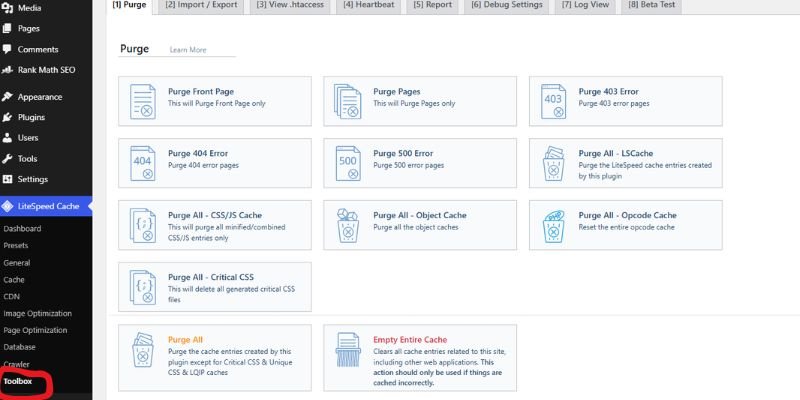
If you use LiteSpeed Cache, open:
LiteSpeed Cache → Toolbox → Purge
Select the appropriate purge option. Purge All is useful when you need to clear the website’s cached pages and related cached resources.
Other caching plugins have similar options, although their menu names may differ.
2. Clear your hosting cache
Some hosting providers maintain server-level caching separately from WordPress plugins.
Log in to your hosting panel and look for its cache management option. Clear the website cache if available.
3. Clear CDN cache
If you use a CDN such as Cloudflare, open its caching settings and purge the relevant files or cache.
Don’t assume you use a CDN just because your hosting provider offers one. Check your actual configuration first.
4. Clear your browser cache
In Chrome, press:
Ctrl + Shift + Delete
Choose cached images and files, then clear the data.
You can also test the website in an incognito window.
5. Test as a visitor
Open the affected page in an incognito window without logging in.
Check whether the plugin now works correctly.
What if the plugin still doesn’t work?
Move to the next step. The problem may involve JavaScript optimization rather than cached page content.
Step 4: Pause JavaScript Optimization Settings
JavaScript optimization can improve website performance, but certain settings may interfere with plugins.
This is particularly common with plugins that rely on JavaScript for interactive features, including:
- Contact forms
- Pop-up windows
- Sliders and carousels
- Shopping carts
- Search filters
- Login forms
- Booking systems
If a button appears but doesn’t respond when clicked, JavaScript optimization is worth checking.
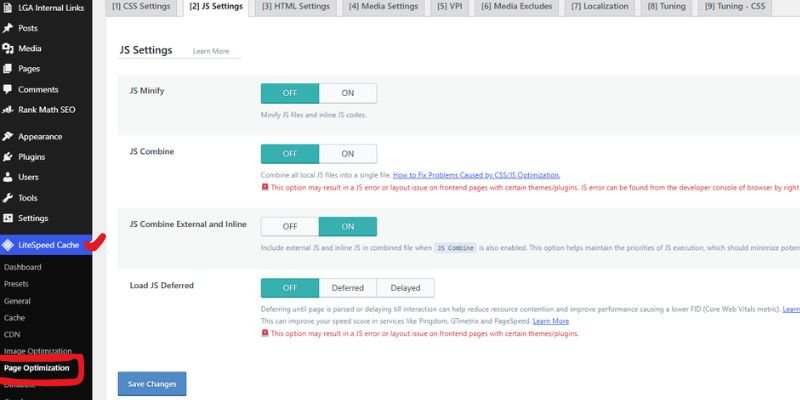
For example, LiteSpeed Cache includes JavaScript optimization options such as:
- JS Minify
- JS Combine
- Load JS Deferred
- Delay JS
Other performance plugins may offer similar settings.
How to test JavaScript optimization:
- Open your caching or performance plugin settings.
- Find its JavaScript optimization section.
- Note the current settings so you can restore them.
- Temporarily disable JS Minify, JS Combine, Defer, and Delay.
- Save your changes.
- Purge all relevant caches.
- Open the affected page in an incognito window.
- Test the plugin again.
If the plugin starts working, one of the optimization settings may be responsible.
Don’t leave every optimization setting disabled permanently because your site will slow down. For other safe ways to keep your pages fast, read my guide on how to speed up a WordPress website.
Instead, identify which setting causes the problem and add the affected JavaScript file to the plugin’s exclusion list.
For example, if delaying a form plugin’s JavaScript breaks form submission, exclude its relevant script from the Delay JS setting.
The exact exclusion depends on the plugin and the script URL. Check the plugin developer’s documentation before adding exclusions.
Step 5: Check the Browser Console for JavaScript Errors
If a plugin’s buttons, forms, or interactive features aren’t working, check your browser’s developer console.
The console displays JavaScript errors that may help you identify the problem.
You don’t need programming experience to perform this basic check.
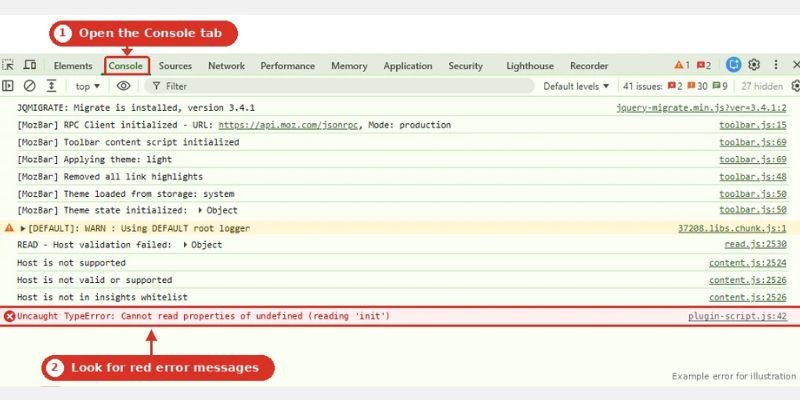
How to open the browser console in Chrome:
- Open the page where your plugin isn’t working.
- Press F12 on your keyboard.
- Select the Console tab.
- Refresh the page.
- Look for red error messages.
You can also right-click anywhere on the page, select Inspect, and open Console.
What do the messages mean?
| Console message | Possible meaning |
| Uncaught TypeError | JavaScript tried to use a value or method incorrectly |
| Uncaught ReferenceError | A required variable or function isn’t available |
| Failed to load resource | A script, stylesheet, or other file couldn’t load |
| 403 Forbidden | The server or a security rule denied a request |
| 404 Not Found | The requested file or resource couldn’t be found |
| Mixed Content | A page loaded an insecure HTTP resource over an HTTPS website |
These messages are clues, not automatic proof that the plugin itself is responsible.
For example, a missing JavaScript file might result from an incorrect optimization setting, a caching issue, or a plugin conflict.
Check the file URL and error details before deciding what to change.
If you aren’t sure what an error means, copy the complete message and send it to the plugin developer.
Step 6: Find a Plugin Conflict Safely
A plugin conflict happens when two or more plugins interfere with each other’s functionality.
For example, two plugins may use overlapping JavaScript libraries, modify the same checkout process, or interfere with the same WordPress hooks.
One plugin may work perfectly on its own but fail when another plugin is active.
The safest way to identify the conflict is to use the Health Check & Troubleshooting plugin.
Method 1: Use Troubleshooting Mode
- Open Plugins → Add New.
- Search for Health Check & Troubleshooting.
- Install and activate it.
- Navigate to Tools → Site Health → Troubleshooting.
- Enable Troubleshooting Mode.
- Open the affected page and check whether the problem remains.
Troubleshooting Mode creates a clean session for your logged-in account. It temporarily disables plugins and switches to a default theme for your session.
Your normal visitors continue seeing the website with its existing plugins and theme active.
Now reactivate plugins individually:
- Enable the plugin you’re investigating.
- Refresh the affected page.
- Check whether the feature works.
- Enable another plugin.
- Repeat the test until the problem returns.
When the error appears after activating a particular plugin, investigate that plugin and its interaction with the others.
If the problem occurs only when two plugins are active together, test each plugin separately to confirm the conflict.
Method 2: Deactivate plugins manually
If you cannot use Troubleshooting Mode, create a backup and use this fallback method.
- Navigate to Plugins → Installed Plugins.
- Select all plugins.
- Choose Deactivate from the Bulk Actions menu.
- Click Apply.
- Check whether the problem disappears.
- Reactivate plugins one at a time.
- Check your website after each activation.
The “deactivate everything” method also works, but use it only on a staging site. On a live site, it switches off features your visitors use. I explain how to prevent conflicts after updates in my guide on reducing WordPress plugin conflicts.
On a staging site, open Plugins → Installed Plugins. Tick the select-all checkbox, choose Deactivate from Bulk actions, and click Apply. Then reactivate your plugins one at a time and test after each.
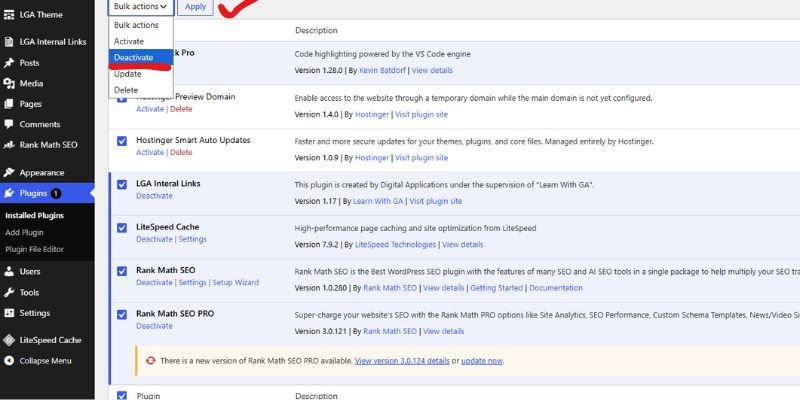
If the issue returns after activating a particular plugin, investigate it further.
Remember that deactivating plugins can temporarily affect important features, including forms, payments, security, and caching. Avoid doing this on a busy live website when staging or troubleshooting mode is available.
For a more detailed walkthrough, see our guide on how to fix WordPress plugin conflicts.
Step 7: Test for a Theme Conflict
Your WordPress theme can also interfere with plugin functionality.
Some themes include built-in scripts, styling rules, and features that overlap with plugins. A theme update may also introduce compatibility problems.
To check whether your theme causes the issue, test your website with a default WordPress theme.
If you’re using Health Check Troubleshooting Mode:
- Open Tools → Site Health → Troubleshooting.
- Enable Troubleshooting Mode.
- Open the Themes section or troubleshooting controls.
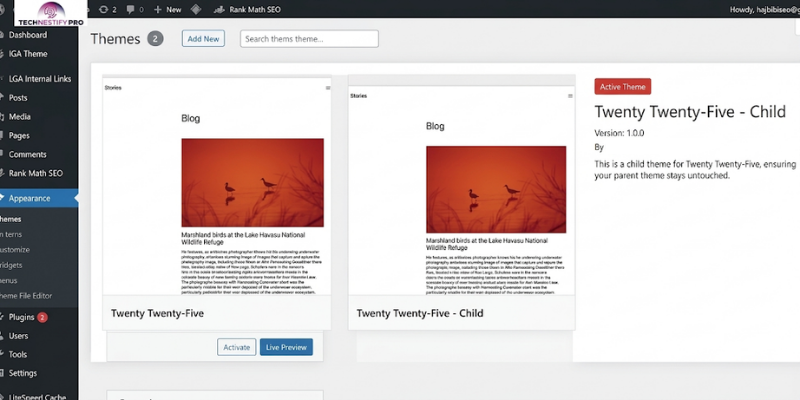
- Switch to an available default WordPress theme, such as Twenty Twenty-Five or another compatible default theme.
- Visit the affected page.
- Check whether the plugin works.
If the plugin works with the default theme but fails with your original theme, you may have identified a theme compatibility issue.
Contact the theme developer and provide the exact error, theme version, plugin version, and WordPress version.
Important: A theme switch can change your website’s layout and appearance. Use troubleshooting mode or staging rather than changing the active theme for all visitors. If you customize theme files, use a child theme so updates do not erase your changes. My guide to WordPress child theme setup best practices shows how.
Step 8: Check Your PHP Version and Memory Limit
WordPress plugins run using PHP on your web server. If your server uses an incompatible PHP version or has insufficient memory, certain plugins may fail.
You might see:
- A critical error message.
- A blank page.
- A plugin activation failure.
- A memory exhaustion warning.
- Features that stop working after a PHP update.
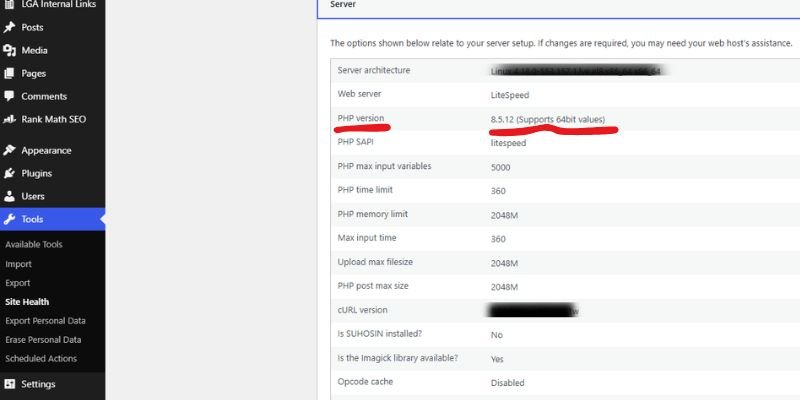
Check your PHP version through WordPress:
- Log in to your dashboard.
- Navigate to Tools → Site Health.
- Open the Info tab.
- Expand the Server section.
- Find the PHP version and PHP memory limit.
What PHP version should you use?
According to the official WordPress requirements, WordPress recommends PHP 8.3 or greater.
However, the newest PHP release isn’t automatically the best choice for every website. Check whether your active plugins and theme support the version offered by your hosting provider.
Before changing PHP:
- Create a complete website backup.
- Check your plugin and theme compatibility.
- Test the new version on staging if possible.
- Change the version through your hosting panel.
- Test your website’s front end and dashboard.
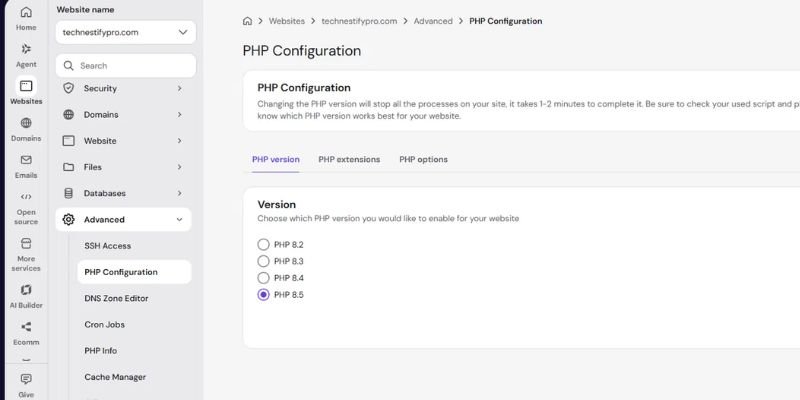
How to check PHP in Hostinger hPanel:
- Log in to your Hostinger account.
- Open Websites and select your website.
- Click Dashboard next to your website, then search for PHP Configuration in the sidebar.
- Find the PHP version selector.
- Check the available versions and select a compatible release.
- Apply the change.
- Open your website and test the affected plugin.
What about the PHP memory limit?
A plugin may require more memory than your server currently allows.
Check the PHP memory limit under Site Health → Info → Server.
If you see memory exhaustion errors, ask your hosting provider whether the PHP memory limit can be increased. Don’t assume that increasing memory will fix every plugin problem; first confirm that the log actually reports a memory issue.
For a complete walkthrough, read our guide on how to update PHP in WordPress.
Step 9: Turn On Debug Mode and Read the Error Log
If the previous steps haven’t identified the problem, WordPress debugging can help you find the underlying PHP error.
WordPress includes built-in debugging constants that record errors in a log file.
You’ll need access to your website’s wp-config.php file.
Before editing: Create a backup and use a staging website whenever possible. Don’t display debugging errors publicly on a live website.
How to enable WordPress debugging:
- Open your hosting panel.
- Navigate to File Manager.
- Open your WordPress installation’s root directory.
- Find wp-config.php.
- Download a backup copy before editing.
- Open the file and find the line:
/* That’s all, stop editing! Happy publishing. */
- Add the following code above that line:
define( 'WP_DEBUG', true );
define( 'WP_DEBUG_LOG', true );
define( 'WP_DEBUG_DISPLAY', false );
@ini_set( 'display_errors', 0 );

/* That's all, stop editing! Happy publishing. */If these constants already exist, edit their existing values rather than adding duplicate definitions.
Save the file.
Where can you find the error log?
WordPress normally stores the log here:
wp-content/debug.log
Open your hosting File Manager and navigate to the wp-content folder.
Look for debug.log.
Open it and check the latest entries. Look for the plugin name, file path, error type, and line number.
For example, an error mentioning a file inside:
wp-content/plugins/example-plugin/
may point towards that plugin.
However, a file path alone doesn’t prove that the plugin is the root cause. Another plugin or theme may have triggered the error.
How to turn debugging off
After troubleshooting, edit wp-config.php and change:
php

define( 'WP_DEBUG', false );

define( 'WP_DEBUG_LOG', false );

define( 'WP_DEBUG_DISPLAY', false );If you added these constants specifically for testing, you can remove them instead.
Delete the debug log when you no longer need it, provided you have saved any information required for support.
Debug logs can contain technical information about your website, so don’t leave them publicly accessible.
For more details, see the official WordPress debugging documentation.
Step 10: Check Security Plugins, Firewall, and Site Health
Security plugins and server firewalls protect your website, but their rules can sometimes block requests that a plugin needs.
This can happen when a plugin tries to save settings, submit a form, communicate with an external API, or make a REST API request.
Check these areas:
1. Security plugin settings
If you use a security plugin, review its firewall logs and blocked requests.
Look for requests involving the affected plugin or page.
Don’t disable your entire security system without understanding the risk. If you find a blocked request, check the security plugin’s documentation or ask its support team about a safe exception.
2. Check REST API errors
Some plugins rely on the WordPress REST API to communicate with the server.
Navigate to:
Tools → Site Health → Status
Review any REST API warnings or errors.
A REST API problem may affect the block editor, forms, page builders, and other plugin features.
3. Check loopback requests
WordPress uses loopback requests to run certain background tasks and scheduled processes.
If Site Health reports that loopback requests failed, ask your hosting provider to investigate server restrictions, authentication rules, or firewall settings.
4. Review Site Health recommendations
Open:
Tools → Site Health → Status
Read the critical issues and recommended improvements.
Not every Site Health warning causes your plugin problem, but the results can reveal server or configuration issues that deserve attention.
If a firewall is blocking a legitimate plugin request, ask your hosting provider or security plugin developer to help whitelist the specific request safely.
Step 11: Roll Back or Reinstall the Plugin
If a plugin stopped working immediately after an update, the new version may contain a bug or compatibility problem.
You have two main options: roll back to the previous version or reinstall a clean copy.
Option 1: Roll back the plugin
You can use the WP Rollback plugin to return to an earlier version of a plugin when the developer provides previous releases.
The general process is:
- Create a full backup.
- Install and activate WP Rollback from the WordPress plugin directory.
- Open Plugins → Installed Plugins.
- Find the affected plugin.
- Select its Rollback option, if available.
- Choose a previous version.
- Confirm the rollback.
- Test the plugin again.
Not every plugin supports rollback through this method. Check the plugin’s documentation and compatibility before proceeding.
Avoid rolling back security-sensitive plugins to vulnerable versions. If the update addressed a security issue, contact the developer for a patched release instead.
Option 2: Reinstall the plugin
A plugin’s files may become corrupted during an incomplete update or installation.
To reinstall it:
- Create a full backup.
- Go to Plugins → Installed Plugins.
- Deactivate the affected plugin.
- Check whether the plugin stores settings or data that could be removed during deletion.
- Delete it only if you have confirmed the removal is safe.
- Install a clean copy from the official WordPress plugin directory or the developer’s trusted website.
- Activate it.
- Restore the required settings and test its functionality.
Will deleting a plugin remove its data?
It depends on how the plugin handles uninstalling.
Some plugins preserve settings and database records. Others remove certain data through their uninstall routines.
Check the plugin developer’s documentation before deleting it, especially if it stores orders, forms, bookings, or customer information.
Step 12: Decide Whether to Contact Support or Replace the Plugin
Sometimes a plugin contains a bug that you cannot fix through normal WordPress settings.
You may also discover that the developer no longer maintains it.
Before spending more time troubleshooting, check its maintenance and support status.
Review these five things:
- Last updated: When did the developer release the latest version?
- Tested up to: Does the plugin list compatibility with your WordPress version?
- Support activity: Are developers responding to questions in the support forum?
- Changelog: Do recent releases include bug fixes and compatibility improvements?
- Known issues: Have other users reported the same problem?
A plugin that hasn’t received an update recently isn’t automatically unsafe or broken. However, a lack of maintenance combined with unresolved compatibility problems is a reason to look for alternatives.
Copy this support message when contacting the developer:
Subject: Plugin not working on my WordPress website
Hello,
I’m experiencing an issue with your plugin on my WordPress website.
Here are my website details:
- WordPress version: [Your WordPress version]
- PHP version: [Your PHP version]
- Plugin name and version: [Plugin details]
- Active theme: [Theme name]
- Other active plugins: [Plugin list]
Problem:
[Explain exactly what happens when you use the plugin.]
Error message:
[Copy the complete error message, if available.]
Troubleshooting I’ve tried:
- Cleared website and browser caches.
- Checked plugin settings and activation.
- Tested for plugin and theme conflicts.
- Reviewed Site Health and error logs.
Could you please help me identify the cause and suggest a fix?
Thank you.
[Your name]
Providing these details helps the developer reproduce the problem without repeatedly asking you for basic information.
If the plugin remains broken, lacks support, or creates security concerns, choose a maintained alternative with similar functionality.
What If You Can’t Log In to WordPress After a Plugin Problem?
If a plugin causes a fatal PHP error, WordPress may prevent you from accessing your dashboard.
You might see a blank screen, a critical error message, or a login page that keeps failing.
You can still disable the faulty plugin without logging in to WordPress. Try the following methods.
- Use the WordPress Recovery Mode Email
WordPress includes a built-in Recovery Mode feature that can help you regain dashboard access after certain fatal errors.
When WordPress detects a qualifying fatal PHP error, it may send an email to your administrator email address.
The email usually contains:
- A description of the technical problem.
- The name of the plugin or theme involved, when identified.
- A special Recovery Mode login link.
Follow these steps:
- Open the administrator email account associated with your WordPress website.
- Search for an email about a technical issue with your website.
- Open the message and find the Recovery Mode link.
- Click the link and log in to your WordPress dashboard.
- Navigate to Plugins or Appearance → Themes.
- Deactivate the faulty plugin or investigate the identified component.
- Fix the problem and exit Recovery Mode.
Recovery Mode temporarily pauses the faulty plugin or theme for your administrator session. It doesn’t automatically repair the underlying code.
What if you don’t receive the email?
Check your spam and junk folders. If the message isn’t there, your hosting provider may be able to help you access the website files.
You can also use the following File Manager method.
- Rename the Plugin Folder in File Manager or FTP
If you know which plugin caused the problem, you can deactivate it by renaming its folder.
This method doesn’t require WordPress dashboard access.
Follow these steps using Hostinger hPanel:
- Log in to your Hostinger account.
- Open your website’s dashboard.
- Navigate to Files → File Manager.
- Open your WordPress installation directory, usually public_html.
- Find the wp-content folder.
- Open wp-content/plugins.
- Find the folder belonging to the faulty plugin.
- Right-click the folder and select Rename.
- Add -disabled to its name.
For example:
Original folder: wp-content/plugins/example-plugin
Renamed folder: wp-content/plugins/example-plugin-disabled
WordPress can no longer load the plugin from its original directory.
Now try opening your WordPress login page again.
If you regain access, navigate to Plugins → Installed Plugins and check the plugin’s status.
Keep the folder renamed while you investigate the problem. Don’t delete it until you have confirmed that you no longer need its files.
Note: Renaming a plugin folder disables that plugin, but it doesn’t repair the code or remove its database records.
- Rename the Whole Plugins Folder if You Don’t Know the Culprit
What if you cannot identify which plugin caused the error?
You can temporarily disable all plugins by renaming the entire plugins directory.
Use this method only when the individual plugin method doesn’t help.
Follow these steps:
- Open your hosting File Manager or connect through FTP.
- Navigate to wp-content.
- Find the folder named plugins.
- Rename it to plugins-disabled.
- Open your WordPress login page.
- If you can access the dashboard, investigate the plugins and identify the faulty one.
Renaming the complete directory prevents WordPress from loading the plugins stored inside it.
After identifying the problem, restore the original folder name:
plugins-disabled → plugins
If WordPress created a new empty plugins directory, handle that carefully before restoring the original directory. Don’t overwrite or delete the original plugin files accidentally.
Once you restore the folder, log in and activate the plugins individually while checking your website.
Remember: Disabling every plugin may temporarily affect your forms, shopping cart, security features, and other website functions. Restore the required plugins after troubleshooting.
Extra Tips and Best Practices to Prevent Plugin Not Working in WordPress Issues
You can prevent many WordPress plugin problems by following a few simple maintenance habits.
- Update one plugin at a time. Check your website after each update so you can identify the plugin responsible if something breaks.
- Test updates on staging. Use a staging website to check compatibility before applying major updates to your live site.
- Check the tested, up-to-date version. Review the plugin’s compatibility information before installing or updating it.
- Read changelogs. Check recent releases for bug fixes, removed features, and known compatibility changes.
- Turn off debug mode after testing. Don’t leave debugging enabled unnecessarily on a live website.
- Review Site Health weekly. Check for PHP warnings, REST API problems, outdated software, and other server-related recommendations.
Also, avoid installing plugins from unknown websites. Download them from the official WordPress plugin directory or a trusted developer.
A smaller collection of well-maintained plugins is generally easier to manage than dozens of plugins that provide overlapping features.
Common Problems and Fixes for Plugins Not Working in WordPress
Not every plugin problem requires advanced troubleshooting. Some issues have simple explanations and quick solutions.
| Problem | Why it happens | What to do |
| Shortcode shows as plain text | The shortcode is incorrect, unsupported, or placed in the wrong editor block | Copy the correct shortcode from the plugin settings and add it using a Shortcode block |
| Plugin works for admins but not visitors | Caching, user permissions, or conditional display settings | Clear all cache layers and review the plugin’s visibility settings |
| Can’t add, upload, or install a plugin | Hosting restrictions, insufficient permissions, upload limits, or WordPress.com plan restrictions | Check your hosting limits, file permissions, and platform restrictions |
| Website stuck in maintenance mode | An update was interrupted, and the .maintenance file remains | Back up your site and remove the .maintenance file from the WordPress root directory using File Manager |
Plugin Error Messages and What They Mean
WordPress may display different error messages when a plugin fails. Understanding the message can help you decide which troubleshooting step to try.
Here are some common messages and their possible meanings.
| Error message | Possible cause | Suggested fix |
| There has been a critical error on this website. | Fatal PHP error in a plugin, theme, or custom code | Check Recovery Mode and the PHP error log |
| Plugin could not be activated because it triggered a fatal error. | Incompatible or faulty plugin code | Check PHP compatibility and debug.log |
| Allowed memory size exhausted | PHP memory limit reached | Review the memory limit and ask your host about increasing it |
| The plugin does not have a valid header. | Missing or invalid plugin header information | Reinstall a clean copy of the plugin |
| Destination folder already exists | A previous plugin installation left files behind | Inspect the existing folder before reinstalling |
| Installation failed: Could not create directory. | File permission or ownership problem | Ask your hosting provider to check directory permissions |
| 403 Forbidden | Firewall, security rule, or access restriction | Review blocked requests and server security logs |
| 404 Not Found | Missing file, incorrect URL, or broken resource reference | Check the file path and plugin installation |
These are common diagnostic examples, not a complete list. The exact message and its surrounding details matter. A 403 error, for example, doesn’t always mean a security plugin caused the problem.
If you receive an unfamiliar message, copy the complete error and check the relevant plugin documentation before making changes.
Conclusion
A WordPress plugin that stops working doesn’t always require professional help. Start with activation and configuration, clear your caches, check JavaScript errors, and test for plugin or theme conflicts. If those steps don’t help, investigate your PHP version, debug logs, and plugin files.
The best way to fix a plugin not working in WordPress is to identify the actual cause and make one change at a time.
Keep regular backups, test updates on staging, and use maintained plugins. These habits can help you avoid many common WordPress problems.
If a plugin conflict is causing your issue, read our detailed guide on fixing WordPress plugin conflicts.
Frequently Asked Questions
WordPress plugins can stop working because of outdated code, incomplete setup, or compatibility problems. Conflicts with other plugins or your active theme can also cause errors. Caching and JavaScript optimization may prevent certain features from loading correctly. Check recent changes first, then troubleshoot one possible cause at a time.
Log in to your WordPress dashboard and navigate to Plugins → Installed Plugins. Find the plugin you want to enable and click Activate. Some plugins also require additional setup, a license key, or configuration before their features work. Visit the plugin’s settings page and complete any remaining setup instructions.
First, check whether the plugin is activated and configured correctly. Clear your website cache and browser cache, then test the affected page. If the problem continues, check for JavaScript errors and plugin or theme conflicts. You can also review PHP error logs to identify fatal errors.
A WordPress update may introduce compatibility problems with older plugin code. The plugin developer may need to release an update to support the newer WordPress version. Check the plugin changelog, compatibility information, and support forum. If the update caused the issue, test a compatible version or contact the developer before rolling back.
Your browser may show cached content that differs from what visitors receive. The plugin may also have user-specific visibility settings, login restrictions, or permissions. Clear your website, hosting, CDN, and browser caches. Then test the page in an incognito window without logging in.
Deactivating a plugin usually stops its functionality without immediately deleting its stored settings or database records. Deleting a plugin may remove some data if it includes an uninstall routine. Other plugins preserve their settings even after deletion. Check the developer’s documentation and create a backup before removing a plugin permanently.



- Be Respectful
- Stay Relevant
- Stay Positive
- True Feedback
- Encourage Discussion
- Avoid Spamming
- No Fake News
- Don't Copy-Paste
- No Personal Attacks
- Be Respectful
- Stay Relevant
- Stay Positive
- True Feedback
- Encourage Discussion
- Avoid Spamming
- No Fake News
- Don't Copy-Paste
- No Personal Attacks
