How to Add a Product Personalizer to WooCommerce (Step-by-Step Guide)
Published: 12 Aug 2026
A WooCommerce product personalizer lets customers add their own name, message, photo, or design to a product before they buy it – think engraved jewellery, monogrammed bags, or custom-printed mugs. It’s sometimes called a product customizer or product configurator, but the goal is the same: turn a standard listing into something the customer made their own.
Selling the same product as everyone else makes it hard to stand out. Shoppers today want more than a plain “Add to Cart” button; they want to make the product their own.
This guide isn’t tied to one specific plugin. The steps below work no matter which WooCommerce personalization tool you choose, so you can pick what actually fits your store instead of being pushed toward one product. Personalization also tends to pay for itself: Deloitte’s 2024 research found that consumers who prefer personalized brands spend 50% more with those brands than they do elsewhere.
This guide will show you step-by-step how to set up product personalization so that your customers can start making items their own right away.
What Is a Product Personalizer for WooCommerce?
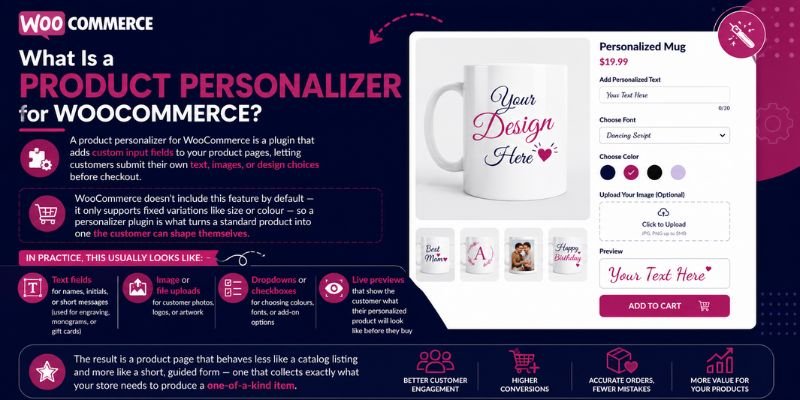
A product personalizer for WooCommerce is a plugin that adds custom input fields to your product pages, letting customers submit their own text, images, or design choices before checkout. WooCommerce doesn’t include this feature by default; it only supports fixed variations like size or colour, so a personalizer plugin is what turns a standard product into one the customer can shape themselves.
In practice, this usually looks like one or more of the following on the product page:
- Text fields for names, initials, or short messages (used for engraving, monograms, or gift cards)
- Image or file uploads for customer photos, logos, or artwork
- Dropdowns or checkboxes for choosing colours, fonts, or add-on options
- Live previews that show the customer what their personalized product will look like before they buy
The result is a product page that behaves less like a catalogue listing and more like a short guided form that collects exactly what your store needs to produce a one-of-a-kind item.
What You Need Before Setting Up a WooCommerce Product Personalizer
Before you install a product personalizer in WooCommerce, make sure you have a few things ready. This will save you time once you start setup.
- A working WooCommerce store – Since the personalizer will be added to pages that already have products, your store must already be up and running.
- Admin access to WordPress – You’ll need to install and activate a plugin, which requires admin-level permissions.
- A personalization plugin – This guide uses a WooCommerce-compatible product personalizer plugin. Which one depends on your store; see the section below to figure out which type fits you.
- A clear idea of what you want customers to personalize – Decide upfront whether you want text fields, image uploads, or both. This makes setup much faster.
Which Type of Personalization Plugin Fits Your Store?
Not every WooCommerce store needs the same kind of personalization tool. Before you install a plugin, it helps to know which category your store actually falls into; this saves you from paying for features you’ll never use, or picking something too basic for what you’re selling.
- Simple text-field plugins – Best if you just need customers to add a name, initials, or a short message. These are usually free or low-cost, quick to set up, and cover most gift-shop style stores (engraved jewellery, personalized cards, monogrammed items).
- Advanced visual customizers – Best if customers need to design the product itself, choosing colours, fonts, uploading photos, or arranging clipart with a live preview. These suit apparel, drinkware, and home decor stores where the visual result matters as much as the text.
- Print-ready / web-to-print tools – Best if you run print-on-demand or need automated production files. These generate ready-to-print output (PDF, SVG, or PNG) directly from what the customer designs, which saves you from manually prepping files for every order.
Match the plugin type to what you’re actually selling first. The setup steps below apply to all three types; only the specific field options will look slightly different.
Free vs. Paid: Which One Actually Makes Sense?
The free tier of most personalization plugins is genuinely usable, not just a stripped-down demo; it typically covers text fields, basic image uploads, and simple pricing rules. That’s enough for a small or new WooCommerce store testing personalization on a handful of products.
Paid tiers usually add conditional logic (showing or hiding fields based on earlier choices), live previews, multiple file uploads, and priority support. These start to matter once your store sells personalization at real volume; a few dozen personalized orders a week is a reasonable point to reconsider, since the time saved on conditional logic and cleaner previews starts outweighing the plugin cost.
| Feature | Free Tier (typical) | Paid Tier (typical) |
| Field types | Text, checkbox, basic dropdown | All free types, plus file/image upload, colour swatches, repeater fields |
| Conditional logic | Rarely included | Standard, show or hide fields based on earlier choices |
| Live preview | Rarely included | Common, sometimes with real-time rendering |
| Products/fields allowed | Often capped (limited products or field count) | Unlimited or high limits |
| Pricing rules | Basic fixed fee | Fixed fee, percentage markup, and conditional pricing |
| File upload limits | None, or very basic | Higher file size limits, multiple files per field |
| Support | Community forum or docs only | Priority or direct support |
| Best fit | Small or new store testing personalization | Store selling personalization at real volume |
If you’re not sure yet, start free. You can upgrade later without losing your existing field setup on most plugins.
Popular WooCommerce Personalization Plugins to Consider
If you’re ready to pick a specific tool, here are real options across the plugin types above. This isn’t a ranked “best” list; check current pricing and reviews before choosing, since plugins update often.
- WooCommerce Product Add-Ons – the official WooCommerce extension, covering text fields, checkboxes, and file uploads with built-in pricing rules. A straightforward starting point if you’re already using other official WooCommerce extensions.
- Flexible Product Fields – a free plugin covering 18 custom field types, good for simple text and dropdown personalization without a budget.
- Custom Product Builder for WooCommerce – a drag-and-drop product designer with clipart libraries and real-time preview, aimed at apparel, gifts, and print-on-demand stores.
- Fancy Product Designer – a long-standing visual product designer plugin supporting drag-and-drop text, images, and clipart across product types.
Fancy Product Designer – a long-standing visual product designer plugin supporting drag-and-drop text, images, and clipart across product types. - Smart Customizer for WooCommerce – a web-to-print tool that generates ready-to-print output (PDF, PNG, SVG) directly from what the customer designs.
- Zakeke – a customization platform with 3D and AR features, suited to higher-value or highly configurable products.
If you sell in a specific niche, a purpose-built tool can go even further than a general personalizer; see our full review of WooCommerce Pizza Builder Pro, a niche configurator built for build-your-own food products.
Matched back to the categories above: Product Add-Ons and Flexible Product Fields are simple text-field tools, Custom Product Builder and Fancy Product Designer are advanced visual customizers, and Smart Customizer and Zakeke lean toward print-ready and premium configurable experiences.
Step-by-Step: How to Set Up a Product Personalizer in WooCommerce (Beginner-Friendly)
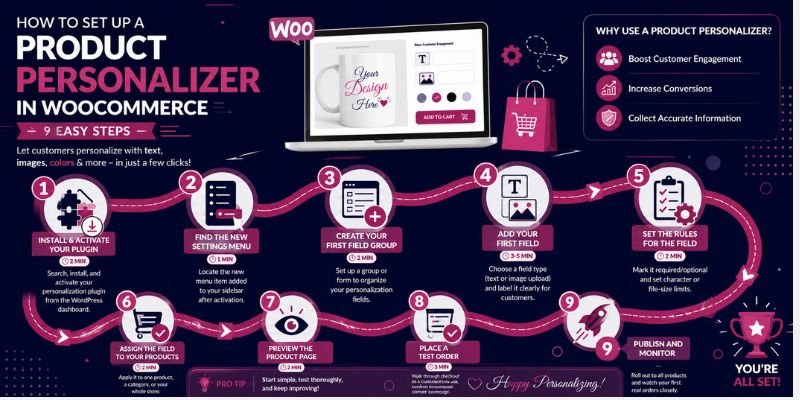
Most WooCommerce personalization plugins follow the same basic flow, even though menu names differ slightly. This walkthrough breaks that flow into clear, clickable steps. Total time for your first product: about 15-20 minutes.
Step 1: Install and Activate Your Plugin (2 minutes)
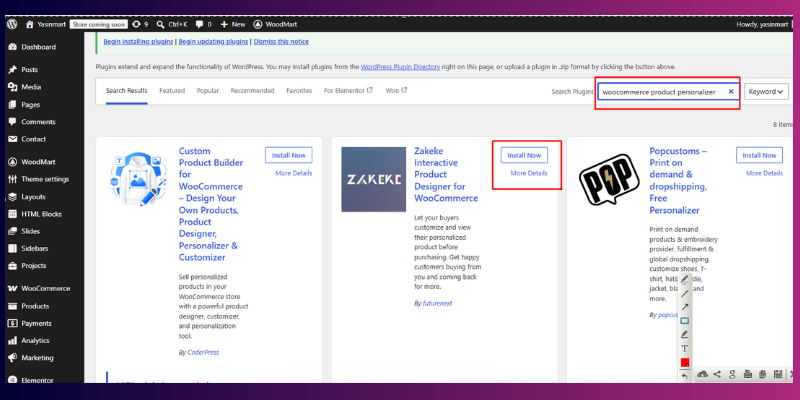
- Log into your WordPress dashboard.
- Click Plugins > Add New in the menu on the left sidebar.
- In the top-right corner, type your chosen plugin’s name into the search box.
- Find it in the results, click Install Now, then click Activate once installation finishes.
Beginner tip: If you bought a paid plugin and downloaded a .zip file instead of finding it in the search results, go to Plugins > Add New > Upload Plugin, then upload that file instead.
Step 2: Find the New Settings Menu (1 minute)
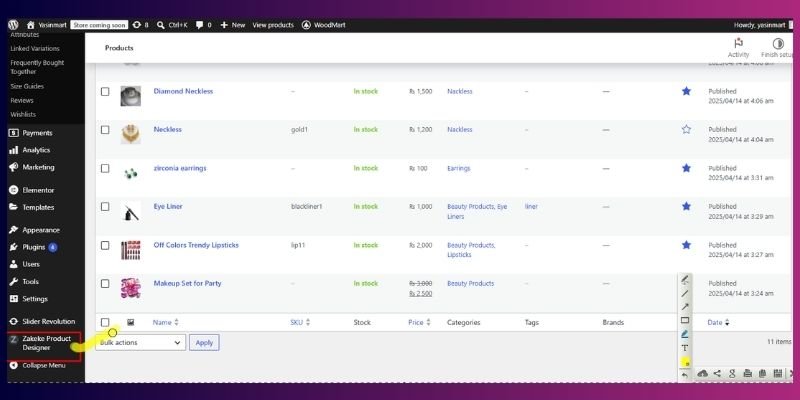
- After activation, refresh your dashboard and look at the left sidebar.
- You’ll see a new menu item that wasn’t there before, usually named something like “Product Add-ons,” “Product Options,” or “Personalizer,” depending on your plugin.
- Click it to open the settings area.
Step 3: Create Your First Field Group (2 minutes)
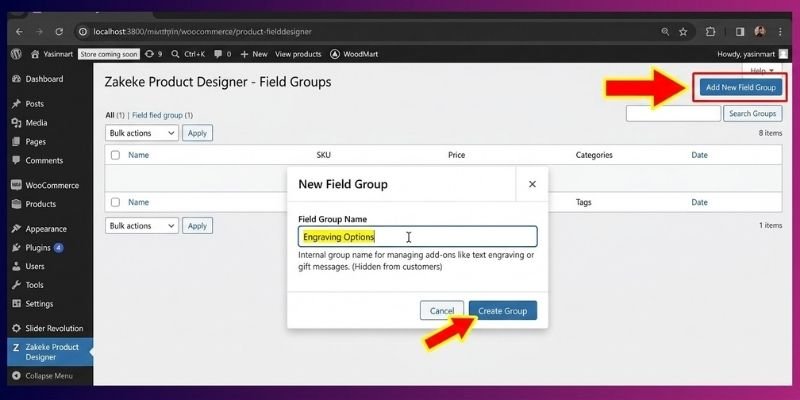
- Most plugins organize fields into “groups” or “forms” so you can apply several fields to a product at once.
- Click the button labelled something like Add New Group, Add New Form, or Create New Group of Add-ons.
- Give the group a clear name for your own reference, like “Engraving Options” or “Gift Message.” Customers won’t see this name.
Step 4: Add Your First Field (3-5 minutes)
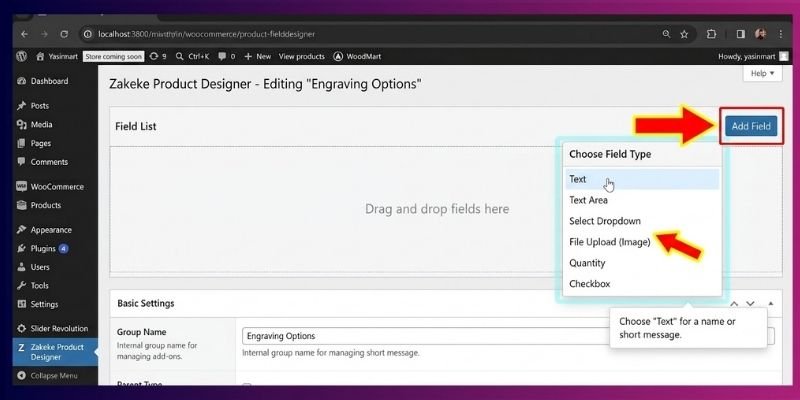
- Inside your new group, click Add Field or Add Option.
- Choose a field type from the dropdown. For your first field, “Text” is the easiest starting point; use it for names or short messages.
- Type a label customers will actually see, like “Enter Your Engraving Text” or “Upload Your Photo.”
- Adding an image upload instead? Choose “File Upload” or “Image Upload” from the same dropdown.
Step 5: Set the Rules for the Field (2 minutes)
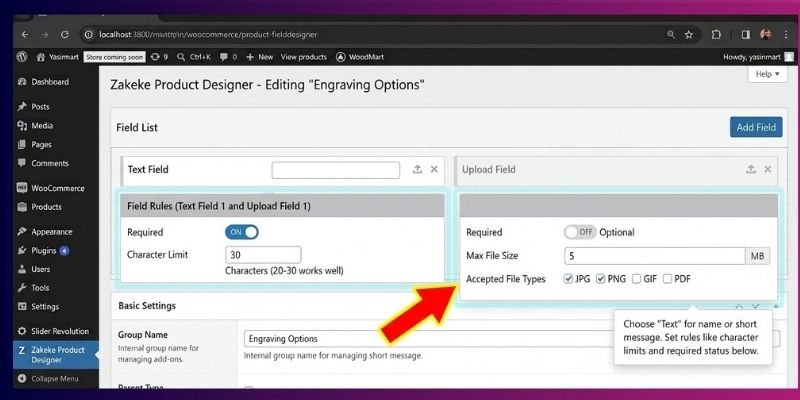
- Decide if the field should be Required or Optional; this is usually a toggle right in the field’s settings.
- For text fields, set a character limit. 20-30 characters works well for short engravings or names.
- For upload fields, set a maximum file size (2-5 MB is usually plenty) and accepted file types (JPG and PNG cover most cases).
Step 6: Assign the Field to Your Products (2 minutes)
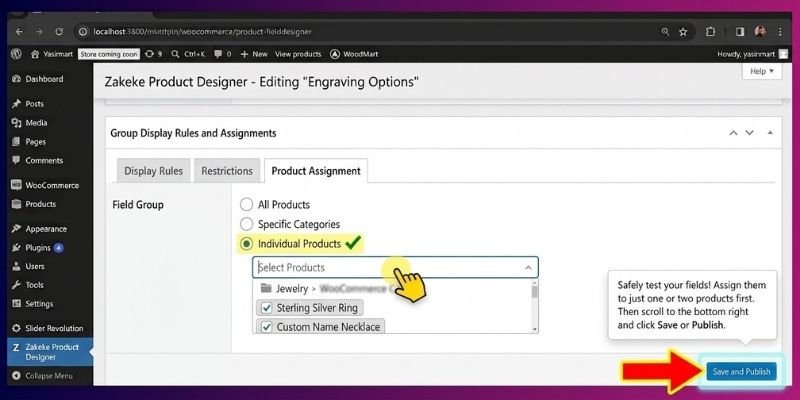
- Scroll to the “Product,” “Restrictions,” or “Display Rules” section of the group settings.
- Choose whether to apply the field to All Products, a specific Category, or Individual Products.
- For your first attempt, pick just one or two products so you can test safely before rolling it out store-wide.
- Click Save or Publish.
Step 7: Preview the Product Page (2 minutes)
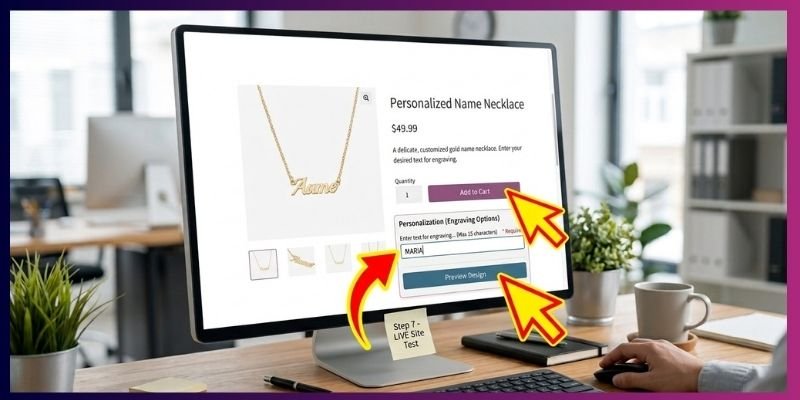
- Open the product page on your live site, or click Preview if your plugin supports it.
- Confirm the field appears where you’d expect, usually just below the product options or above the Add to Cart button.
- As a quick test, fill it in yourself to make sure it works the way you set it up.
Step 8: Place a Test Order (3 minutes)
- Add the product to your cart and go through checkout as if you were a customer.
- Fill in the personalization field with sample text or a sample image.
- Complete the order; you can cancel or refund it afterwards.
- In your WooCommerce admin, go to Orders, open the test order, and confirm the personalization details show up clearly in the order details.
Step 9: Publish and Monitor
- Once your test order looks correct, apply the field to the rest of your products.
- Watch your first few real orders closely for the first week to make sure personalization data keeps coming through as expected.
Extra Tips for a Smooth WooCommerce Product Personalizer Setup
These best practices help a WooCommerce product personalizer run smoothly for both you and your customers, beyond the basic setup steps above.
- Keep personalization fields short and simple; customers are more likely to complete a quick text field than a long form.
- Add example text as a placeholder, like “e.g. Ali & Madiha,” so customers know exactly what to type in.
- Set a reasonable file size limit for image uploads to avoid slowing down your checkout page.
- Show a price add-on clearly if personalization costs extra, so there are no surprises at checkout.
- Double-check that personalization data appears in your order emails and packing slips, not just the admin dashboard.
- Test on mobile: most shoppers will fill out personalization fields on their phone.
How to Charge Extra for Personalization
Personalized WooCommerce products can usually carry a higher price than standard ones, but only if you set up the pricing correctly in your plugin’s field settings. Separate research from Medallia found that 61% of consumers are willing to spend more with companies that offer a customized experience, so the surcharge is often easier to justify to customers than it seems.
Most personalization plugins support two pricing approaches:
- Fixed fee – Add a flat charge, like $5, whenever a customer uses a personalization field. This is the simplest option and works well for small add-ons like engraving or a gift message.
- Percentage markup – Charge a percentage of the product’s price instead of a flat fee. This fits higher-priced items better, since the surcharge scales with the product.
To set this up, open your plugin’s field settings and look for a “price” or “surcharge” option next to each field. Enter a fixed amount, or switch to percentage mode if your plugin supports it. You can also apply pricing conditionally, for example, charging only when a customer uploads an image, but not for a simple text field.
Always preview the cart after setting a price rule. Confirm the total updates correctly before you launch, and place a real test order to check it flows through to checkout and the final order total.
Mobile UX for Personalization Fields
Most WooCommerce shoppers will fill out your personalization fields on a phone, not a desktop, so the field needs to actually work well at that size; not just technically display.
A few things matter more on mobile than desktop:
- Touch target size – Buttons and dropdowns need to be large enough to tap accurately with a thumb. If your plugin lets you adjust field padding or button size, err on the larger side.
- Upload buttons need to support the camera, not just the photo library – Most personalization plugins default to opening the device’s file picker, which should let the customer either snap a new photo or choose an existing one. Test this yourself on your phone before launch.
- Keep text fields short on mobile – A long text field that wraps awkwardly on a small screen looks broken even if it technically works. Character limits (see the setup steps above) do double duty here.
- Live previews need a mobile layout, not just a shrunk desktop one – If your plugin offers live previews, check that the preview image doesn’t get pushed below the fold or overlap other elements on a small screen.
- Test on a real device, not just your browser’s mobile view – Browser device emulators don’t show things like how taps actually work and how cameras send pictures. Pull up the product page on your own phone before rolling personalization out store-wide.
Common WooCommerce Product Personalizer Problems and Fixes
These are the most common issues WooCommerce store owners run into after setting up product personalization, along with a quick fix for each.
- Personalization field isn’t showing on the product page. Check that you’ve applied the plugin to that specific product or category in the settings. It’s easy to accidentally leave a product excluded.
- Customer image uploads are failing. This usually means your file size limit is too low. You can increase the plugin’s upload limit, and you should also check wordpress‘s upload limits for media.
- Personalization text isn’t showing up in the order. Set the field to display in cart and checkout, not just on the product page. Some plugins have a separate toggle for this.
- Checkout feels slower after adding image uploads. Compress accepted file types and set a lower maximum file size for the upload field. This keeps checkout fast without limiting the customer experience too much.
- The price add-on isn’t calculating correctly. Double-check whether the field is set to fixed fee or percentage markup; mixing the two up is a common cause. Also confirm you’ve attached the surcharge rule to the specific field, not the whole product.
- Personalization data is missing from invoices or packing slips. Some plugins only show custom fields in the admin order screen by default. Look for a setting to include order metadata in emails, invoices, and packing slip templates. Our guide on customizing order emails in WooCommerce covers the email side of this in more detail.
- Personalization fields look broken or misaligned on mobile. This is often caused by a theme conflict rather than a plugin issue. Test the product page on a few different devices, and check if your personalization plugin offers a mobile-specific display setting.
- Personalization details disappear when a customer changes a product variation. Some plugins reset custom fields when a variation (like size or colour) changes. Check your plugin’s settings for an option to preserve field values across variation changes, or test the exact flow your customers will use.
Conclusion
Adding a product personalizer to your WooCommerce store gives customers a reason to choose you over a generic listing elsewhere. With the right plugin type for your store, a few well-set-up fields, and pricing that reflects the extra value, you can turn ordinary products into custom gifts and one-of-a-kind items your customers will love.
Ready to get started? Install a personalization plugin today and add your first custom field in under ten minutes. Once your personalized products are live, pair this setup with proper product schema and a broader pass at optimizing your WooCommerce product pages for SEO to get the most out of your new listings.
FAQs about WooCommerce Product Personalizer
No, WooCommerce doesn’t include personalization fields out of the box. You’ll need a plugin to add text fields, image uploads, or other custom options to your product pages.
Yes, most personalization plugins let you add a fixed fee or percentage markup when a customer uses the personalization option.
Not usually, as long as you set reasonable file size limits for uploads. If the plugin is built well, it shouldn’t slow down the page speed.
Yes, most personalization plugins support image uploads alongside text fields, so customers can submit photos, logos, or artwork.
Yes, even a small store can benefit. Personalized products often sell at a higher price point and create a more memorable shopping experience.
No, most personalization plugins are built for non-developers and use a simple settings panel with no code required.
Yes, you can apply personalization fields store-wide, to a category, or to individual products only.




- Be Respectful
- Stay Relevant
- Stay Positive
- True Feedback
- Encourage Discussion
- Avoid Spamming
- No Fake News
- Don't Copy-Paste
- No Personal Attacks
- Be Respectful
- Stay Relevant
- Stay Positive
- True Feedback
- Encourage Discussion
- Avoid Spamming
- No Fake News
- Don't Copy-Paste
- No Personal Attacks
