How to Automatically Send Shipment Tracking Emails in WooCommerce
Published: 29 Jul 2026
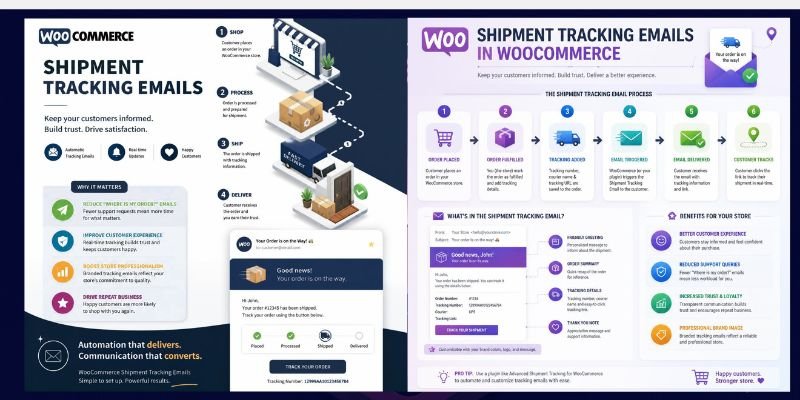
Waiting for a package is stressful. If your customers don’t know where their order is, they start emailing you to ask. That means more support tickets, more stress, and unhappy shoppers.
The good news? You don’t need to answer every “where is my order” email by hand. You can set up WooCommerce to send shipment tracking emails automatically, so customers always know where their package is, without you lifting a finger.
We tested this exact setup on a live WooCommerce store to confirm every step below actually works, not just in theory. In this guide, you’ll learn exactly how to set up automatic shipment tracking emails in WooCommerce, step by step. No coding needed.
Quick Answer
WooCommerce can send shipment tracking emails automatically once a tracking number is added to an order, no coding required. There are three ways to do it:
- Free plugin method – Install Advanced Shipment Tracking, add a tracking number to the order, and WooCommerce includes it in the “Completed Order” email automatically.
- Shipping platform sync – If you already use ShipStation or Shippo, turn on automatic tracking export so it syncs to WooCommerce and triggers the email instantly.
- Paid automation – Tools like FunnelKit Automations send a fully customized tracking email plus optional follow-ups, like delivery confirmations or review requests.
Most stores only need Method 1 or 2.
Why Shipment Tracking Emails Matter
Industry data backs this up: these “where is my order” questions (often called WISMO inquiries in ecommerce) typically make up 20% to 40% of all ecommerce support tickets, and that share can climb past 50% during peak shopping periods. Most shoppers check tracking when it’s available, and many check it daily until the package arrives.
Beyond cutting support tickets, tracking emails give you a few other wins:
- Fewer payment disputes. A visible tracking number and delivery confirmation give you a paper trail if a customer opens an “item not received” dispute through PayPal or Stripe.
- A second place customers can check. Once tracking is set up, most plugins also show it on the order’s “My Account” page, so customers who missed the email can still check it themselves without contacting you.
- Fewer refund requests. Customers who can see their order is moving are less likely to assume it’s lost and ask for a refund early.
What You’ll Need Before You Get Started
Before you begin, make sure you have these ready:
- A live WooCommerce store – You need an active WordPress site with WooCommerce installed and at least one order type to test with.
- Admin access – You’ll need to log in to your WordPress dashboard as an admin to install plugins and change settings.
- A shipment tracking plugin – This adds the tracking number field to your orders. We’ll use a free one in this guide.
- A working email setup – WooCommerce needs to actually send emails from your site. If your emails already land in customer inboxes, you’re set.
That’s it. You don’t need any coding skills or a paid tool to get started. So, let’s get into these methods one by one.
Methods to Automatically Send Shipment Tracking Emails in WooCommerce
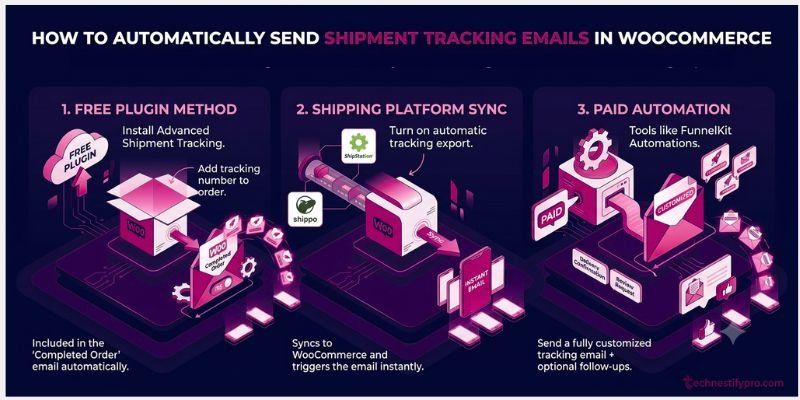
There are three ways to do this: a free method using a tracking plugin plus WooCommerce’s built-in emails, syncing automatically if you already use a shipping platform like ShipStation, or a paid automation method if you want extra features like SMS alerts or upsells inside the email.
Method 1: Tracking Plugin + Manual Entry (The Free Method)
There are three ways to do this: a free method using a tracking plugin plus WooCommerce’s built-in emails, syncing automatically if you already use a shipping platform like ShipStation, or a paid automation method if you want extra features like SMS alerts or upsells inside the email. This method covers the free plugin approach, since it works for almost every store.
Step 1: Install a Shipment Tracking Plugin
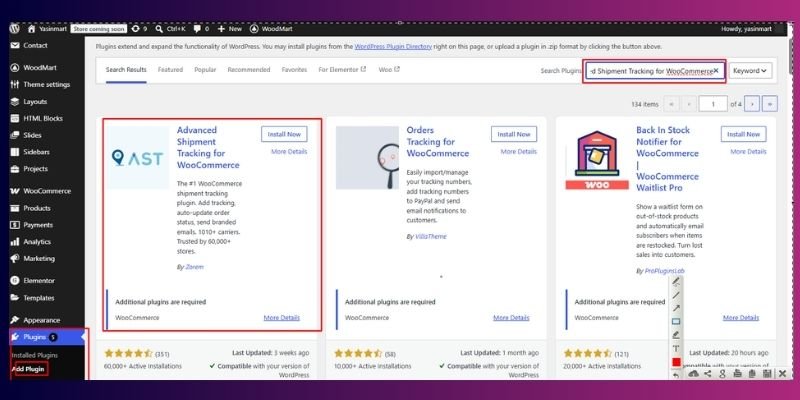
Go to your WordPress dashboard, then click Plugins > Add New. Search for “Advanced Shipment Tracking for WooCommerce” (often shortened to AST). Click Install Now, then Activate.
This plugin adds a tracking number field to every order and connects it to your customer emails automatically.
Step 2: Enable Tracking in WooCommerce Settings
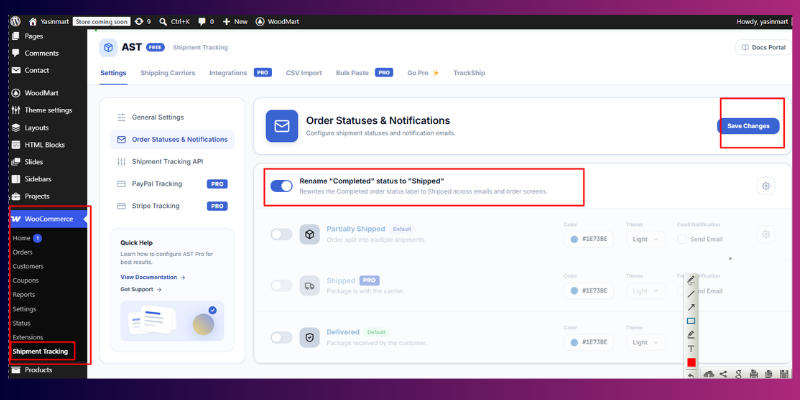
Go to WooCommerce > Shipment Tracking in your dashboard sidebar. Turn on the option that renames your “Completed” order status to “Shipped.” This makes your order statuses match what’s actually happening, so customers aren’t confused.
Save your changes before moving to the next step.
Step 3: Add Tracking Information to an Order
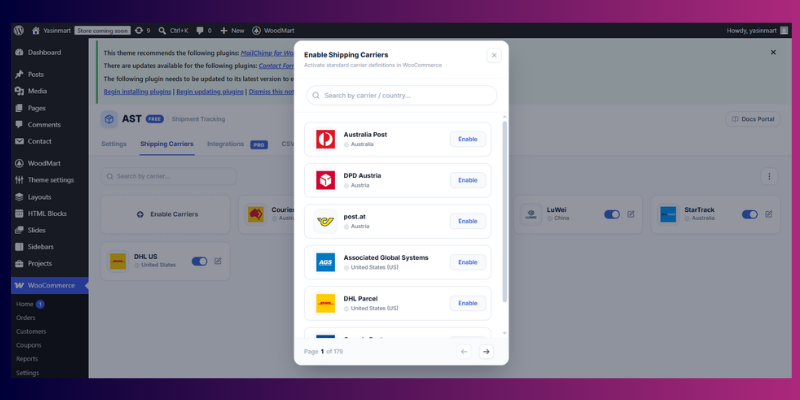
Open any order from WooCommerce > Orders. Look for the Shipment Tracking box on the order page. Select your shipping carrier from the dropdown list; most stores use FedEx, UPS, DHL, or USPS, and all four are supported out of the box. If your carrier isn’t listed, choose “Custom Provider” and enter the tracking URL yourself.
Type in the tracking number, then click Add.
Most tracking plugins support direct integrations for major carriers like UPS, FedEx, and DPD, which can pull tracking numbers in automatically if you print shipping labels through their systems. If you ship manually, the dropdown method above works fine.
Step 4: Confirm Tracking Info Appears in the Order Email
WooCommerce automatically pulls the tracking details you just added into the “Completed Order” email template. You don’t need to write any code for this part.
To check it’s working, change the order status to “Completed” (or “Shipped,” if you renamed it in Step 2).
Step 5: Send a Test Order to Yourself
Create a test order using your own email address. Add a tracking number to it, then mark it as completed. Check your inbox. You should see the tracking number, carrier name, and a clickable tracking link, all inside the email.
If it looks good, you’re done. Every real order from now on will send tracking details automatically.
Method 2: Sync Automatically with a Shipping Platform (ShipStation, Shippo)
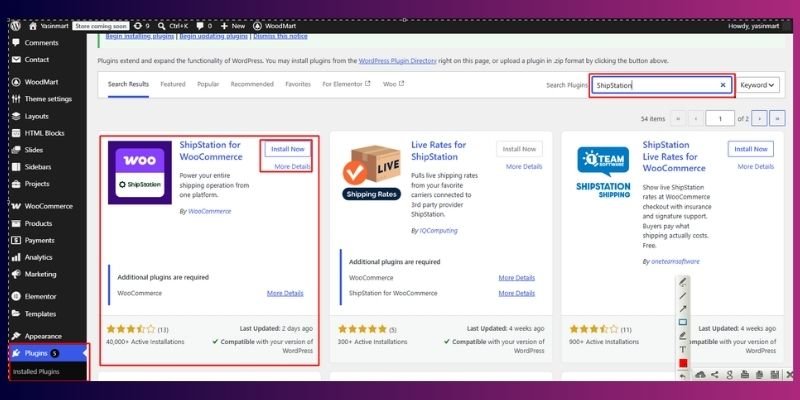
If you already print your shipping labels through ShipStation (or a similar platform like Shippo), you don’t need to add tracking numbers manually at all. These platforms can send tracking numbers straight to WooCommerce the moment you print a label.
Here’s how to set it up with ShipStation:
- Install the ShipStation plugin. Go to Plugins > Add New, search for “ShipStation for WooCommerce,” and install the official plugin (or get it directly from WordPress.org).
- Connect your accounts. In WooCommerce > Settings > Shipping > ShipStation, enter the API Key and Secret from your ShipStation account (found under Settings > Account > API Settings in ShipStation). Click “Test Connection” to confirm it worked.
- Turn on automatic export. In ShipStation’s settings, enable the option to update WooCommerce order status and export tracking numbers automatically when you print a label.
Once this is set up, printing a label in ShipStation automatically sends the tracking number to WooCommerce and triggers the completed order email, no manual entry needed.
If you don’t use ShipStation, Shippo works almost identically and has a genuinely free tier (30 labels per month, then a small per-label fee unless you use Shippo’s own discounted carrier rates). Both integrate with WooCommerce the same way: install the plugin, connect your account, turn on automatic export.
Method 3: Paid Automation for Advanced Workflows
The two methods above send one plain tracking email. If you want more, a follow-up if the package is delayed, a review request a few days after delivery, or upsell products inside the shipping email, you’ll need a marketing automation plugin like FunnelKit Automations.
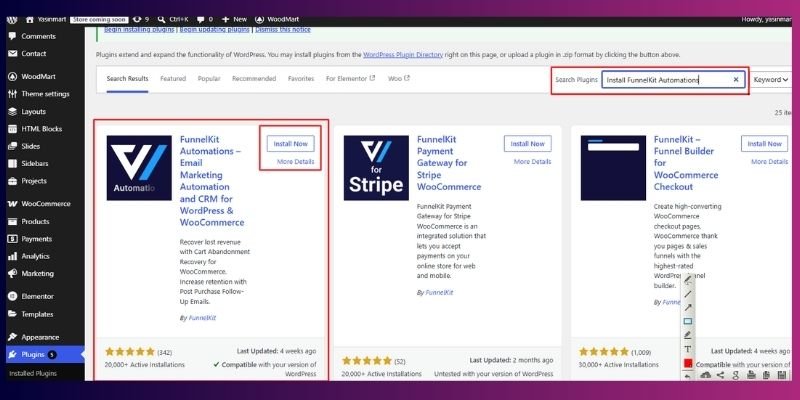
Here’s the short version of how it works:
- Install FunnelKit Automations from Plugins > Add New.
- Create a new automation and set the trigger to “Order Status Changed” → “Completed.”
- Add an email action, then use FunnelKit’s drag-and-drop builder to design the tracking email, pulling in the tracking number, carrier, and estimated delivery date automatically from your tracking plugin.
- Optionally, add follow-up steps after a delay: a delivery-confirmation email a few days later, or a review request a week after that.
This costs more in time and money than the two methods above. FunnelKit’s pricing varies by plan, and full automation features are generally only available from their Professional plan upward, which runs in the $200–$250/year range as of 2026 (check FunnelKit’s own pricing page for current rates, since introductory pricing changes).
This is worth it mainly if you’re already sending 100+ orders a week and want the tracking email to double as a marketing touchpoint, not just a status update.
If you’re just starting out, stick with Method 1; you can always add automation later once you know it’s worth the investment.
Only Have a Few Orders a Week? Skip the Plugin Entirely
If your store only ships a handful of orders, you don’t need any of the three methods above. Go to WooCommerce > Orders, open the order, and add an order note. Type in the tracking number and carrier name, then check the box that says “Note to customer” before clicking Add. WooCommerce emails this note to the customer directly.
This is slower for larger stores, but it works instantly with zero setup.
Free vs. Paid Tracking Plugins: Which One Fits Your Store?
If you’re deciding between the plugins mentioned in Method 1 and Method 2, here’s how the main options compare:
| Plugin | Cost | Best for |
| Advanced Shipment Tracking for WooCommerce (AST) | Tracking for WooCommerce (AST)Free, or $129/year for AST Pro | Most small to mid-size stores; covers everything in Method 1. Pro adds 900+ more carriers, native PayPal/Stripe tracking sync, a branded tracking page, and bulk import via FTP/SFTP |
| WooCommerce Shipment Tracking (official) | Paid ($59/year+) | Stores that want official WooCommerce support |
| ParcelPanel | Free plan available | Stores that want a branded customer-facing tracking page |
| AfterShip | Free plan available | Stores shipping through many different carriers worldwide |
| ShipStation | Paid, usage-based | Stores that already print shipping labels through ShipStation and want tracking numbers to sync automatically |
The free Advanced Shipment Tracking plugin used in Method 1 is sufficient for most beginners. Only consider a paid option if you specifically need a branded tracking page or support for carriers outside the main four.
What to Include in a Good Tracking Email
Getting the email to send automatically is only half the job. What’s inside it matters too. A good tracking email includes:
- A clear subject line that says the order shipped, not a generic “Order Update.”
- The customer’s name, so the email doesn’t feel like a form letter.
- A short order summary, so the customer can match the email to their purchase without digging through their inbox.
- The tracking number and a clickable link, so they can check status in one tap.
- An estimated delivery date, even a rough one. This is one of the most requested details customers look for and one of the easiest to forget.
Most tracking plugins let you add these fields to the “Completed Order” email template without any code, using placeholder tags the plugin provides.
Extra Tips and Best Practices
- Keep your subject line simple. Something like “Your Order Is On Its Way!” works better than something long and generic.
- Add the tracking link, not just the number. A clickable link saves your customer a step and reduces confusion. This matters more than it might seem: in a 2025 consumer survey by Sifted, 63% of shoppers said full visibility throughout the delivery process is essential, not just a nice-to-have.
- Set expectations early. Consider sending a short “your order is being prepared” email right after purchase, so customers aren’t wondering for days before the tracking email arrives.
- Check your emails on mobile. Most people check tracking emails on their phone, so make sure the email looks clean on a small screen.
- Upgrade only if you need more. If you want SMS alerts, upsells inside the email, or multi-step email sequences, that’s when a paid marketing automation tool makes sense. For most small stores, the free method above is enough.
Common WooCommerce Tracking Email Problems and Fixes
Now, let’s talk about some common WooCommerce tracking email problems and how to fix them:
1. Tracking number is missing from the email
Why it happens:
WooCommerce pulls tracking details when the order status changes. If you mark an order as “Completed” before adding the tracking number, the email may be sent without tracking information.
Fix:
Add the tracking number first, then change the order status to “Completed.” This ensures the tracking details are included in the customer email.
2. WooCommerce is not sending any emails
Why it happens:
In most cases, this is related to your website server’s email delivery settings rather than WooCommerce itself.
Fix:
Install an SMTP plugin such as WP Mail SMTP to improve email delivery. SMTP helps your store send emails through a properly authenticated mail server instead of relying on your hosting server’s default mail function.
3. Tracking emails are going to spam
Why it happens:
Email providers may not trust your store emails if your domain authentication records are missing.
Fix:
Add SPF and DKIM records for your domain through your hosting provider. These records verify that your emails are coming from a trusted source.
You can also test your email setup using Mail Tester. It provides a score and highlights any missing email authentication settings.
4. Tracking emails are delayed after creating a shipping label
Why it happens:
The delay is often caused by WordPress Cron. wordpress uses this background system to run scheduled tasks, but it depends on website visits. Low-traffic stores may experience delays because scheduled tasks do not run immediately.
Fix:
Disable WordPress’s built-in cron system and replace it with a server cron job.
Add this line to your site’s wp-config.php file:
define(‘DISABLE_WP_CRON’, true);
Then create a server cron job from your hosting control panel (such as cPanel) to run every 5 minutes.
If you prefer a simpler option, use a transactional email service like SendGrid or Mailgun. These services can send emails instantly without depending on WordPress Cron.
5. Tracking link opens the wrong carrier page
Why it happens:
The selected shipping carrier may not match the tracking number format.
Fix:
Check the carrier selected in the Shipment Tracking section. If your carrier is not available, choose “Custom Provider” and add the correct tracking URL manually.
You can also check the tracking number format:
- USPS: Usually 20–22 digits
- FedEx: Usually 12–15 digits
- UPS: Usually starts with “1Z”
- DHL: Usually 10–11 digits
If the tracking number format does not match the selected carrier, WooCommerce may generate the wrong tracking link.
6. Customer did not receive a new tracking number after a label replacement
Why it happens:
WooCommerce usually sends tracking emails for the first tracking number added to an order. If a shipping label is cancelled and replaced, the new tracking number may not trigger another automatic email.
Fix:
Add the updated tracking number as an order note and select the “Note to customer” option. WooCommerce will send the note separately with the new tracking details.
Always check orders with replaced shipping labels to avoid missing this step.
7. Only one tracking number appears for multiple shipments
Why it happens:
WooCommerce may not display multiple tracking numbers unless your tracking plugin supports multiple shipments.
Fix:
Add each tracking number separately through the Shipment Tracking section.
If you use a tracking plugin, check its settings for options like:
- Multiple shipments
- Tracking table
- Display all tracking numbers in email
These options allow customers to see every shipment linked to their order.
Conclusion
You now know how to send shipment tracking emails automatically in WooCommerce, without writing a single line of code. Just install a tracking plugin, connect it to your order emails, and test it once to make sure everything works.
This one small setup step can save you hours of answering “where is my order” emails every week, while making your customers feel more confident about shopping with you.
For more detail on how WooCommerce’s own tracking extension works under the hood, you can check WooCommerce’s official Shipment Tracking documentation.
Haven’t launched your store yet? Our guide to setting up a WooCommerce store walks you through it before you get to this step. And if you’re looking for other ways to fine-tune what customers see on your storefront, our guide on hiding private products in WooCommerce is worth a look too.
FAQs
-
Do I need a paid plugin to send shipment tracking emails in WooCommerce?
Advanced Shipment Tracking for WooCommerce is enough for most stores. Paid tools only add extra features like SMS alerts or in-email upsells.
-
Will WooCommerce send the tracking email automatically, or do I need to send it myself?
Once it’s set up, WooCommerce sends it automatically whenever you mark an order as “Completed” or “Shipped.” You don’t need to send anything manually.
-
What if my shipping carrier isn’t in the plugin’s list?
Choose “Custom Provider” while entering the tracking number. You can type in the carrier’s name and paste the correct tracking link yourself.
-
Can I customize what the tracking email looks like?
Yes. You can edit the “Completed Order” email template under WooCommerce > Settings > Emails, or use an email builder plugin for more design control.
-
Why isn’t my test email showing up?
Check your spam folder first. If it’s not there, confirm your site can send emails at all by installing an SMTP plugin like WP Mail SMTP.
-
How do I know if my customers are actually receiving these emails?
Send yourself a test order and watch your own inbox. This is the easiest way to confirm delivery before relying on it for real customers.
-
Can I add tracking info to multiple orders at once?
Some tracking plugins support bulk uploads through a CSV file, which is helpful if you process a high volume of orders daily. Check your specific plugin’s documentation for this feature.
-
What’s the difference between an order number and a tracking number?
Your order number identifies the purchase inside your WooCommerce store. The tracking number identifies the shipment inside the shipping carrier’s system. They’re separate numbers used by two different systems.
-
Will the customer get a new email if I update or replace the tracking number?
Not automatically. WooCommerce only emails the first tracking number added to an order. If you need to send an updated number later, add it as an order note and check “Note to customer” so the customer gets notified.




- Be Respectful
- Stay Relevant
- Stay Positive
- True Feedback
- Encourage Discussion
- Avoid Spamming
- No Fake News
- Don't Copy-Paste
- No Personal Attacks
- Be Respectful
- Stay Relevant
- Stay Positive
- True Feedback
- Encourage Discussion
- Avoid Spamming
- No Fake News
- Don't Copy-Paste
- No Personal Attacks
