How to Set Up a WooCommerce Store: Complete Beginner’s Guide (2026)
Published: 14 Jul 2026
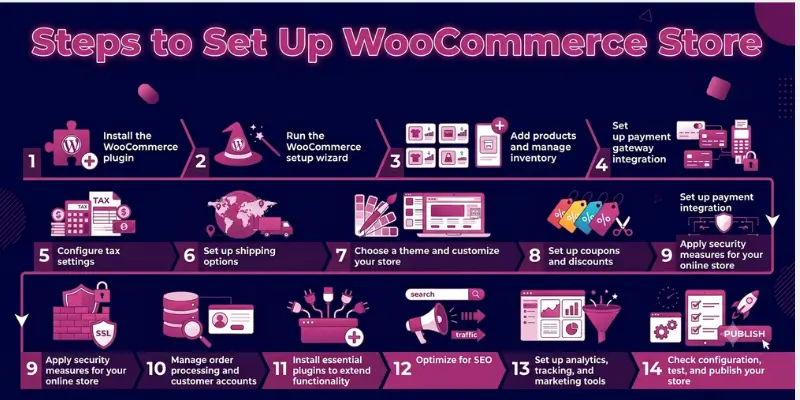
Setting up a WooCommerce store means installing the free WooCommerce plugin on WordPress, then configuring products, payments, shipping, and taxes before you launch. If you want to sell products online without paying a monthly platform fee or losing control of your data, WooCommerce is still the most flexible way to do it.
In this guide, I’ll walk you through every step of setting up a WooCommerce store from installing the plugin to launching a fully secure, SEO-ready storefront. Nothing is skipped. By the end, you won’t need to search for a missing step anywhere else.
Quick facts before you start:
- Typical setup time: a few hours for the basics; 1–2 weeks for a fully polished, secure, SEO-ready store
- Typical cost: $0 for the WooCommerce plugin itself; $2,000–$10,000/year total once you add hosting, a theme, extensions, and payment processing fees
- Market context: WooCommerce powers somewhere between 4.3 million and 6.2 million live stores worldwide in 2026, making it the largest single eCommerce platform on the web by store count
If you’re weighing whether WooCommerce is even the right platform, our Advantages & Disadvantages of WooCommerce guide and WordPress vs. WooCommerce comparison cover that decision. This guide assumes you’ve already decided and just want to build a WooCommerce store from scratch correctly.
What Is WooCommerce and Why Use It?
WooCommerce is a free, open-source eCommerce plugin you install on a WordPress website to turn it into a full online store. Because WordPress itself powers roughly 43% of all websites, WooCommerce store setup benefits from a genuinely massive ecosystem of themes, developers, extensions, and support communities that few competing platforms can match.
Is WooCommerce free to use? Yes. The core plugin costs nothing. You’ll still pay for hosting, a domain, and any premium extensions you choose, but there’s no mandatory monthly platform fee the way there is with Shopify or BigCommerce.
WooCommerce vs. Shopify, in one sentence: pick WooCommerce for full control, lower long-term costs, and deep content/SEO integration through wordpress; pick Shopify if you want a fully managed platform and don’t mind a monthly fee.
Before You Start: What You’ll Need for eCommerce Setup
Handle these four things before you touch the setup wizard:
- A business name and niche → a working name is fine to start with; you can always refine your branding later.
- A domain name → your store’s web address (for example, yourstore.com).
- WordPress hosting→ this is where your website’s files actually live, and it’s the single decision that most affects your store’s speed and reliability. You have two real routes:
- Managed hosting, where the provider handles software updates, security, and server maintenance for you.
- Self-hosting, where you install WordPress yourself on a general-purpose host and manage more of the technical side directly.
- An SSL certificate → this encrypts data between your store and your customers’ browsers. Most hosts now include this free with any plan, and it’s non-negotiable once you start accepting payments.
Once you activate your hosting and install WordPress, you can begin the WooCommerce setup process below.
Steps to Set Up and Manage WooCommerce Store
Setting up and running a WooCommerce store isn’t a one-and-done task; it’s a sequence of steps that build on each other, from installation all the way through to ongoing management after launch. Follow them in order below, and you’ll end up with a store that’s not just live, but actually secure, sellable, and built to grow.
- Install the WooCommerce plugin
- Run the WooCommerce setup wizard
- Add products and manage inventory
- Set up payment gateway integration
- Configure tax settings
- Set up shipping options
- Choose a theme and customize your store
- Set up coupons and discounts
- Apply security measures for your online store
- Manage order processing and customer accounts
- Install essential plugins to extend functionality
- Optimize for SEO
- Set up analytics, tracking, and marketing tools
- Check configuration, test, and publish your store
Step 1: Install the WooCommerce Plugin (WordPress Plugin Configuration)
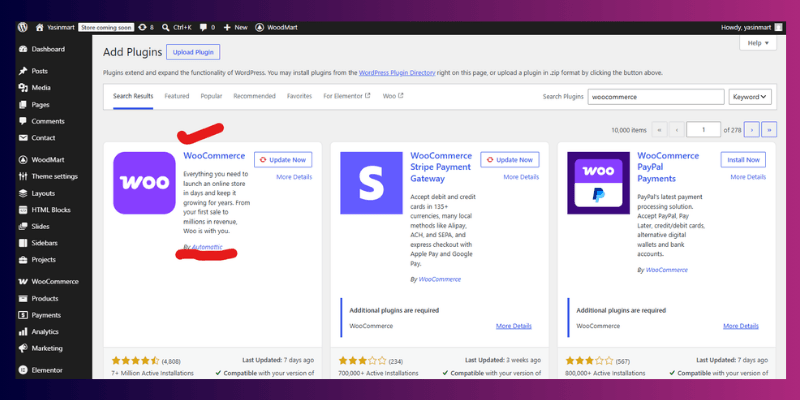
From your WordPress dashboard, go to Plugins → Add New, search for “WooCommerce,” click Install Now, then Activate. This single piece of WordPress plugin configuration is what turns a regular website into a functioning online store; every step below builds on top of it.
Step 2: Run the WooCommerce Setup Wizard
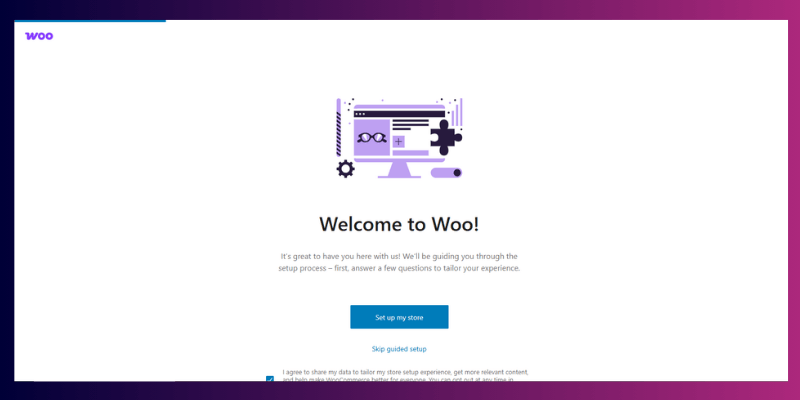
The moment WooCommerce activates, the WooCommerce setup wizard launches automatically. It runs you through a store profiler, asking for your store’s location, industry, and the type of products you plan to sell. It then generates a Store Setup Checklist covering products, payments, tax, and shipping, using your answers to recommend the right settings for your specific situation.
Don’t rush through this part. The choices you make here shape which options appear later, so answer as accurately as you can rather than clicking through on autopilot.
Step 3: Add Products and Manage Inventory (Product Listing)
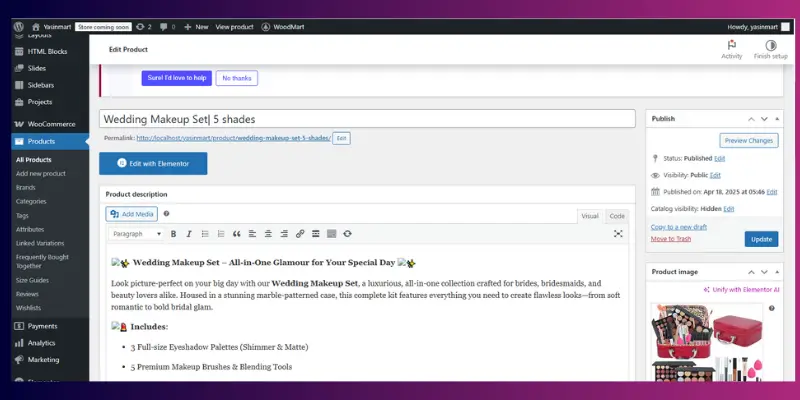
This is where product listing actually happens, and where your store starts to take real shape. WooCommerce supports six product types out of the box:
| Product Type | What It’s For |
| Simple product | A single item with no options; a mug, a single-size t-shirt |
| Variable product | Items with options like size or colour, each carrying its own SKU and stock count |
| Grouped product | A set of simple products sold together as a bundle |
| Virtual product | Service or non-shipped items, like consulting or a class booking |
| Downloadable product | Digital files: ebooks, templates, software |
| External/affiliate product | Listed on your site but sold elsewhere, like a marketplace |
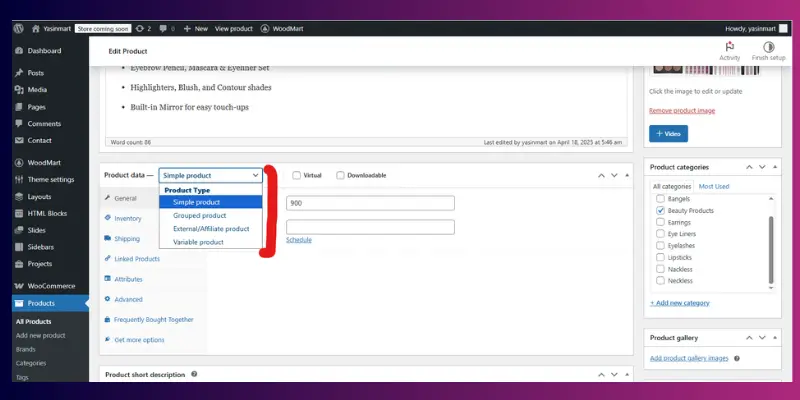
Understanding the difference between a simple product vs. variable product setup matters early, since it determines how you structure pricing and stock for your entire catalogue.
For each product, write a clear title, a full description, and a product short description, the summary near the “Add to Cart” button. Don’t leave this generic; it’s one of the most overlooked fields for conversion.
Set up categories, tags, and attributes so customers can browse and filter easily (colour, material, size all count as attributes). Every product also needs a SKU, a unique alphanumeric code that makes tracking inventory management far easier as your catalogue grows.
Once your products are live, get in the habit of checking WooCommerce → Settings → Products → Inventory every so often. It’s also where you decide what happens when something sells out: whether to hide it, mark it as backordered, or let customers order it anyway and wait. I’ve written a full breakdown of how backorders work if you want to get that part exactly right.
While you’re setting up each product, it’s worth spending a little extra time on titles, descriptions, and images; these small details end up mattering a lot for how well your products actually show up in search. I’ve put together a more detailed walkthrough on getting your product pages search-ready if you want to dig into that side of things.
Step 4: Set Up Payment Gateway Integration
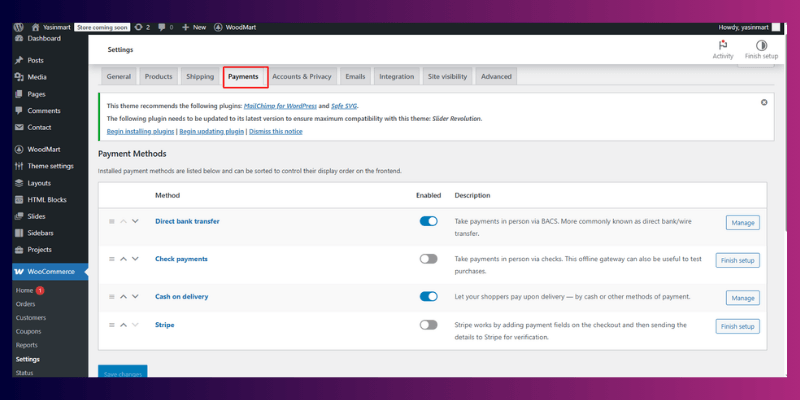
Your store can’t process a single sale without this step. Payment gateway integration in WooCommerce covers several categories:
- Card payment processors → Stripe, Square, and similar services let customers pay directly with a credit or debit card.
- Alternative payment providers → PayPal and similar wallets let customers check out with an account they already trust, which tends to reduce abandonment at the checkout page.
- Buy now, pay later options: Klarna and Afterpay let customers split payments, and this method has grown sharply in popularity over the past few years.
- Crypto payments → a smaller but growing option if you’re selling to a tech-forward audience.
Understanding the transaction fee: most processors charge a percentage plus a flat fee per sale; a common structure looks like 2.9% + $0.30. On a $100 order, that works out to roughly $3.20 in processing costs. For a first-time store owner deciding between Stripe and PayPal specifically: Stripe usually wins if you want more customization and control over the checkout page design, while PayPal wins if you want faster customer trust and a payment method shoppers already recognize. Many stores simply enable both.
Step 5: Configure Tax Settings
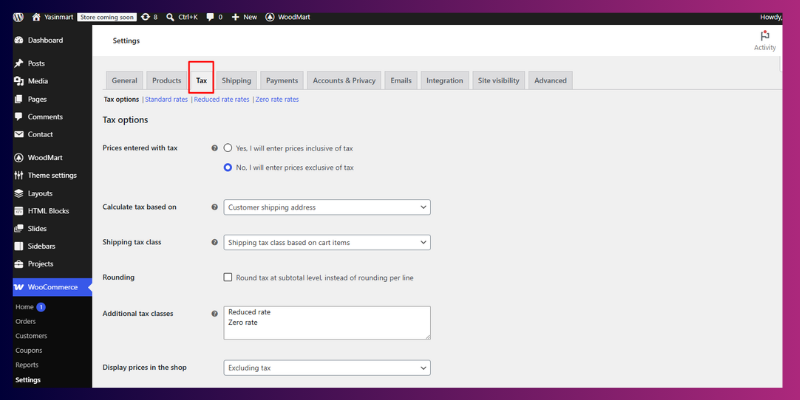
Tax settings scare a lot of new store owners, but WooCommerce keeps the process manageable. You have three real paths:
- Automated tax calculation → a connected service calculates rates by customer location automatically. This is the better choice once you sell across multiple states or countries, since manually tracking every tax nexus (the specific locations where you’re legally required to collect tax) becomes unmanageable fast.
- Manual setup → you enter your own rates by region. This works well if you only sell in one state or country.
- Tax-exempt bypass → skip sales tax collection entirely if your business qualifies.
For example, a small U.S.-based store selling only within its home state can usually get by entering one manual rate for that state. A store selling nationwide should switch to automated calculation before it grows past a handful of states, simply because rates and rules change often enough that manual tracking turns into a part-time job. This isn’t legal advice; confirm your specific obligations with a licensed tax professional.
Step 6: Set Up Shipping Options
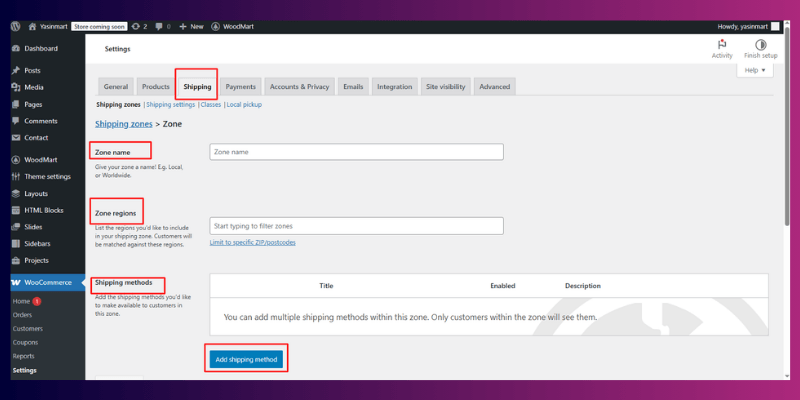
Under WooCommerce → Settings → Shipping, this is where shipping options setup happens in full. Start by creating shipping zones geographic groupings like “local,” “national,” and “international” then assign a rate to each. For example, you might set a flat $5 rate for local zone orders, $12 for national, and calculated rates for international orders based on weight.
You can also set up shipping classes to charge different rates for different product types (heavier items, fragile items needing extra packaging), and enable local pickup if customers can collect orders from you directly, which saves both of you the shipping cost entirely.
Step 7: Choose a Theme and Customize Your Store

Theme selection for online stores directly affects both how your store looks and how well it actually converts visitors into buyers. Look specifically for a WooCommerce-compatible theme; this label matters because it guarantees your product pages, cart, and checkout page render correctly without extra custom coding. I’ve rounded up strong options in my Best WordPress Themes guide; you can check.
Once you pick a theme, move into full store customization:
- Colours and fonts → match your brand identity consistently across every page
- Logo → your first visual impression; a logo maker tool can get you started affordably if you’re not ready to hire a designer
- Main menu → should include your Shop page, About, Contact, and policy pages (shipping, returns, privacy) at minimum
- Widgets and sidebars → useful for showcasing best-sellers, recently viewed products, or trust badges near your content
- Breadcrumbs → help customers navigate back through categories, especially valuable once your catalogue grows past a handful of products
- Store currency settings → confirm this matches your target market before launch; changing it later after orders exist can create accounting headaches
Step 8: Set Up Coupons and Discounts
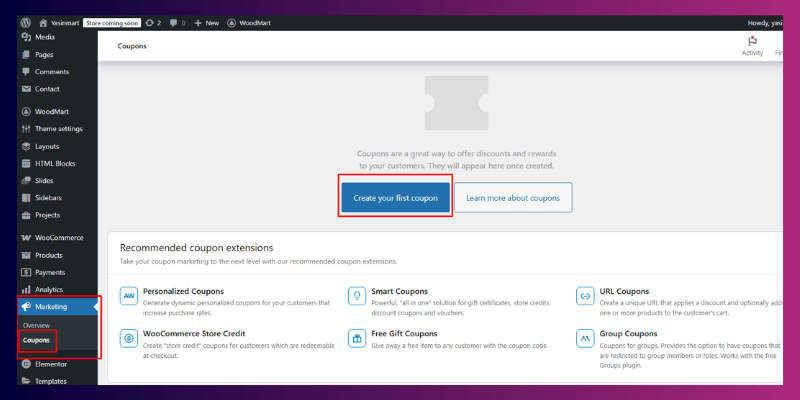
Under Marketing → Coupons, create percentage discounts, fixed-cart discounts, or free shipping codes. Coupons remain one of the simplest ways to drive first-time purchases or reward repeat customers, and WooCommerce lets you set usage limits, expiration dates, and minimum spend requirements right out of the box.
Step 9: Apply Security Measures for Your Online Store
Security measures for online store protection aren’t optional once you’re processing payments and storing customer data. At minimum, work through this list:
- Host with a reputable, security-conscious provider.
- Keep your SSL certificate active and enforced site-wide, not just on the checkout page.
- Only use trusted plugins and themes from verified sources.
- Keep WordPress, WooCommerce, and every installed plugin updated.
- Use strong, unique passwords for every admin account.
- Enable two-factor authentication for anyone with dashboard access.
- Install a spam filter to block junk submissions and fraudulent orders.
- Run backups on a regular, automated schedule.
Skipping this step is one of the most common and most expensive mistakes new store owners make, since a single security breach can cost far more than the hour it takes to set these measures up properly.
Step 10: Manage Order Processing and Customer Accounts
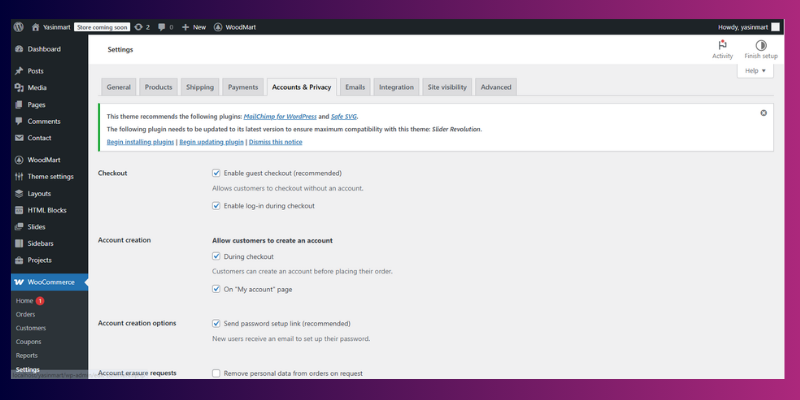
Once orders start arriving, you’ll live in WooCommerce → Orders regularly. Here’s what real order processing looks like day to day:
- Viewing orders — see customer details, items purchased, and payment status at a glance
- Managing order status — move each order through stages like Processing, On Hold, Completed, and Refunded as you fulfil it
- Updating tracking information — add shipment tracking numbers so customers can follow their delivery, often handled through a shipping extension
- Adding order notes — leave internal notes for your team, or send notes directly to customers about delays or special instructions
Decide early whether you’ll require customer account creation or allow guest checkout. Guest checkout tends to reduce friction and cart abandonment, while accounts make repeat purchases and order history easier to manage on both sides; many successful stores simply offer both and let the customer choose.
Step 11: Install Essential Plugins to Extend Functionality
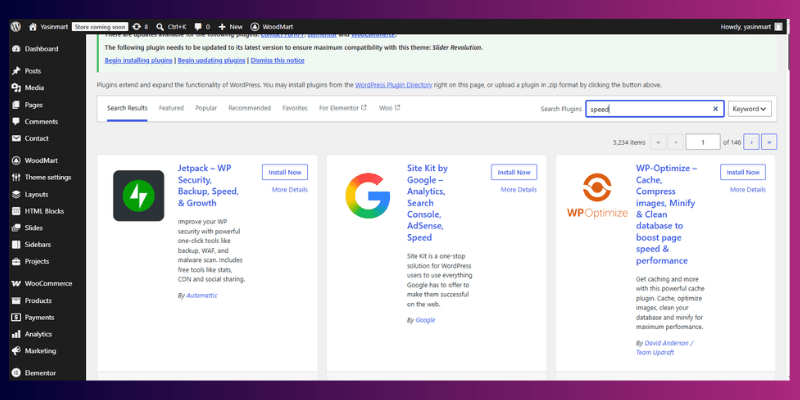
A handful of plugin categories consistently pay off for most stores:
- Invoicing and packing slip plugins — for professional order paperwork, especially useful for B2B sales
- SEO Plugins — Rank Math or a similar tool for on-page optimization (see our comparison between Rank Math and Yoast for WooCommerce).
- Speed and caching plugins — a caching plugin stores a ready-to-load version of your pages so visitors aren’t waiting on WooCommerce to rebuild everything on every visit, which matters more as your catalogue grows. If you want to see which caching and speed plugins are actually worth installing, we’ve covered that in detail
- Backup plugins — these run automatic, scheduled copies of your entire store (products, orders, customer data, and all) and store them somewhere safe off your live site, so if anything ever breaks, gets hacked, or gets accidentally deleted, you can restore everything instead of starting over from scratch
Resist installing everything at once. Every added plugin is a potential site speed and security tradeoff, so add only what your store genuinely needs right now.
Step 12: SEO Optimization for eCommerce
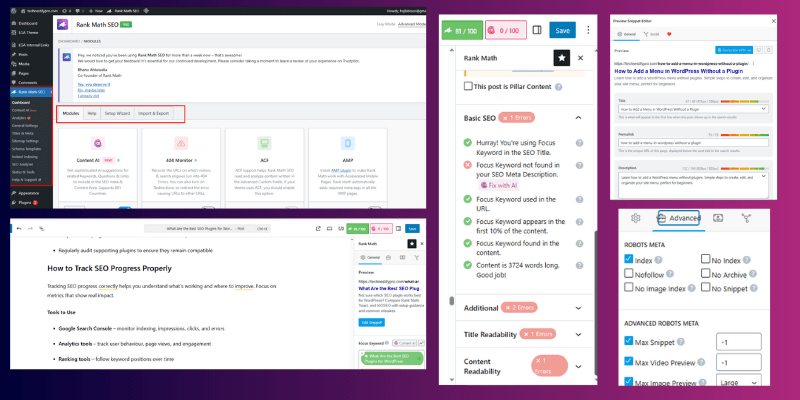
Search visibility turns a store that merely exists into a store that people actually find. At minimum, work through:
- Install an SEO plugin like Rank Math and connect it to Google Search Console.
- Write unique titles, meta descriptions, and product descriptions; never rely on manufacturer copy alone, since duplicate content hurts rankings across your whole catalogue.
- Add structured data (schema) for products so search engines can display rich results like pricing and star ratings.
- Optimize image alt text and file sizes for both accessibility and page speed.
For a full breakdown of which plugin fits your store, read our Rank Math vs. Yoast for WooCommerce comparison; for page-level tactics specifically, see Product Page SEO guide.
Step 13: Analytics and Tracking, Plus Marketing Tools Integration
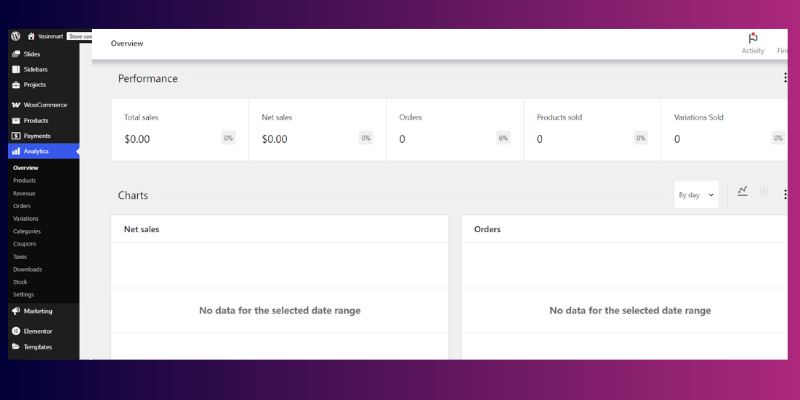
You can’t improve what you don’t measure. WooCommerce includes built-in Reports covering sales, top products, and customer data, but most store owners pair this with:
- Google Analytics — for full-funnel traffic insight beyond WooCommerce’s native reporting
- Conversion tracking — shows exactly which channels drive sales, not just visits
- Traffic source monitoring — tells you whether organic search, social, or paid ads deserve more of your budget
- Customer behaviour analysis — heatmaps or session recordings reveal where shoppers hesitate or abandon carts before checkout
For growth, layer in proper marketing tools integration: connect email marketing automation for abandoned cart recovery and win-back campaigns, and set up social commerce integrations (Instagram, TikTok, Pinterest) so your catalogue can be discovered beyond your own site.
Step 14: Check Configuration, Test, and Publish Your Store
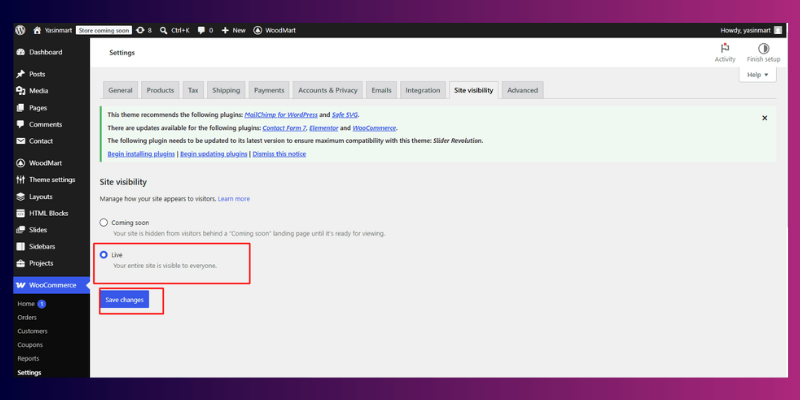
Before announcing your store to the world, run through this checklist:
- Place a test order and confirm your payment gateway processes it end-to-end.
- Verify tax and shipping calculate correctly at checkout.
- Test the mobile experience specifically; mobile traffic accounts for well over half of WooCommerce store visits, so a broken mobile layout costs you real sales. Confirm order confirmation emails send correctly and look professional.
- Double-check your policy pages (shipping, returns, privacy) are linked from your main menu and accurate.
Once everything checks out, publish your store.
A Note on Advanced Setups: HPOS and Headless WooCommerce
Two developments matter even for beginners, since they shape how modern WooCommerce stores get built in 2026. High-Performance Order Storage (HPOS) moves order data into dedicated database tables built specifically for ecommerce, improving speed and reliability as your order volume grows; it’s increasingly becoming the standard configuration rather than an optional extra.
Headless WooCommerce separates your store’s backend from its frontend design, letting developers build fully custom shopping experiences through WooCommerce’s Store API. You don’t need to configure either on day one, but knowing they exist helps you make smarter hosting and theme decisions as your store scales.
Extra Tips and Best Practices to Grow Your Store
- Don’t skip the setup wizard. It saves you time later by setting up tax, shipping, and payment basics correctly from the start.
- Use clear, honest product titles. Skip keyword-stuffed names; they confuse customers and don’t help you rank anyway.
- Add real product photos, not just stock images. Real photos build trust and cut down on returns.
- Keep your product descriptions short and useful. Provide answers to the questions a potential buyer would actually ask before making a purchase.
- Test checkout yourself, regularly. Place a real test order every time you change a theme, plugin, or payment setting.
- Don’t install a plugin for everything. Every extra plugin can slow your site down. Only add what you’ll actually use.
- Turn on automatic backups from day one. Don’t wait until something breaks to think about backups.
- Enable two-factor authentication. It takes two minutes to set up and blocks most account break-in attempts.
- Check your site on a phone, not just a laptop. Most shoppers browse on mobile, so this is where problems show up first.
- Offer more than one payment method. Some customers trust PayPal more than cards, and some prefer the opposite. Give them a choice.
- Keep shipping costs clear and upfront. Surprise shipping fees at checkout are one of the biggest reasons carts get abandoned.
- Update WooCommerce and your plugins regularly. Outdated plugins are one of the most common ways stores get hacked.
- Reply to customer questions quickly. Fast responses build trust and often turn a hesitant buyer into a sale.
- Watch your site speed as your catalogue grows. More products and images mean more to load, so keep an eye on it.
- Don’t launch without a backup plan. If something goes wrong on launch day, you want an easy way to undo it.
Common Problems and Fixes When Setting Up a WooCommerce Store
Almost everyone runs into a few issues while setting up their first store. None of this means you’re doing something wrong; these are the same hurdles most store owners hit, and each one has a simple fix.
Checkout works in testing but fails for real customers. This usually comes down to a payment gateway that’s still in test mode, or an SSL certificate that isn’t active site-wide. Double-check both are switched to live mode and that the padlock shows up on every page, not just the homepage.
Shipping costs look wrong or don’t show up at checkout. This almost always means a shipping zone hasn’t been set up for that customer’s location. Go back into Settings → Shipping and make sure all regions you sell to have a zone and a rate assigned to it.
The store feels slow, especially as more products get added. This is completely normal as a catalogue grows, and it’s fixable. A caching plugin and an image-optimization step usually solve most of it without needing anything technical.
The site looks great on a laptop but breaks on a phone. This happens more often than you’d think, usually because of a theme that wasn’t properly tested on mobile. Open the store on your own phone after every theme or plugin change, just to be safe.
Product pages aren’t showing up in Google. This is rarely a technical issue; it’s usually thin or copied product descriptions that are causing the problems. Writing original, specific descriptions for each product makes a real difference here, even just a few extra sentences per product.
Too many plugins installed, and things start feeling cluttered or slow. It’s easy to add a plugin for every little feature. A good rule of thumb: if you haven’t opened a plugin’s settings in the last month, it’s worth asking whether you still need it.
Something breaks after an update, and there’s no way to undo it. This is the one problem that’s completely avoidable. Automatic backups mean a bad update is a five-minute fix instead of a stressful afternoon.
Orders come in, but staying on top of them feels overwhelming. This gets easier once there’s a routine. Checking the Orders page at the same time each day and updating order status as you go keeps things from piling up.
Final Thoughts
You now know exactly how to set up a WooCommerce store, from installing the plugin all the way through to launch day. That’s not a small thing. A lot of people put this off because it feels big and technical, but you’ve just walked through every real step, one at a time, and none of it was as hard as it first looked.
Take a moment to be proud of that. You’ve got products listed, payments working, shipping sorted, and a store that’s actually ready to sell. That’s more than most people ever get to.
Here’s what to do next. Place a real order yourself and see the whole process from a customer’s side. Share your store with a few friends or family members and ask what they notice first. Once things feel steady, start exploring the more advanced side of things, like better SEO, email marketing, or new plugins that can save you time.
You don’t have to get everything perfect on day one. Every successful store started exactly where you are right now. Keep going, keep learning, and keep improving a little at a time.
If you’re still deciding whether WooCommerce fits your business at all, weighing WooCommerce pros and cons or seeing how it compares to running WordPress without it are both worth reading.
FAQs
Install the free WooCommerce plugin on your WordPress site, then follow the setup wizard to add your products, payments, shipping, and tax details. Once you test your checkout, you’re ready to launch.
The plugin itself is completely free. You’ll still pay for hosting, a domain, and payment processing fees, so it’s not entirely cost-free overall.
WooCommerce setup means turning a regular WordPress site into a working online store. It covers installing the plugin, adding products, and getting payments and shipping ready to go.
Not really. The setup wizard does most of the heavy lifting, so most people can get a basic store live in just a few hours.
There’s no monthly fee for the plugin, but hosting, a theme, and payment fees add up. Most stores end up spending somewhere between a few hundred and a few thousand dollars a year total.
A basic store can go live within a single day. A fully optimized store with SEO, security, analytics, and a polished theme usually takes one to two weeks of focused, part-time work.
It’s beginner-friendly once you follow the steps in order, though it does ask more of you upfront than something like Shopify. Most people find it manageable within their first afternoon of setup, and it gets easier from there.


- Be Respectful
- Stay Relevant
- Stay Positive
- True Feedback
- Encourage Discussion
- Avoid Spamming
- No Fake News
- Don't Copy-Paste
- No Personal Attacks
- Be Respectful
- Stay Relevant
- Stay Positive
- True Feedback
- Encourage Discussion
- Avoid Spamming
- No Fake News
- Don't Copy-Paste
- No Personal Attacks
