Fix My WordPress Site: 8 Easy Steps to Repair Common Problems
Published: 5 Nov 2026
Quick Answer: How Do You Fix a Broken WordPress Site?
To fix a broken WordPress site, find the error type, back up your site, turn on debug mode, deactivate your plugins, switch to a default theme, clear your cache, check your PHP version and memory limit, and restore a backup if nothing works. Most problems come from plugin conflicts, theme errors, old cache, or PHP settings. Test your site after each step, and stop as soon as it works again.
Your WordPress site just stopped working. Maybe you see a blank white page. Maybe a message says, “There has been a critical error on this website.” Maybe the site will not open at all. A WordPress error like this feels scary, especially right after an update.
Take a breath. Most broken WordPress sites have a simple cause, and you can find it without writing code. If you keep asking yourself, “How do I fix my WordPress site?”, this guide gives you the exact steps, in the right order.
We use the same process on our own site, TechNestifyPro. It runs on Hostinger hosting with a custom theme, LiteSpeed Cache, and Rank Math SEO. Plugins, themes, cache, and PHP versions cause most of the trouble there too. You will learn the order we check them in, and why that order saves time.
Your posts and pages almost always stay safe. They live in your database, and most problems only break how the site loads. So let’s get it working again.
Fix My WordPress Site: Key Points to Remember
- Most broken WordPress sites trace back to a plugin, theme, cache, or PHP problem.
- Back up your files and database before you change anything.
- Debug mode shows the exact error and often names the plugin or theme at fault.
- Deactivate all plugins first, then reactivate them individually to identify which one is causing the issue.
- Change one thing at a time, and test your site after each change.
- Restore a backup from before the problem started if every other step fails.
- Most fixes need no coding skills.
What to Check Before You Start to Fix WordPress Issues
Before you fix anything, get four things ready: hosting dashboard access, file access through FTP or File Manager, a recent backup, and a calm mindset. This check takes about five minutes. It protects you from making the problem worse.
Use this checklist:
- Hosting dashboard access. You need it to reach backups, PHP settings, and error logs. Log in now. If you forgot your password, reset it before you start.
- FTP or File Manager access. If your WordPress admin area is down, your files are the only way in. The File Manager inside your hosting panel works fine and needs no extra software.
- A recent backup. A backup lets you undo any mistake. Open your host’s backup list or your backup plugin. Note down the date of the newest backup.
- A calm mindset. Panic leads to random changes. Change one thing at a time, then test your site after each change.
How to Fix My WordPress Site Step by Step
The fastest way to repair a broken WordPress site is to find the cause first, then switch off the usual suspects one at a time: plugins, theme, cache, and PHP. Work through the steps in order. Stop as soon as your site works again.
Each step starts with a short answer. The details follow right after it.
Step 1: Find Out What Kind of WordPress Error You Have
Look at what your screen shows. The error message can help you identify the possible cause. Use this table to pick your starting point.
| What you see | Likely cause | Where to go next |
| Blank white page | Plugin, theme, or PHP error | Steps 3, 4, and 5 |
| “There has been a critical error on this website” | A plugin or theme with failing code | Steps 3, 4, and 5 |
| Site will not open at all | Outdated plugin, hosting, domain, or server problem | Step 4, then contact your host |
| “Briefly unavailable for scheduled maintenance” | An update that got interrupted | Maintenance mode fix below |
| Broken layout or missing styles | Cache or theme conflict | Steps 5 and 6 |
| 404 error on posts and pages | Permalink settings | Permalink fix below |
| 500 Internal Server Error | Plugin, .htaccess file, or memory limit | Steps 4 and 7 |
Next, check one more thing. Are you able to access your WordPress dashboard? If yes, you can do most fixes from the dashboard. If no, use your hosting File Manager or FTP.
Step 2: Back Up Your Site
Back up your files and your database before you change anything. A fresh backup gives you a safe way back if a fix goes wrong.
Here is how to do it:
- Log in to your hosting panel.
- Open the backup section.
- Create a new backup, or confirm that a recent automatic one exists.
- Download a copy to your own computer.
A broken WordPress site can still be backed up from your host. You do not need the dashboard for this. Keep the copy off the server, too. If your server fails, you will still have your files.
Step 3: Turn On Debug Mode to Find the Cause
Debug mode makes WordPress write the exact error to a log file. The error log usually identifies the plugin or theme responsible for the problem.
Follow these steps:
- Open your File Manager or connect with FTP.
- Find the file wp-config.php in your site’s main folder.
- Make a copy of it first. This gives you a quick undo.
- Open the original and find the line that says “That’s all, stop editing!”
- Add these three lines above it:
define( 'WP_DEBUG', true );
define( 'WP_DEBUG_LOG', true );
define( 'WP_DEBUG_DISPLAY', false );These three lines come straight from the official WordPress debugging guide, so you can trust them.
- Save the file and reload your site.
- Open wp-content/debug.log and look for lines that say “Fatal error.”
Read the file path in that line. A path with /plugins/plugin-name/ points to a plugin. A path with /themes/theme-name/ points to your theme. That one clue can save you an hour.
When you finish, change WP_DEBUG back to false. Logs can expose private details, so do not leave debug mode on.
You can also look in your WordPress admin email account. For critical errors, WordPress often sends a message with a recovery mode link. This link allows you to access your dashboard and deactivate the faulty plugin.
Step 4: Deactivate All Plugins, Then Turn Them On One by One
- Deactivate every plugin, then turn them back on one at a time. The plugin causing the issue is the one that makes your site crash again. Plugin conflicts cause more broken sites than almost anything else.
If the debug log already named a plugin, deactivate that one first. If not, use one of these two methods.
If you have access to your WordPress dashboard:
- Go to Plugins, then Installed Plugins.
- Select all plugins.
- Choose Deactivate from the bulk actions menu.
- Check your site.
If you cannot log in:
- Open File Manager or FTP.
- Go to the wp-content folder.
- Rename the plugins folder to plugins-old.
- Check your site.
If your website starts working again, it means a plugin is causing the issue. Rename the folder back to plugins. Then activate your plugins one at a time. Test your site after each one. When the error returns, you have found the culprit. Remove the plugin, install its latest update, or replace it with another one.
For a deeper look at this problem, read our guide on how to reduce WordPress plugin conflicts after an update.
- Our first-hand experience: the critical error. We have seen this error firsthand. Our site showed the message “There has been a critical error on this website.” The cause was outdated plugins, an outdated WordPress version, and an outdated PHP version. They no longer worked well together.
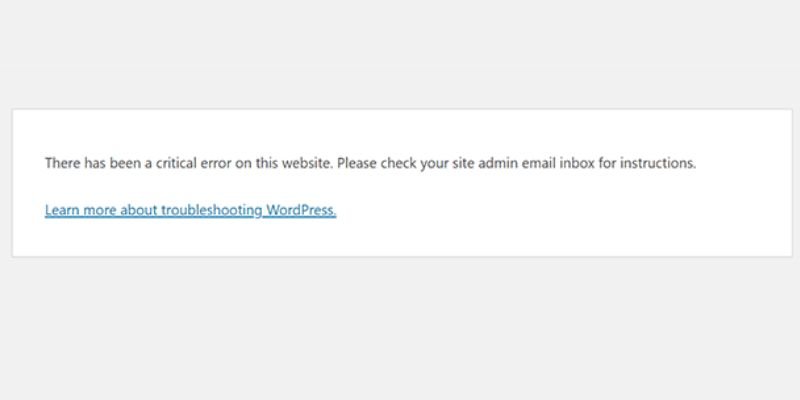
We fixed it ourselves from the hosting control panel. We renamed one plugin’s folder and opened the site, and it loaded. Next, we renamed the folder back to its original name and saved the change. Then we tried to log in, and the login worked.
- Our second experience: the timeout that looked like a server problem. Another time, our site would not load. Chrome showed “This site can’t be reached” with the code ERR_CONNECTION_TIMED_OUT. It looked like a hosting problem, so we contacted Hostinger support. They told us it was not a server-level problem. An outdated Rank Math Pro plugin caused it. Once we updated the plugin, the site worked smoothly again.
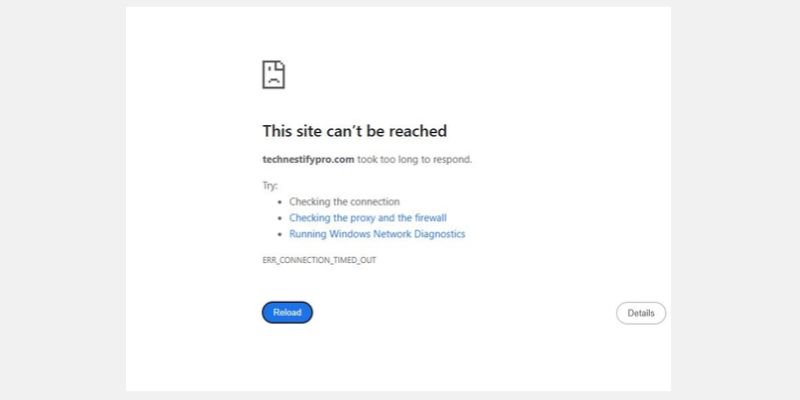
The rename test works because WordPress skips a plugin when it cannot find its folder. If your site loads after the rename, you know that plugin was involved. Both of our problems came from outdated software. The lesson is simple: keep your plugins, WordPress, and PHP up to date. If you are not sure whether the problem sits on the server, ask your host’s support team.
Step 5: Switch to a Default Theme
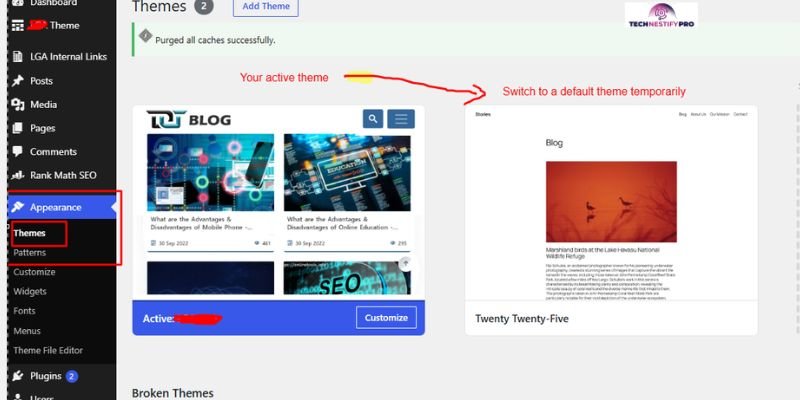
Switch to a default WordPress theme to test whether your own theme causes the problem. Default themes have names that start with “Twenty,” such as Twenty Twenty-Five.
If you can log in:
- Go to Appearance, then Themes.
- Activate a default theme.
- Check your site.
If you cannot log in:
- Open File Manager or FTP.
- Go to wp-content/themes.
- Rename the folder of your active theme.
- Reload your site. WordPress will fall back to a default theme.
Make sure a default theme is installed first. Without one, this trick will not work. This test matters even more if you use a custom theme, as we do. Custom code can fail after a WordPress or PHP update. A default theme rules your theme in or out in under a minute.
Step 6: Clear Your Cache
Clear every cache layer: your browser, your caching plugin, your server, and your CDN. Old cached files often cause broken layouts, even after you fix the real problem.
Here is the order we use:
- Open your caching plugin. On our site, that is LiteSpeed Cache. Go to LiteSpeed Cache, then Toolbox, then click Purge All.
- Clear the server-side cache through your hosting control panel.
- Clear your CDN cache if you use one.
- Test your website using a private or incognito browser window.
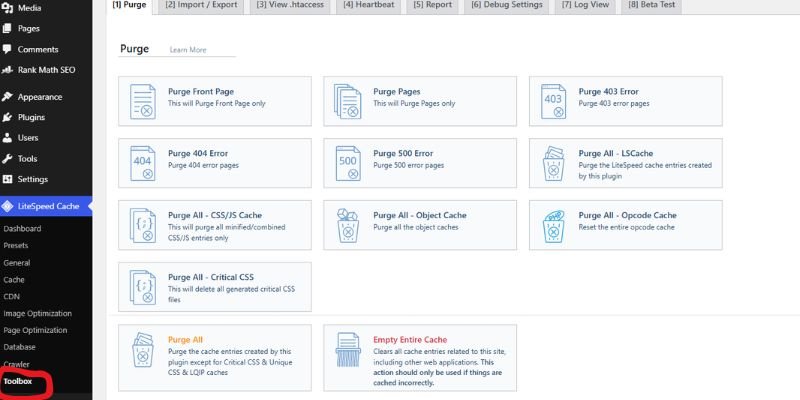
The private window matters. It skips the cached files stored in your regular browser.
Step 7: Check Your PHP Version and Memory Limit
Make sure your PHP version is supported by your plugins and theme, and make sure your memory limit is high enough. A mismatch in either one can break your site.
First, find your current settings. In your dashboard, go to Tools, then Site Health, then the Info tab. Open the Server section. You will see your PHP version and memory limit there.
Now check your PHP version:
- A very old PHP version can break new plugins.
- A very new PHP version can break old plugins.
- Make sure your installed plugins and theme are compatible with your current PHP version.
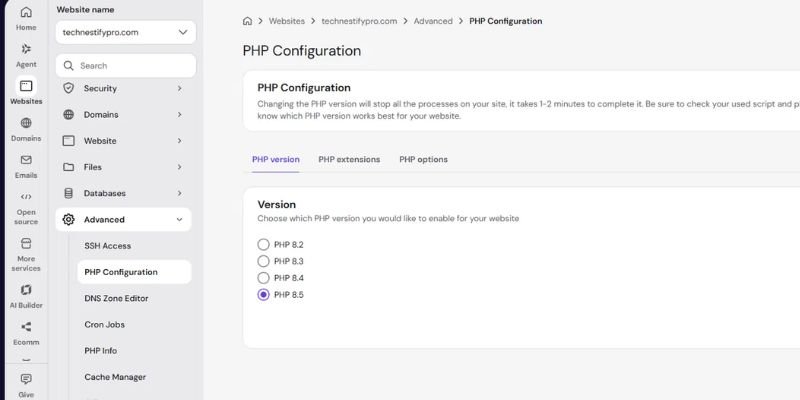
You can change PHP in your hosting control panel. We updated PHP on our own site through the Hostinger control panel. You can do this in just a few clicks, but make sure to check your website immediately afterwards. If something breaks, switch back to the previous version. We have a dedicated guide to update PHP in WordPress.
Next, check your memory limit. If you see the message “Allowed memory size exhausted,” raise it. Add this line to wp-config.php, above the “That’s all, stop editing!” line:
define( 'WP_MEMORY_LIMIT', '256M' );Some hosts set their own limit, and it can override this line. If nothing changes, ask your host to raise it.
Step 8: Restore From a Backup if Nothing Works
If nothing else works, restore your most recent good backup. Pick a backup from before the problem began.
Here is how:
- Go to your hosting control panel or open your backup plugin.
- Choose a backup dated before the error appeared.
- Start the restore and wait for it to finish.
- Test your site.
Your website will lose any changes you made after creating the backup. That is why Step 2 matters. Copy any new posts or orders from your fresh backup first. Then repeat your updates one at a time, so you can see which one caused the trouble.
If the restore fails, contact your host’s support team. They can read server logs that you cannot see.
Extra Tips to Fix WordPress Issues Before They Start
The best fix is prevention. These five habits stop most problems before they begin.
- Back up before every update. Updates are the most common trigger for broken sites. A backup takes a minute and saves hours.
- Test updates on a staging site. A staging site is a private copy of your site. Try updates there first. Then update your live site when everything works.
- Keep your plugins to a minimum. Every plugin adds code that can fail. Delete plugins you do not use.
- Choose reliable hosting. Good hosting gives you daily backups, fast support, and easy PHP controls. These features make every fix easier.
- Update PHP regularly. Old PHP versions lose security support and slow your site down. Read our guide on how to update PHP in WordPress to do it safely.
Common WordPress Site Problems and How to Fix Them
Most broken WordPress sites fall into six common cases. Here is the quickest fix for each.
- WordPress White Screen of Death
A blank white page usually means a plugin, theme, or memory problem. Deactivate all plugins (Step 4), then raise your memory limit (Step 7).
- My WordPress Website Is Not Opening
First, check whether the problem is only on your device. Open your site on your phone using mobile data. Then log in to your host and confirm that your hosting plan and domain are active. If both look fine, rename your plugins folder (Step 4). An outdated plugin can cause this problem, and it can look like a server error. Still stuck? Contact support.
- Stuck in Maintenance Mode
An interrupted update leaves a hidden file named .maintenance in your site’s main folder. Open File Manager, turn on “show hidden files,” and delete .maintenance. Reload your site.
- Broken Layout After an Update
A broken layout usually comes from old cached files or a theme conflict. Clear every cache (Step 6). If the layout stays broken, deactivate the plugin you updated last.
- 404 Error After Changing Permalinks
Go to Settings, then Permalinks, and click Save Changes. Do not change anything. This refreshes your site’s link rules. For the full walkthrough, read our guide on fixing a 404 error after changing WordPress permalinks.
- Site Says It Redirected You Too Many Times
This error means your site is stuck in a redirect loop. Two settings keep sending visitors back and forth until the browser gives up. Clear your cache first. Then check that your WordPress Address and Site Address match. If the loop stays, deactivate your plugins (Step 4). If your browser says the site redirected you too many times, our step-by-step guide covers every fix, including Cloudflare and HTTPS conflicts.
Conclusion
You now know how to repair a broken WordPress site. You learned to read the symptom, back up your files, find the cause with debug mode, and test plugins, themes, cache, and PHP one at a time. You also know how to restore a backup when nothing else works.
The next time you search for how to fix your WordPress website, remember the rule that saves the most time: change one thing, then test. That habit turns a scary problem into a short checklist.
Want to stop problems before they start? Read our guide on reducing WordPress plugin conflicts after an update. It shows you how to keep your next update from breaking your site.
FAQs about fixing a WordPress site
Start by finding the type of error on your screen. Then back up your site and turn on debug mode to find the cause. Deactivate your plugins, switch to a default theme, and clear your cache. Check your PHP version and memory limit last. If nothing works, restore a recent backup.
The most common causes are a plugin error, a theme error, or a hosting problem. An outdated plugin may cause issues that seem like server-related problems. On our own site, a timeout screen came from an outdated Rank Math Pro plugin. First, test your site on another device and check that your hosting plan and domain are active. If both are fine, rename your plugins folder and test again.
Change one thing at a time and test after each change. Begin with debug mode, because it shows the exact error. Next, check your plugins, theme, cache, and PHP version one at a time in this order. Write down each change you make. That record helps you undo anything that does not help.
Yes, you can fix most problems without coding skills. You deactivate plugins, switch themes, and clear your cache using buttons and menus. You only need to insert a few lines of code into one file to complete the steps in this guide. If you feel unsure, make a backup first.
Plugin and theme conflicts cause some of the most common errors. They often show up as a white screen or a critical error message. They usually appear right after an update. Deactivating your plugins is the fastest way to confirm this cause.
First, clear your cache and test your site in a private window. If the error stays, deactivate the plugin or theme you updated last. Then check the debug log for the exact cause. If you cannot find it, restore the backup you took before the update.
Simple problems often take only a few minutes. Examples include a stuck maintenance mode or a cache issue. Plugin conflicts can take 30 minutes to an hour. A full restore may take longer, depending on your site’s size. Take your time and test after each step.



- Be Respectful
- Stay Relevant
- Stay Positive
- True Feedback
- Encourage Discussion
- Avoid Spamming
- No Fake News
- Don't Copy-Paste
- No Personal Attacks
- Be Respectful
- Stay Relevant
- Stay Positive
- True Feedback
- Encourage Discussion
- Avoid Spamming
- No Fake News
- Don't Copy-Paste
- No Personal Attacks
