How to Set WooCommerce to Skip the Cart (Step-by-Step Guide 2026)
Published: 25 Jul 2026
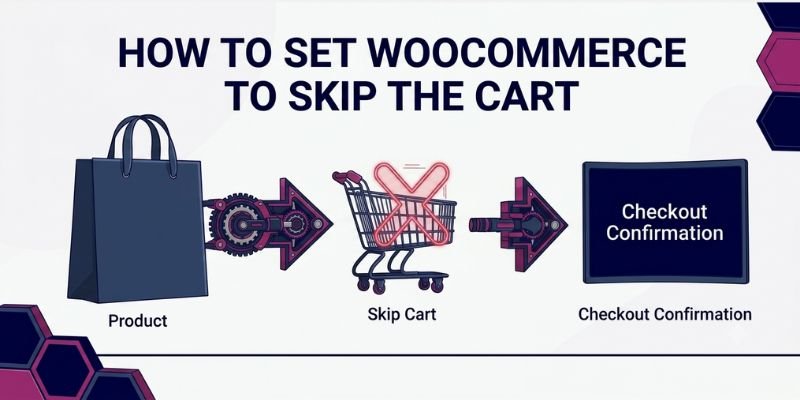
You add a product to your WooCommerce store, click “Add to Cart,” and land on a cart page that just… sits there. For a lot of stores, that extra click is where customers quietly give up.
It’s a real problem. According to the Baymard Institute, which has tracked checkout behaviour across 50 separate studies, the average cart abandonment rate sits at over 70%. A meaningful chunk of that is tied directly to checkout friction. Baymard’s research also found that roughly 1 in 5 US shoppers has abandoned an order specifically because the checkout process felt too long or complicated.
The good news: you can fix this. This guide walks you through exactly how to set WooCommerce to skip the cart, using three different methods depending on your comfort level and store setup. By the end, you’ll know which method fits your store, how to implement it correctly, and how to avoid the mistakes that trip up most tutorials on this topic.
Quick answer:
To set WooCommerce to skip the cart, uncheck “Redirect to the cart page after successful addition” under WooCommerce > Settings > Products > General, then add a code snippet using the woocommerce_add_to_cart_redirect filter (or install a free plugin like “Add To Cart Direct Checkout for WooCommerce”) to send customers straight to the checkout page instead of the cart. For shop and archive pages using AJAX add-to-cart buttons, you’ll also need a small JavaScript snippet listening for the added_to_cart event, since the standard filter alone won’t trigger a redirect there.
Why Skip Cart Direct Checkout Matters for Your Store
Skipping the cart isn’t a requirement for every store, but the convenience it creates for shoppers is hard to ignore. Here’s what a direct checkout path actually improves:
1. Faster conversions. Fewer clicks between choosing a product and paying for it means fewer moments where a customer can stall out or second-guess the purchase. That directly supports a higher conversion rate.
2. Lower cart abandonment. A long or complicated checkout is one of the most common reasons shoppers leave without buying; the Baymard stat above is proof of that. Cutting a page out of the path shortens the distance between intent and payment, which lowers the odds of losing that customer along the way.
3. A smoother shopping experience. With no extra page to click through, buying feels effortless rather than like a multi-step process. That kind of frictionless experience is part of what turns a first-time buyer into a repeat one.
4. Quicker checkout: Instead of loading a separate cart page, customers move straight into entering payment and shipping details. That saves real time, both in page load and in decision-making.
5. Fewer distractions along the way: Cart pages often nudge shoppers toward cross-sells, coupon fields, or shipping calculators, useful for some stores, but a distraction for others. Skipping it keeps attention on completing the purchase, which matters most for single-item, high-intent buyers.
What You Need Before You Start
Before making any changes, make sure you have the basics in place. This keeps you from getting stuck halfway through.
- Admin access to your WordPress dashboard ⟶ you’ll need this to change settings, install a plugin, or add code
- A staging site or backup ⟶ always test checkout changes somewhere safe first, since checkout is the most revenue-critical part of your store
- A code snippets plugin (if using the code method) ⟶ WPCode is a solid free option; it lets you add PHP snippets without editing theme files directly
- Clarity on your store type ⟶ single-product stores and impulse-buy stores benefit most from skipping the cart; multi-item stores that rely on upsells or cross-sells on the cart page should think carefully before removing it (more on this below)
How Does WooCommerce’s Default Cart Flow Work?
Before changing anything, it helps to understand what you’re actually modifying. By default, WooCommerce follows a 3-step buying path: a customer clicks Add to Cart on a product, lands on the Cart page to review items and quantities, then moves to the Checkout page to enter payment and shipping details.
This flow exists to give customers control, a chance to double-check what they’re buying before paying. For stores with multiple products per order, that review step genuinely helps. But for stores selling one product, digital downloads, or impulse-buy items, it’s often just an extra click standing between “I want this” and “I bought this.” That’s the exact gap the methods below are designed to close.
If you’re also working on getting more visitors to this page in the first place, it’s worth reviewing how product pages are structured for search visibility alongside making this change.
How to Set WooCommerce to Skip the Cart: 3 Methods Compared
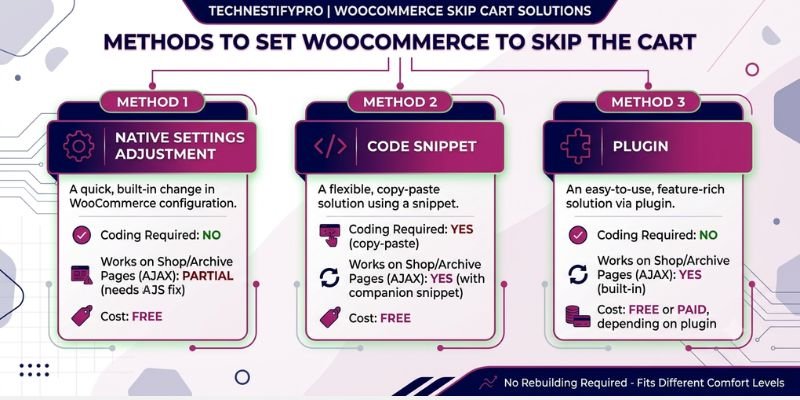
There are three real ways to skip the cart in WooCommerce, and none of them requires rebuilding your store from scratch. Each one fits a different comfort level, from a quick settings change to a fully custom code solution. Here’s how they compare before you pick one.
| Method | Coding Required | Works on Shop/Archive Pages (AJAX) | Cost |
| Native settings adjustment | No | Partial — needs the JS fix below | Free |
| Code snippet | Yes (copy-paste) | Yes, with the companion snippet | Free |
| Plugin | No | Yes (built-in) | Free or paid, depending on the plugin |
Method 1: Native WooCommerce Settings
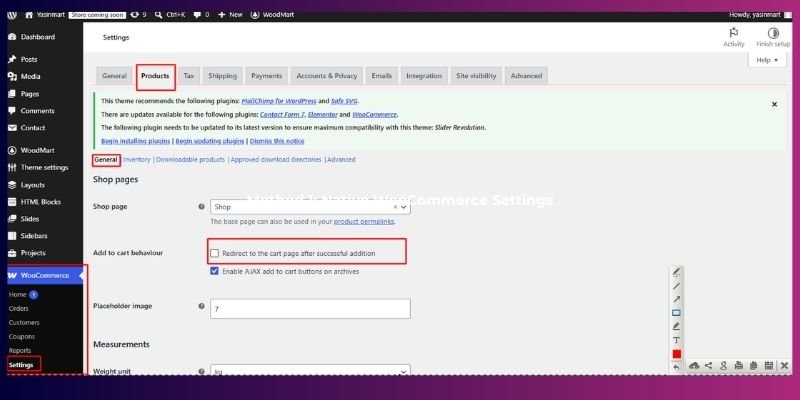
WooCommerce doesn’t have a single toggle labelled “skip cart,” but you can get partway there using a setting that already exists in your dashboard. This is the fastest option to try, and it needs no code and no plugin. Just know upfront that it only solves part of the problem, which is explained right after the steps.
- Go to WooCommerce > Settings > Products > General.
- Find the option “Redirect to the cart page after successful addition.” Uncheck it. This stops WooCommerce from automatically sending customers to the cart page after they click “Add to Cart.”
Important limitation to know: this setting alone does not redirect customers to checkout; it just stops the automatic redirect to the cart. To fully skip the cart and land directly on checkout, you’ll need either the code snippet in Method 2 or a plugin in Method 3.
Method 2: Code Snippet for Full Control
This method gives you complete, free control over the redirect behaviour, without installing anything extra. It’s the method most guides talk around without actually showing working code. Here’s a real, tested snippet using WooCommerce’s woocommerce_add_to_cart_redirect filter.
Add this using a code snippets plugin (recommended) or your child theme’s functions.php. If this is your first time editing WooCommerce this way, our guide on customizing the product page at the code level covers the safest way to add snippets like this one.
add_filter( 'woocommerce_add_to_cart_redirect', 'techpro_skip_cart_redirect' );

function techpro_skip_cart_redirect( $url ) {
    global $woocommerce;

    // Prevent an infinite redirect loop if the cart somehow ends up empty
    if ( $woocommerce->cart->is_empty() ) {
        return get_home_url();
    }

    return wc_get_checkout_url();
}A quick technical note that matters here: older versions of this snippet floating around the web use get_checkout_url(), which has since been deprecated. Always use wc_get_checkout_url() instead, or the redirect will silently fail on newer WooCommerce versions. If you want to see this and related filters in WooCommerce’s own documentation, their official hook reference is the definitive, always-current source.
AJAX Add-to-Cart Buttons
If your theme uses AJAX-based Add to Cart buttons (very common on shop and category/archive pages), there’s no page reload, so the redirect filter above never triggers. The customer clicks “Add to Cart,” sees a rapid confirmation, and stays right where they are.
To fix this, add a small JavaScript snippet that listens for WooCommerce’s added_to_cart event and redirects manually:
jQuery(function($) {
    $(document.body).on('added_to_cart', function() {
        window.location.href = '/checkout/';
    });
});Add this through your theme’s custom JS area, or enqueue it properly if you’re comfortable with wp_enqueue_script(). Replace /checkout/ with your actual checkout page URL if it’s different.
With both snippets in place, your store skips the cart whether the customer adds to cart from a single product page or an archive/shop page.
Method 3: Plugin (No Code Required)
If code isn’t your thing, a plugin handles both the single-product and AJAX archive-page scenarios out of the box, with a visual settings screen instead of a code editor. This is the best fit if you want fine-grained control (by product, category, or user role) without touching a single line of PHP.
- Free option: Add To Cart Direct Checkout for WooCommerce” (available on WordPress.org) specifically handles the AJAX add-to-cart case on archive pages, which is the exact gap the manual code method requires two snippets to solve.
- Paid options: WooCommerce’s own official “Skip Cart & Direct Checkout” extension, along with third-party options like Addify’s Quick Buy Now or CartHopper, add extra controls showing/hiding the direct checkout button by product, category, tag, or user role, and customizing button text and colours.
What to Look For in a Skip Cart Plugin
Not all skip cart plugins offer the same level of control. Before installing one, check whether it lets you:
- Show or hide the button by page type ⟶ product page, shop/listing page, or both
- Restrict by category or tag ⟶ useful if only certain products should skip the cart
- Restrict by user role ⟶ for example, showing direct checkout only to logged-in or returning customers, while new visitors still see the full cart page for reassurance
- Customize button text and colour ⟶ so the button matches your store’s branding instead of looking like a generic plugin add-on
- Handle both standard and AJAX add-to-cart ⟶ confirm this specifically, since many plugins only handle one or the other (see the AJAX issue in Method 2)
The more of these a plugin supports, the more control you’ll have if you decide to fine-tune the experience later instead of applying it store-wide.
Basic setup steps for most plugins in this category:
- Go to Plugins > Add New, search for your preferred plugin, install and activate it.
- Find its settings, usually under WooCommerce > Settings or its own menu item.
- Enable the direct checkout / skip cart option.
- Choose whether it applies to all products or only specific ones.
- Save your settings and test a live purchase.
Should You Skip the Cart? When It Helps and When It Hurts
Skipping the cart isn’t automatically the right move for every store. It genuinely helps some setups and quietly hurts others, so it’s worth thinking through before you commit to any of the methods above.
Skipping the cart works well for:
- Single-product stores
- Digital downloads
- Limited-time offers, flash sales, and event tickets
- Impulse-buy items
- Logged-in or returning customers, since they already trust your store and often already have saved payment/shipping details; skipping the cart for this group specifically (while keeping it for new visitors) reduces friction without removing the reassurance step first-time buyers may still want
Skipping the cart can hurt you if:
- You rely on cart-page upsells or cross-sells to increase average order value (AOV); removing the cart page removes that opportunity entirely
- Customers regularly buy multiple items per order; a cart page lets them review and adjust quantities before paying, which reduces returns and support requests
- You use coupon codes often; the cart page is typically where customers apply them; skipping it can bury this option or confuse first-time buyers
WooCommerce’s flexibility is exactly what makes this kind of trade-off possible to control; you can read more about that in our breakdown of WooCommerce’s overall strengths and weaknesses.
If your store falls into the second group, consider a hybrid approach: keep the cart page for carting the majority of products, but add a “Buy Now” button only on specific high-intent, single-item product pages using the category/tag targeting options in Method 3’s plugins.
Extra Tips and Best Practices
- Test on both desktop and mobile before launching. Mobile checkout behaves differently, and mobile abandonment rates are consistently higher than desktop, according to Baymard’s research.
- Keep coupon fields visible on checkout if you remove the cart page, since that’s usually the only place customers can apply a discount code.
- Watch your average order value after the change. If skipping the cart causes AOV to drop noticeably, that’s a sign your cart page was doing useful upsell work.
- Use Google Analytics or WooCommerce Analytics to compare conversion rates before and after the change, over at least a two-week window, so you’re comparing real data, not a lucky few days.
- Don’t skip the cart on grouped or bundled products. These product types usually need the cart page for the customer to see everything included.
- Pair this with basic page speed improvements. Skipping the cart removes one kind of friction, but a slow-loading checkout page creates another. The Federal Trade Commission notes that clear, simple online processes improve consumer trust and reduce confusion; a fast, straightforward checkout supports that same trust, so it’s worth checking your checkout page’s load time alongside this change, not instead of it.
Common Problems When Skipping the WooCommerce Cart (and How to Fix Them)
Even after you’ve set up WooCommerce to skip the cart, you may run into a few unexpected issues. In most cases, the fix is straightforward once you know what’s causing the problem. Below are some of the most common issues users face and the steps you can take to get everything working as expected.
1. The redirect works on product pages but not on the shop page
Why it happens
The WooCommerce shop page usually adds products to the cart using AJAX. Because of that, the PHP snippet alone can’t handle the redirect after a product is added.
How to fix it
If you’re using the custom code method, make sure you’ve also added the JavaScript snippet from Method 2 that listens for the added_to_cart event. After adding the code, clear your website cache and test the shop page again.
2. Customers get stuck in a redirect loop
Why it happens
This happens when the redirect runs even though the cart is empty. As a result, visitors keep getting sent between the cart and checkout pages.
How to fix it
Use the code provided in this guide, as it checks whether the cart contains products before redirecting. If you’ve modified the snippet, verify that this condition is still in place.
3. The checkout page shows an error or an empty cart
Why it happens
This is often caused by using an outdated WooCommerce function or by having the wrong page assigned as the checkout page.
How to fix it
Make sure your code uses wc_get_checkout_url() instead of the deprecated get_checkout_url() function. Then go to WooCommerce → Settings → Advanced and confirm that the correct page is selected as your checkout page.
4. Your Buy Now plugin or theme feature stops working
Why it happens
Some themes and plugins replace WooCommerce’s default add-to-cart behaviour. This can prevent your custom redirect from working as expected.
How to fix it
Temporarily disable other add-to-cart or checkout-related plugins and test your site. If the redirect starts working again, reactivate the plugins one by one until you identify the one causing the conflict.
.
Conclusion
Learning how to set WooCommerce to skip the cart comes down to picking the right method for your comfort level: native settings for a quick partial fix, a code snippet for full free control (including the AJAX fix most guides leave out), or a plugin if you’d rather not touch code at all.
Whichever you choose, test it properly, watch your average order value afterwards, and remember that skipping the cart isn’t right for every store; it’s a genuine win for single-product and impulse-buy stores, but worth a second thought if upsells and multi-item orders are part of your sales strategy.
Start with the method that matches your skill level today, measure the results over a couple of weeks, and adjust from there.
FAQs
Use the woocommerce_add_to_cart_redirect filter to send customers directly to checkout instead of the cart page after they click “Add to Cart.” For shop or archive pages using AJAX buttons, you’ll also need a small JavaScript snippet listening for the added_to_cart event.
Add this filter to your child theme’s functions.php or a code snippets plugin: add_filter(‘woocommerce_add_to_cart_redirect’, function() { return wc_get_checkout_url(); });. This sends customers straight to checkout after clicking “Add to Cart,” skipping the cart page entirely.
Go to WooCommerce > Settings > Advanced > Page setup. The “Cart page” dropdown lets you choose which page acts as your cart. Most stores keep the default page WooCommerce creates automatically during setup.
Uncheck “Redirect to the cart page after successful addition” under WooCommerce > Settings > Products > General, then add a redirect using the woocommerce_add_to_cart_redirect filter or a plugin. This sends customers directly to checkout instead.
WooCommerce doesn’t let you fully delete the cart page, but you can redirect around it using the woocommerce_add_to_cart_redirect filter, so customers never see it. A free plugin like “Add To Cart Direct Checkout for WooCommerce” does this without code.
Not a single dedicated toggle. You can uncheck “Redirect to the cart page after successful addition” under WooCommerce > Settings > Products > General, but this only stops the automatic redirect to cart; it doesn’t send customers to checkout on its own. For a full skip, you’ll need a code snippet or plugin.
It depends on your store. For single-product or impulse-buy stores, skipping the cart usually helps conversions by removing friction. For stores that rely on cart-page upsells, cross-sells, or frequent multi-item orders, removing the cart page can lower average order value, so it’s worth testing carefully.
Most shop and archive pages use AJAX-based Add to Cart buttons, which don’t trigger a full page reload. The standard woocommerce_add_to_cart_redirect filter only fires on a form submission with a page reload, so you’ll need the additional JavaScript snippet that listens for the added_to_cart event to catch AJAX-based additions too.
Yes. “Add To Cart Direct Checkout for WooCommerce” is available for free on wordpress.org and specifically handles both standard and AJAX-based add-to-cart scenarios, which most free code snippets don’t cover on their own.
No. Use a code snippets plugin like WPCode to add the PHP and JavaScript snippets safely, without editing your theme directly. This also protects your changes from being wiped out during theme updates.
Yes. Most plugin-based solutions let you enable direct checkout for specific products, categories, tags, or user roles, rather than applying it store-wide. This is the safer option if you only want to fast-track a few high-intent products.



- Be Respectful
- Stay Relevant
- Stay Positive
- True Feedback
- Encourage Discussion
- Avoid Spamming
- No Fake News
- Don't Copy-Paste
- No Personal Attacks
- Be Respectful
- Stay Relevant
- Stay Positive
- True Feedback
- Encourage Discussion
- Avoid Spamming
- No Fake News
- Don't Copy-Paste
- No Personal Attacks
