Essential Settings to Configure After Installing WordPress
Published: 11 Nov 2025

When you install WordPress, your site is technically live, but it’s not ready for visitors. Default settings, dummy content, and basic configurations can cause slow loading, poor SEO, and security risks.
Configuring WordPress correctly from the start ensures your site is secure, fast, professional, and search engine-friendly. This guide covers essential settings to configure after installing WordPress step by step, with examples, tips, and practical advice for beginners.
1. General Settings
These are the core settings that define your site’s identity and basic functionality.
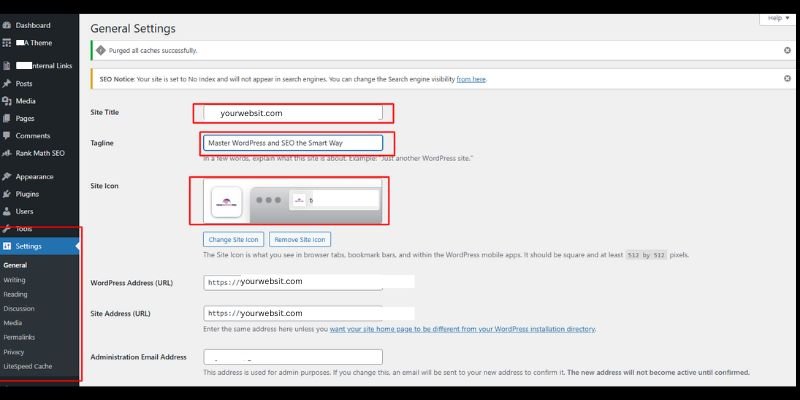
1.1 Site Title & Tagline
The site title appears in browser tabs, search results, and emails. The tagline is a short description of your site’s purpose.
Example
- Travel blog: Title → “My Travel Adventures”
- Tagline → “Sharing journeys and travel tips worldwide”
Why it matters: A clear title and tagline improve branding and SEO. Avoid defaults like “Just another WordPress site.”
Where to set it: Settings → General
Tip: Update these if your niche or focus changes.
1.2 WordPress Address & Site Address
- WordPress Address (URL): Location of your WordPress files
- Site Address (URL): What visitors type to access your site
Why it matters: Using incorrect URLs can break your site. Usually, both addresses are the same.
Tip: Always double-check URLs when moving your site or changing domains.
1.3 Admin Email
The admin email receives notifications about:
- New users
- Comments
- Plugin updates
Why it matters: Using an active, checked email ensures you don’t miss critical alerts.
Tip: Avoid using a personal email that you rarely check.
1.4 Timezone, Date Format & Language
- Set the correct timezone so posts publish on time
- Choose a professional date format
- Select your preferred language for the dashboard and users
Pro Tip: Check the timezone before scheduling posts to avoid mistakes.
2. Writing Settings
Your writing settings determine how you create and publish content. They help you maintain consistency and improve productivity.
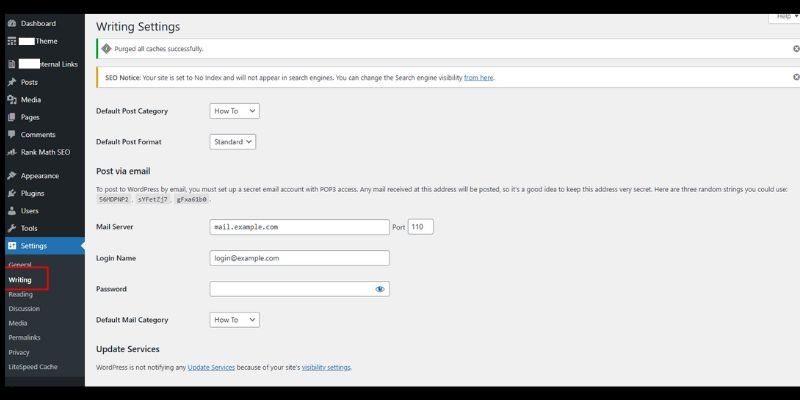
2.1 Default Post Category & Format
wordpress assigns a default category to posts if you forget to select one.
- Default category example: “Uncategorized” → change to your niche like “Recipes” or “SEO Tips.”
- Default post format: Standard, Video, Gallery, etc.
Why it matters: Ensures content is organized, improves SEO, and helps readers find relevant posts.
Where to set it: Settings → Writing
Tip: Always assign posts to the correct category before publishing.
2.2 Update Services
Update services notify search engines when you publish a new post.
- Example service: https://rpc.pingomatic.com/
Why it matters: Helps new posts get indexed faster, increasing traffic potential.
Tip: Only add reputable services to avoid spam notifications.
3. Reading Settings
Reading settings determine how visitors see your website and interact with content.
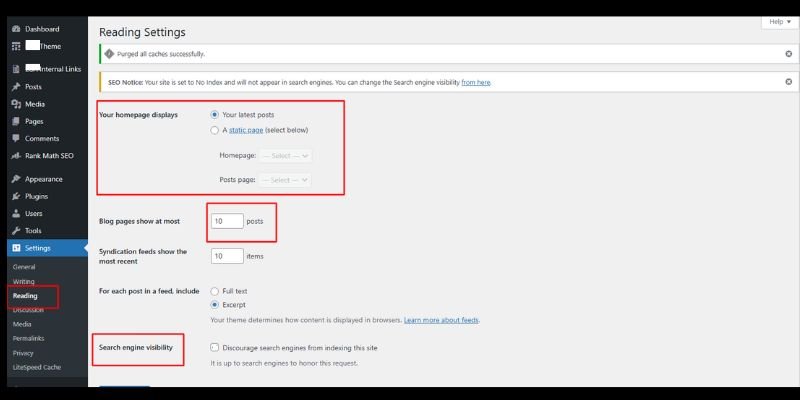
3.1 Homepage Display
- Select between showing the latest posts or displaying a static page.
- Recommended: Static page for business or portfolio sites.
Example: A photography website can use a static homepage showcasing featured images.
Why it matters: Controls first impressions and improves usability.
Where to set it: Settings → Reading
Tip: Update homepage settings when redesigning or changing site focus.
3.2 Blog Feed & RSS Settings
Your blog feed (RSS) determines how your content is shared and displayed across different platforms, including feed readers and other websites. Setting it up properly helps with content distribution, SEO, and user experience.
Key Settings:
- Decide how many posts appear in your feed
- Choose whether to display the full text or only excerpts
Why it matters:
Displaying the full content in feeds may seem convenient, but it can hurt your on-site engagement. Readers might consume your content directly from feed readers without visiting your site. Excerpts, on the other hand, encourage clicks, increase page views, and reduce duplicate content risks — something search engines take seriously.
Example:
If you post long-form tutorials or guides, showing only excerpts helps attract readers to your actual website, where you can offer related articles, internal links, and monetized content.
Pro Tip:
Use plugins like WP RSS Aggregator or Feedzy RSS Feeds for better feed control, tracking, and customization. You can even integrate your feed with platforms like Mailchimp or ConvertKit to automate newsletters every time a new post goes live.
3.3 Search Engine Visibility
This setting is small but extremely powerful and often misunderstood by beginners.
Inside your WordPress dashboard, under Settings → Reading, you’ll find the option:
“Discourage search engines from indexing this site.”
If checked, this tells Google and other search engines not to show your site in search results.
Why it matters:
When your site is live and ready for visitors, leaving this box checked can completely block your site from appearing on Google, even if you’ve done great SEO work.
In any case, if your site is still under development, staging, or undergoing redesign, keeping this box checked temporarily can prevent unfinished pages from being indexed.
Best Practice:
- Uncheck this option once your website is live.
- After launch, test your site’s visibility using Google Search Console.
- Submit your sitemap to Google to ensure proper indexing.
Tip:
If you’ve just launched your site and it’s not appearing on Google, this is one of the first settings to check.
4. Discussion Settings
The discussion settings in WordPress control how people interact with your content through comments. Managing these options properly helps you build a healthy community, maintain your brand’s tone, and protect your site from spam or harmful interactions.
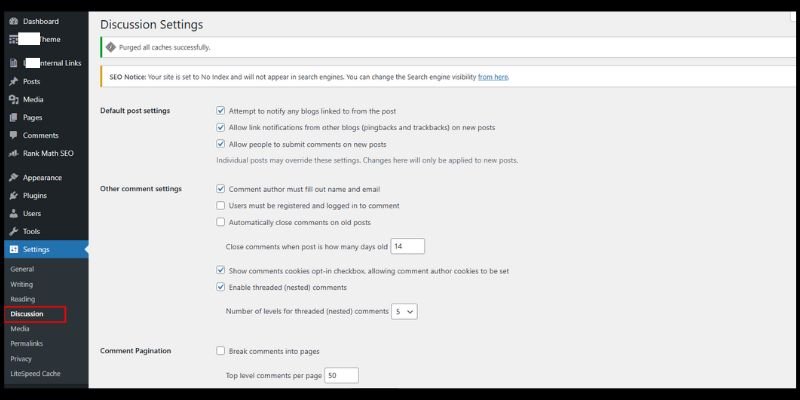
4.1 Default Article Settings
These settings determine how WordPress handles comments and link notifications (pingbacks/trackbacks) on new posts.
Options include:
- Allowing or disallowing comments on new posts
- Enabling or disabling link notifications from other blogs (pingbacks and trackbacks)
Why does it matter?
Comments are a great way to foster engagement and gather feedback, but unmanaged comment sections can attract spam or irrelevant links. If you’re running a business or portfolio site, disabling comments might keep things cleaner. For blogs or educational sites, thoughtful discussions can boost user trust and engagement, key factors for E-E-A-T.
Example: A food blogger might keep comments open to let readers share feedback or recipe tips, while an agency website might disable them to focus on service inquiries instead.
Pro Tip: Review your audience’s behaviour; if comments often go unanswered or off-topic, consider using a contact form or forum instead.
4.2 Comment Moderation & Spam Control
Unmoderated comments can harm your site’s credibility and SEO. That’s why setting up proper moderation and spam filters is essential.
How to manage effectively
- Enable manual approval for all comments
- Use Akismet Anti-Spam or Antispam Bee to automatically detect spammy content
- Define rules for moderation, such as holding comments with multiple links or flagged keywords
Why does it matter?
Spam comments often contain misleading links or irrelevant text that can damage your reputation and even affect rankings. Manually moderating ensures that only useful, relevant discussions appear on your site, a sign of professionalism and editorial oversight.
Example: If a comment includes three or more links, you can set it to hold for review. This prevents bots from filling your posts with harmful backlinks.
Pro Tip: Check your spam folder weekly; sometimes legitimate reader comments can get flagged. Responding promptly builds trust and authority with your audience.
4.3 Avatars & Threaded Comments
Avatars personalize your comment section, while threaded comments improve readability in longer discussions.
Best Practices
- Enable avatars to make discussions feel real and connected. It helps readers identify frequent contributors to your replies.
- Turn on threaded (nested) comments so readers can directly reply to others. This creates clear, meaningful discussions.
Tip: Limit nesting to 3–5 levels to prevent clutter and maintain an easy reading experience.
Why does it matter?
A well-structured and interactive comment section reflects real community engagement and content authenticity, both signals that reinforce your website’s Experience and Trustworthiness in Google’s eyes.
Example: On a tech blog, threaded replies help developers discuss solutions under a specific question rather than spreading the conversation across multiple comments.
5. Media Settings
Images and media are essential for user experience and SEO. Optimizing them improves speed and management.
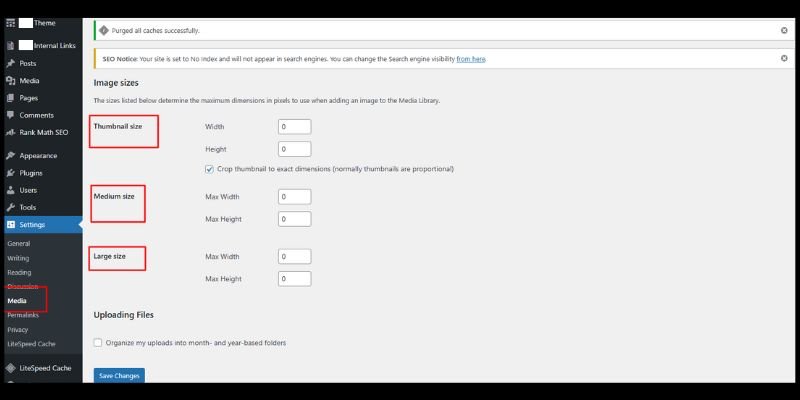
5.1 Image Sizes
WordPress automatically creates thumbnail, medium, and large sizes.
Example: A 2000px wide photo is too large for a blog post; use medium size (600–800px).
Why it matters: Prevents slow pages and saves storage.
Tip: Resize images before uploading.
5.2 Organize Uploads
- WordPress stores uploads by month/year.
- Use descriptive filenames for SEO.
Example: seo-tips-wordpress.jpg instead of IMG1234.jpg.
Why it matters: Easier to find files and improves search optimization.
5.3 Image Optimization
Large image files slow down your site and can hurt search rankings.
Use plugins like Smush, ShortPixel, or Imagify to compress images without losing quality.
Step-by-step:
- Install the plugin (e.g., Smush).
- Bulk compress all existing images.
- Enable automatic compression for future uploads.
Pro Tip: Always check your image quality after compression. Too much compression can make images look blurry.
Extra Benefit: Optimized images reduce server load and make your site faster on mobile devices
6. Permalink Settings
Permalinks define how your URLs look; they’re the permanent web addresses for your pages and posts. A clean and meaningful permalink structure helps both search engines understand your content and users trust your website.
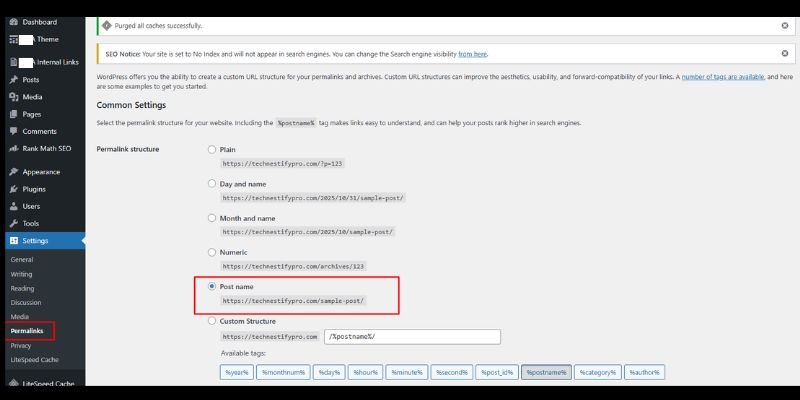
Recommended Structure: Post Name
The Post Name option (https://yourwebsite.com/sample-post/) is ideal for most blogs and business sites. It’s short, descriptive, and SEO-friendly.
Where to set it: Settings → Permalinks
Why does it work?
- URLs containing your main keyword give search engines a clear signal about the topic.
- Users can quickly identify what the page is about before even clicking.
Example
Instead of: https://yourwebsite.com/?p=123
Use: https://yourwebsite.com/seo-tips-for-beginners
Pro Tip: Avoid unnecessary words or dates in URLs. Keep them short and focused, for example, use /wordpress-settings-guide instead of /how-to-configure-wordpress-settings-step-by-step-123%
Changing Permalinks Safely
If your site is already live and indexed, avoid changing your permalink structure unless absolutely necessary. Doing so can lead to broken links and loss of traffic.
If you must change them:
- Set up 301 redirects from the old URLs to the new ones.
- Update internal links using plugins like Better Search Replace.
- Re-submit your sitemap in Google Search Console to speed up reindexing.
Why does it matter?
Incorrectly changed permalinks can harm your SEO and confuse visitors. Managing them properly shows you understand site structure and care about user experience, both essential for EEAT.
Adding Keywords to URLs
Including your primary keyword naturally in the URL helps with SEO and readability.
Example
If your blog is about WordPress tutorials, use:
https://yourwebsite.com/wordpress-installation-guide
instead of
https://yourwebsite.com/post-21
Tip: Use hyphens (-) instead of underscores (_). Google treats them as word separators.
7. Privacy Settings
Privacy settings are not just a formality; they show your audience that you take data protection seriously. Whether you’re collecting emails, comments, or analytics data, visitors deserve to know how their information is being used.
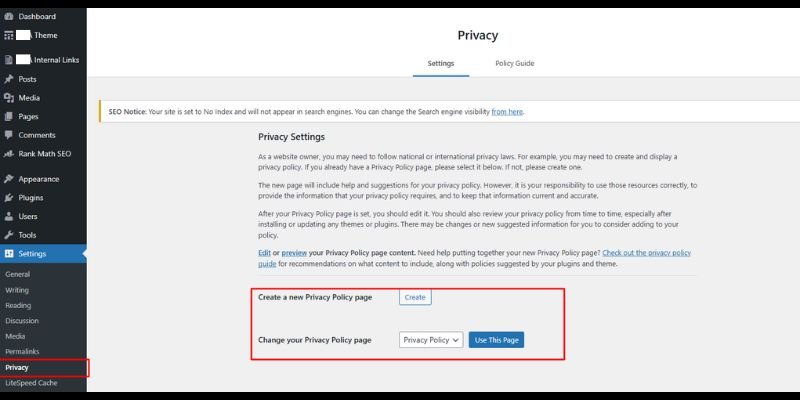
7.1 Create a Privacy Policy Page
WordPress includes a built-in privacy policy generator (Settings → Privacy). This creates a base template with placeholders you can edit to match your own site’s data practices.
Why does it matter?
A clear privacy policy builds trust with your readers and is a legal requirement under privacy laws like GDPR (Europe), CCPA (California), and PIPEDA (Canada).
What to include?
- What personal data do you collect (e.g., name, email, IP address)
- How and why you collect it (contact forms, comments, analytics, etc.)
- Who you share it with (e.g., third-party plugins or payment gateways)
- How long do you store data?
- How users can request data deletion or correction
Example
If you use Google Analytics, mention:
“We use Google Analytics to understand website traffic. It may collect cookies and usage data as outlined in Google’s privacy policy.”
Pro Tip: Don’t copy someone else’s privacy policy. It must reflect your actual website setup and data usage.
7.2 Customize the Template
After generating your page, personalize every section. Replace generic lines like “Insert your contact details here” with your real business or site info.
Add details such as
- Business name and contact email
- The plugin names that process data (e.g., Contact Form 7, Mailchimp, WooCommerce)
- Any third-party tools embedded on your site (YouTube, Google Maps, etc.)
Tip: If you have multiple forms or newsletters, list each one separately with a short note on what data it collects.
7.3 Keep Your Policy Updated
Privacy policies aren’t “set and forget.” Each time you install a plugin or change your data collection process, review and update the document.
Checklist for updates
- Added a new form → Mention it
- Changed analytics tools → Update your disclosure
- Started using an email newsletter → Add how you handle subscriptions
Why does it matter?
Regular updates show accountability and transparency, which builds user trust and helps with Google’s Trustworthiness criteria.
Pro Tip
Add the privacy policy link to your website footer and forms. This improves visibility and signals professionalism.
8. Post-Installation Tasks
After setting up core WordPress configurations, there are a few important tasks to perform. These help your site look professional, be user-friendly, and stay organized.
8.1 Delete Default Content
When you install WordPress, it comes with sample posts, pages, and comments like:
- “Hello World” post
- Sample page
- Sample comment
Why it matters: Removing these avoids confusion and gives your site a clean start.
Step-by-step
- Go to Posts → All Posts → Delete “Hello World”
- Go to Pages → All Pages → Delete sample page
- Go to Comments → All Comments → Delete default comment
Tip: Empty the trash folder afterwards to free up space.
8.2 Update User Profile & Gravatar
Your WordPress profile shows your author bio, social links, and profile picture.
- Gravatar: Displays your image next to posts and comments, making interactions more personal.
Step-by-step
- Go to Users → Your Profile
- Add your full name, bio, and social links
- Upload a profile picture via Gravatar (link it to your email)
Pro Tip: Use a professional photo to build trust with readers.
8.3 Upload Favicon / Site Icon
A favicon is the small icon shown in browser tabs and bookmarks. It improves branding and site recognition.
Step-by-step
- Prepare an image 512×512 px
- Go to Appearance → Customize → Site Identity → Site Icon
- Upload and save
Extra Benefit: Favicons make your site easily recognizable when visitors have multiple tabs open.
8.4 Create Essential Pages
Certain pages are important for trust, navigation, and compliance:
- About Page: Introduces your site and goals
- Contact Page: Allows users to reach you
- Privacy Policy & Terms: Legal compliance
- Example: Add internal links from blog posts to the About page to improve navigation
Tip: Structure pages clearly with headings and links for both users and SEO.
8.5 Setup Navigation Menus
Navigation menus help visitors find important pages quickly.
Step-by-step
- Go to Appearance → Menus
- Create a menu called “Main Menu”
- Add your essential pages and categories
- Assign it to your primary menu location
Pro Tip: Keep menu items limited (5–7 max) to avoid clutter.
Extra Benefit: Well-organized menus improve user experience and SEO ranking.
8.6 Install Essential Plugins
- SEO plugin: Yoast, Rank Math
- Security plugin: Wordfence, iThemes Security
- Caching plugin: WP Rocket, W3 Total Cache
- Backup plugin: UpdraftPlus
Why it matters: Enhances functionality, security, and performance
8.7 Setup Backups & Updates
- Regularly backup files and the database
- Enable automatic updates for WordPress core, themes, and plugins
Tip: Schedule daily database backups and weekly full backups
8.8 Configure Anti-Spam Measures
- Plugins: Akismet or Antispam Bee
- Set moderation rules
Why it matters: Keeps the site clean and professional
9. Security & Performance
Security is one of the most overlooked areas for beginners. A hacked or slow website can destroy all your hard work overnight. Setting up proper security and performance tools right after installation protects your data, improves user trust, and boosts SEO rankings.
9.1 Change Default Admin Username
When you first install WordPress, the default username is often “admin.” Hackers know this and use brute-force attacks to guess your password.
What to do
- Create a new user with Administrator privileges (Users → Add New).
- Use a unique username.
- Log in as the new user and delete the old “admin” account.
Example: Instead of “admin,” use something like david_admin89 or mical_wp.
Why does it matter?
It instantly lowers your site’s hacking risk by removing the most common target.
Tip
Never share your admin credentials with others. Instead, assign roles when needed, like Editor or Author.
9.2 Strong Password & Two-Factor Authentication
Weak passwords are one of the top causes of hacked sites. It is important to use a strong password that includes uppercase, lowercase, numbers, and symbols.
Tools to generate strong passwords:
- Bitwarden
- 1Password
- LastPass
Enable Two-Factor Authentication (2FA)
Use plugins like Wordfence, iThemes Security, or Google Authenticator to add an extra layer of protection.
Example: Even if someone steals your password, they can’t log in without your phone’s 2FA code.
Why does it matter?
2FA blocks 90% of brute-force attacks and adds major trust signals for Google.
9.3 SSL Certificate
With SSL, data is encrypted between your website and visitors, turning “http://” into “https://”.
How to set it up
- Most hosting providers (like Bluehost or SiteGround) offer free SSL via Let’s Encrypt.
- After activation, use the plugin Really Simple SSL to redirect all pages to HTTPS.
Why it matters
- Protects user data
- Builds user trust (Google Chrome shows “Not Secure” without it)
- Improves Google rankings; SSL is an official ranking factor
Pro Tip
If you run an e-commerce store, SSL is non-negotiable; it protects payment info.
9.4 Security Plugins
WordPress alone doesn’t have built-in firewalls or malware scanners.
Recommended plugins
- Wordfence: Real-time firewall and malware scanner
- iThemes Security: Detects vulnerabilities and bans suspicious IPs
- Sucuri: Offers a DNS-level firewall for advanced protection
Step-by-step
- Install one security plugin.
- Set up daily malware scans.
- Enable login attempt limits (3–5 tries max).
Why does it matter?
Active protection keeps your website safe from bots, SQL injections, and brute-force attacks.
Tip
Never install multiple security plugins; they can conflict. Stick to one reliable solution.
9.5 Backup Plugin
Even with the best security, something can go wrong. Backups let you restore your website within minutes.
Top plugins
- UpdraftPlus: Free and beginner-friendly
- BackupBuddy: Paid but excellent for full-site cloning and migrations
Setup advice
- Schedule automatic weekly backups
- Store copies on Google Drive, Dropbox, or OneDrive (not on your server)
Example: If an update breaks your site, you can restore the last working version instantly.
Pro Tip
Test your backups once a month to ensure they’re working correctly.
9.6 Caching & Optimization
Fast-loading websites rank better on Google and keep users engaged.
What to do:
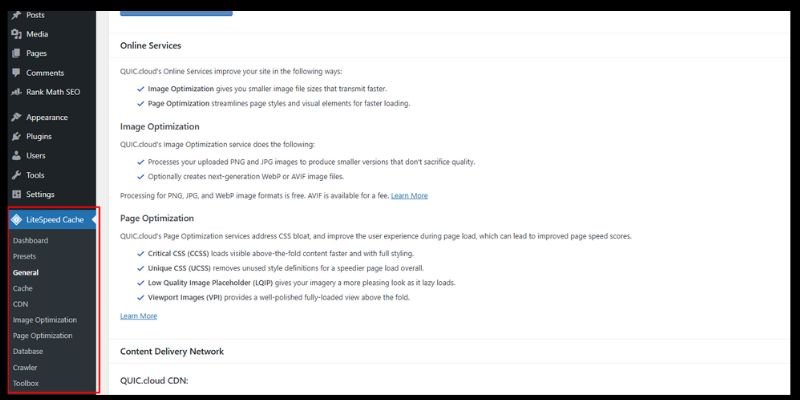
- Install a caching plugin like WP Rocket, LiteSpeed Cache, or W3 Total Cache.
- Enable browser caching, minify CSS/JS, and lazy load images.
- Use image optimization tools like Smush or ShortPixel to reduce image file sizes.
Example
A page that loads in 1.5 seconds converts twice as well as one that loads in 3 seconds.
Why it matters
Site speed directly affects bounce rate and SEO. A fast, secure site signals Google that your content is trustworthy and user-friendly.
Pro Tip
Test your website speed using Google PageSpeed Insights or GTmetrix and follow their recommendations.
10. Performance Optimization
A fast-loading website keeps visitors engaged and improves your search visibility. Here’s how to make your WordPress site perform at its best:
- Install a caching plugin like WP Rocket, LiteSpeed Cache, or W3 Total Cache to store static versions of pages and speed up delivery.
- Minify CSS, JS, and HTML to reduce file sizes without affecting how your site looks.
- Compress images before uploading; tools like TinyPNG or ShortPixel can maintain quality while cutting load time.
- Test your speed regularly using Google PageSpeed Insights or GTmetrix to identify what slows your site down.
- Monitor performance after every major update or plugin installation to ensure nothing impacts load speed.
Tip: Before testing new optimization tools, record your current site speed. That way, you can measure real improvement instead of guessing what worked. Small, consistent tweaks backed by data lead to long-term performance gains.
11. SEO Essentials
Strong SEO foundations help your site rank better, attract the right audience, and maintain consistent visibility on search engines. These two steps are where you begin building that foundation.
11.1 Setup SEO Plugin
An SEO plugin simplifies on-page optimization without needing to edit code manually. Some most popular SEO options include Yoast SEO, Rank Math, and All in One SEO.
Here’s what to configure:
- Meta Titles & Descriptions: Write unique, keyword-focused titles and descriptions for every page and post.
- XML Sitemap: Ensure your sitemap is enabled so search engines can easily crawl your pages.
- Breadcrumbs: Improve site structure and navigation for users and Google.
- Schema Markup: Add structured data (e.g., FAQ, product, article schema) for better visibility in search results.
Why it matters: An SEO plugin ensures your content is readable, structured, and optimized, helping both users and crawlers understand your site.
Pro Tip: Avoid keyword stuffing. Write for readers first, then refine for SEO.
11.2 Connect Google Analytics & Search Console
These two free tools are must-haves for every WordPress site.
- Google Analytics (GA4): Tracks how visitors interact with your site, pages viewed, time spent, and conversion paths.
- Google Search Console (GSC): Shows which keywords bring traffic, detects errors, and monitors indexing issues.
How to connect?
- Create accounts on both platforms.
- Verify your site in Search Console using the DNS or HTML tag method.
- Add the Analytics tracking code through your SEO plugin or Google Tag Manager.
Why it matters
Together, these tools give you data-driven insights that guide your SEO strategy, from content performance to technical health.
Tip: Check Search Console weekly to catch crawl errors, mobile usability issues, and new keyword opportunities early.
Conclusion
Friends, in this article, we’ve covered essential settings to configure right after installing WordPress in detail. From general settings to security and SEO, these steps will help your site run smoothly and safely. My personal recommendation is to take one setting at a time and ensure it’s properly configured before moving to the next. This prevents mistakes and makes your site stronger from day one.
If you found this guide helpful, don’t wait; start configuring your WordPress site today and see the difference it makes.
More Queries?
Here are some of the most frequently asked questions related to Essential Settings to Configure Right After Installing WordPress.
It’s not mandatory to do everything at once, but configuring key settings early ensures your site is secure, fast, and search engine-friendly. Start with general settings, security, and SEO basics. You can adjust other settings gradually as your site grows.
Yes, most WordPress settings can be changed at any time. However, some changes, like permalinks or site URLs, can break links if not done carefully. Always back up your site before making major adjustments.
Both are important, but security should come first. A hacked or slow site cannot rank well in search engines. Once your site is secure, you can focus on SEO to improve visibility.
Not all settings need plugins. WordPress has built-in options for general, reading, discussion, and permalinks. Use plugins only for advanced features like backups, caching, SEO, or spam protection.
Regularly review your settings, especially after adding new plugins or changing themes. Security, SEO, and backup settings should be checked at least monthly. This keeps your site optimized and safe.
Use built-in discussion settings to moderate comments. Plugins like Akismet can automatically detect spam. Always check your spam folder to ensure real comments aren’t blocked.
Select the time zone of your main audience or your own location. Pick a date format that looks professional and is easy to read. Correct settings ensure scheduled posts appear at the intended time.
Yes, caching improves page load speed, which is important for user experience and SEO. Plugins like WP Rocket or LiteSpeed Cache make this easy. Even small improvements can reduce bounce rates significantly.
WordPress Address is where your core WordPress files are stored. Site Address is the URL visitors type to reach your site. Usually, both are the same, but changing them incorrectly can break your site.
Install an SEO plugin like Yoast or Rank Math to track on-page SEO improvements. Connect Google Analytics and Search Console to monitor traffic and indexing. Regularly check these tools to see how your site is performing and adjust settings as needed.


- Be Respectful
- Stay Relevant
- Stay Positive
- True Feedback
- Encourage Discussion
- Avoid Spamming
- No Fake News
- Don't Copy-Paste
- No Personal Attacks
- Be Respectful
- Stay Relevant
- Stay Positive
- True Feedback
- Encourage Discussion
- Avoid Spamming
- No Fake News
- Don't Copy-Paste
- No Personal Attacks
