How to Install WordPress on Localhost XAMPP for Beginners
Published: 9 Nov 2025
If you’re new to WordPress, setting up a live website immediately can feel risky. What if something breaks? That’s where localhost setups come in. Using XAMPP, you can install WordPress on your own computer, test plugins, experiment with themes, and learn safely.
I remember when I first tried to install WordPress on my Windows laptop, I ran into a MySQL error and spent hours troubleshooting because the guides skipped small but crucial details. If you’ve ever felt the same, don’t worry. This guide will show you how to install WordPress on localhost (XAMPP) step by step, so you can safely test plugins, experiment with themes, and learn without risking a live website.
By the end of this guide, you’ll not only have a working local WordPress site but also understand why each step matters, avoid common mistakes, and be ready to take your first site live confidently.
What is XAMPP?
XAMPP is a free software package that lets you run a web server on your own computer. It includes:
- Apache – the part that shows your website in a browser.
- MySQL / MariaDB – where your website’s data (posts, pages, settings) is stored.
- PHP – the language WordPress uses to work.
- Perl – a programming language used by some applications.
In simple words, XAMPP gives your computer everything it needs to run WordPress locally without connecting to the internet. It’s like creating a mini web server on your own machine to practice, test, and learn safely.
Tip: Beginners often think they need a live server to test WordPress, but XAMPP lets you experiment on your computer first.
What is WordPress?
WordPress is a free platform that lets you create websites and blogs easily, even if you don’t know how to code. It’s the most popular content management system (CMS) in the world, powering millions of websites from personal blogs to big business sites.
With WordPress, you can:
- Add content easily – write posts, create pages, upload images.
- Use themes – change how your site looks without coding.
- Install plugins – add extra features like contact forms, SEO tools, and security.
In simple terms, WordPress is like a digital toolbox that gives you everything to build and manage a website on your own.
Tip: WordPress comes in two versions:
- WordPress.com – hosted online with some limitations.
- WordPress.org – self-hosted, more flexible, and what you’ll use with XAMPP.
You can also read the full article on WordPress.com vs WordPress.org to clear your confusion.
What You Need Before You Start
Before diving into installing WordPress on localhost using XAMPP, it’s helpful to have a few things ready. This will make the process smoother and save you from common beginner frustrations.
- A computer with Windows, macOS, or Linux – Your local WordPress site runs on your computer, so having a compatible system is essential.
- XAMPP software – This provides Apache, PHP, and MySQL, which are required to run WordPress locally. Download here
- WordPress zip file – You’ll need the latest version from wordpress.org to install your site. Download here
- Basic computer skills – Knowing how to extract files, navigate folders, and open a browser will make the process much easier.
- A dedicated folder for projects – Keeping all your local WordPress projects in one folder helps you stay organized and prevents confusion.
Tip: Preparing these items first can save time and make your first WordPress setup much less stressful.
Why Use XAMPP for WordPress?
Installing WordPress locally may seem complicated, but it’s the best way to practice and experiment. Here’s why XAMPP is perfect for beginners:
- Safe Environment: Test plugins, themes, or custom code without affecting a live site.
- Learning by Doing: Understand how WordPress works behind the scenes.
- Faster Testing: No internet required once installed, and changes are instant.
Personal note: When I first installed WordPress locally, I learned more about databases and themes in one afternoon than in a week of reading articles online.
Step-by-Step Installation Process: How to Install WordPress Using Xampp on Windows
Setting up WordPress locally might sound tricky, but if you follow these steps carefully, you’ll have a fully working site on your computer in no time. We’ll start with XAMPP and finish with WordPress installation, including database setup and initial configuration.
Step 1: Download and Install XAMPP
Before you can run WordPress locally, you need a web server environment on your computer. XAMPP provides everything you need: Apache, PHP, and MySQL, so WordPress can function smoothly. Installing XAMPP is the first crucial step to building your local WordPress site safely.
Here’s what to do:
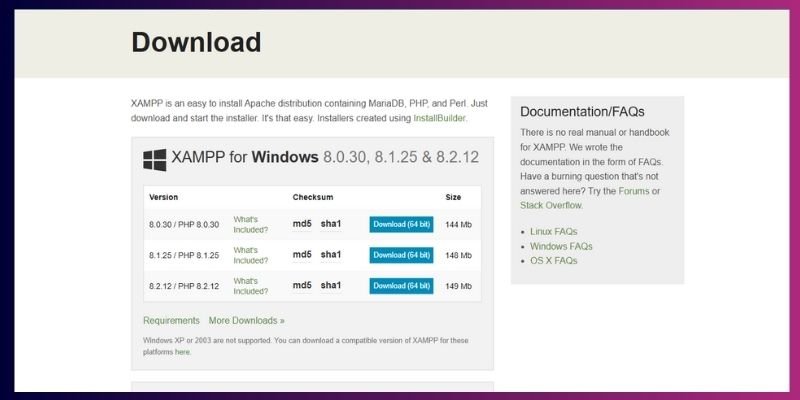
- Download the right XAMPP version
- Visit the official XAMPP website.
- Choose the version for your operating system: Windows, macOS, or Linux.
- Make sure to download the latest stable version to avoid compatibility issues with WordPress or PHP.
- Visit the official XAMPP website.
- Run the installer
- Open the downloaded file and follow the installation instructions.
- Keep default settings unless you have a reason to change them. Default settings include Apache, MySQL, PHP, and phpMyAdmin.
- Choose an installation folder that’s easy to access, e.g., C:xampp on Windows or /Applications/XAMPP on macOS.
- Open the downloaded file and follow the installation instructions.
- Launch the XAMPP Control Panel
- After installation, open the Control Panel. This is where you can start or stop services like Apache (web server) and MySQL (database).
- You’ll use this panel every time you want to work on your local WordPress site.
- After installation, open the Control Panel. This is where you can start or stop services like Apache (web server) and MySQL (database).
- Why this step matters
- XAMPP gives your computer everything WordPress needs to run locally. Without it, WordPress won’t work, and you won’t be able to test themes, plugins, or changes safely.
- Installing XAMPP first also allows you to troubleshoot issues early, like port conflicts or missing components, before setting up WordPress.
- XAMPP gives your computer everything WordPress needs to run locally. Without it, WordPress won’t work, and you won’t be able to test themes, plugins, or changes safely.
- Extra tips to avoid problems
- If Apache doesn’t start, check if port 80 or 443 is already in use (common with Skype or IIS). You can change the port in XAMPP settings.
- Run XAMPP as an administrator on Windows to avoid permission issues.
- Regularly update XAMPP to ensure compatibility with the latest WordPress and PHP versions.
- If Apache doesn’t start, check if port 80 or 443 is already in use (common with Skype or IIS). You can change the port in XAMPP settings.
Pro tip: Keep your XAMPP folder organized. If you plan to create multiple local WordPress sites, create subfolders like C:xampphtdocssite1 and C:xampphtdocssite2. This helps you avoid confusion and manage multiple projects easily.
Step 2: Start Apache and MySQL
Once XAMPP is installed, the next step is to start the services that make WordPress work. Apache runs your website, and MySQL stores all your site’s data. Starting these correctly is very important for a smooth local WordPress setup.
Here’s how to do it:
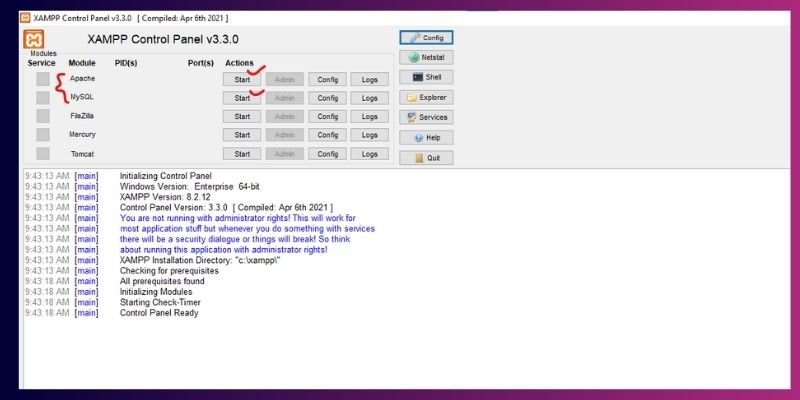
- Open the XAMPP Control Panel
- You’ll see a list of modules like Apache, MySQL, FileZilla, and Mercury.
- Focus on Apache and MySQL, as these are required for WordPress.
- Start the services
- Click Start next to Apache. Wait a few seconds for it to turn green.
- Click Start next to MySQL. It should also turn green.
- Confirm they’re running
- Green indicators mean the services are active.
- You can also check by opening your browser and visiting http://localhost/. You should see the XAMPP welcome page.
- Why this matters
- Apache is the web server that delivers your WordPress pages.
- MySQL stores all your posts and pages, settings, and user accounts. Without them, WordPress cannot function.
- Extra tips and troubleshooting
- If Apache doesn’t start, it may conflict with another app (like Skype or IIS). You can change the port in XAMPP settings (for example, 8080 instead of 80).
- If MySQL doesn’t start, check for other MySQL services running on your computer. Stop them or change the MySQL port (default is 3306).
- Always run XAMPP as administrator (Windows) to avoid permission errors.
- Don’t worry if you see warnings for FileZilla or Mercury; they aren’t needed for WordPress.
Pro tip: Make it a habit to start Apache and MySQL before working on any local WordPress site. This prevents errors when logging into your dashboard or testing themes and plugins.
Step 3: Create a Database for WordPress
Now that Apache and MySQL are running, the next step is to create a database, the place where WordPress will store everything about your site.

It is like the brain of your website; it holds all your posts, pages, settings, users, and plugin data. Without it, WordPress has nowhere to save your content.
Here’s how to set it up:
- Open phpMyAdmin:
- In your browser, go to http://localhost/phpmyadmin/.
- This is a built-in database management tool that comes with XAMPP.
- In your browser, go to http://localhost/phpmyadmin/.
- Create a new database:
- Click the Databases tab at the top.
- In the “Create database” field, enter a name, for example, your website name.
- Click Create.
- You’ll see your new database appear in the sidebar on the left.
- Click the Databases tab at the top.
- Why this step matters
- WordPress stores all your website data, from blog posts to settings, in a MySQL database.
- Creating it now ensures WordPress knows where to save everything when you install it.
- You can create multiple databases later if you plan to run more than one local site.
- WordPress stores all your website data, from blog posts to settings, in a MySQL database.
- Best practices
- Use simple, lowercase names with underscores (e.g., wp_test_site).
- Avoid spaces or special characters to prevent connection errors later.
- Don’t worry about adding tables or users yet. WordPress will handle that automatically during setup.
- Use simple, lowercase names with underscores (e.g., wp_test_site).
- Pro tip:
- If you ever forget your database name, you can always open phpMyAdmin later to check it. Keep the name short and memorable; it’ll save you time when connecting to WordPress.
- If you ever forget your database name, you can always open phpMyAdmin later to check it. Keep the name short and memorable; it’ll save you time when connecting to WordPress.
Remember: The database is where your entire site’s information lives. Treat it like your project’s foundation, solid, organized, and ready before you start building.
Step 4: Download and Extract WordPress
Once your database is created, it’s time to bring WordPress into your local environment. This is where you’ll set up the actual files that make your website work.
Here’s how to do it the right way:
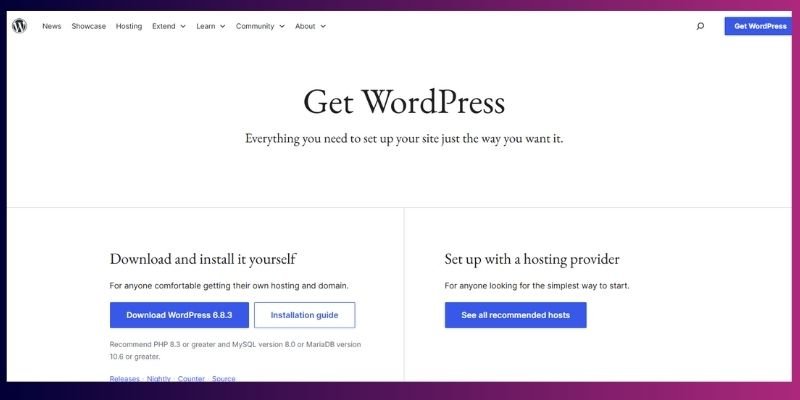
- Download WordPress
- Visit the official website: https://wordpress.org/download/
- Click the Download WordPress button to get the latest version in a .zip file.
- Always download from the official site to ensure you get a secure, malware-free copy.
- Visit the official website: https://wordpress.org/download/
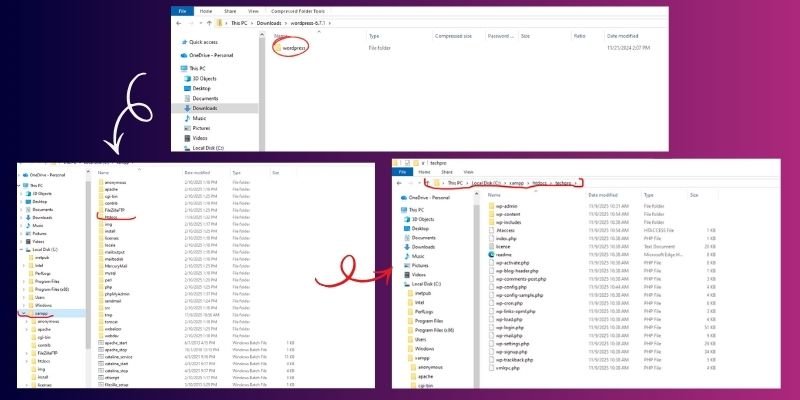
- Extract the Zip File
- Once the file downloads, extract (unzip) it.
- Inside, you’ll find a folder named WordPress, which contains all the files your site needs to run.
- Once the file downloads, extract (unzip) it.
- Move WordPress to XAMPP Folder
- Copy the extracted WordPress folder and place it inside XAMPP’s htdocs directory.
- Here’s where to find it:
- Windows: C:xampphtdocsyour-folder
- macOS: /Applications/XAMPP/htdocs/your-folder
- Windows: C:xampphtdocsyour-folder
- You can rename the folder to something simpler, like yourwebsitename or wordpress_local.
- Copy the extracted WordPress folder and place it inside XAMPP’s htdocs directory.
- Why this matters
- The htdocs folder acts as your local server’s root directory.
- Any project you place inside it becomes accessible via your browser using the address http://localhost/foldername.
- Renaming the folder to something short and clear makes it easier to manage if you plan to run multiple local projects.
- The htdocs folder acts as your local server’s root directory.
- Pro Tips:
- Avoid using spaces or capital letters in the folder name (e.g., my_site instead of My Site).
- Keep a separate backup of your original WordPress zip; you’ll thank yourself if something goes wrong later.
- If you plan to test multiple versions, label them clearly (e.g., wp6_test, wp_theme1, etc.).
- Avoid using spaces or capital letters in the folder name (e.g., my_site instead of My Site).
This is like moving your WordPress engine into your garage. It’s now parked, safe, and ready for you to use.
Step 5: Run the WordPress Installation Wizard
Once WordPress is placed inside your XAMPP folder, it’s time to set everything up using the installation wizard. This process connects WordPress to the database you just created and prepares your local site for use.
Follow these simple steps carefully:
- Open Your Local WordPress Site
- In your browser, type: http://localhost/mywebsite (replace mywebsite with your actual folder name).
- If everything is set up correctly, you’ll see the WordPress setup screen.
- In your browser, type: http://localhost/mywebsite (replace mywebsite with your actual folder name).
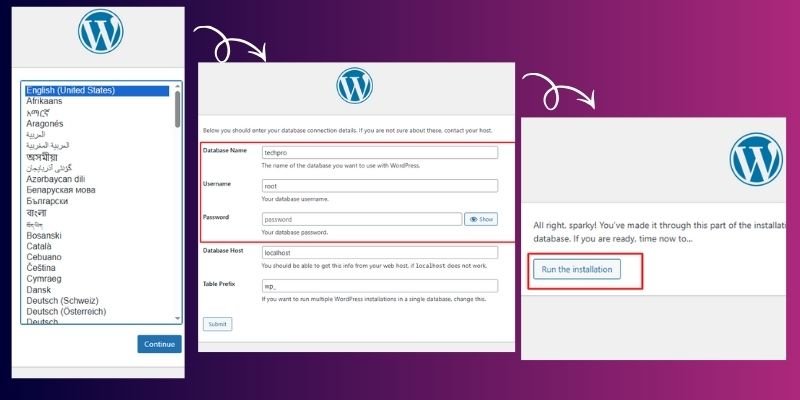
- Choose a Language
- Select your preferred language and click Continue.
- This decides the default language of your WordPress dashboard. You can always change it later.
- Select your preferred language and click Continue.
- Enter Database Details
- Fill out the following fields:
- Database Name: wordpress_local (or whatever name you created earlier)
- Username: root
- Password: (leave blank)
- Database Host: localhost
- Database Name: wordpress_local (or whatever name you created earlier)
- Click Submit → then Run the installation.
- Fill out the following fields:
Why this matters: This step links WordPress with your local MySQL database. Without this connection, WordPress can’t store your posts, pages, or settings.
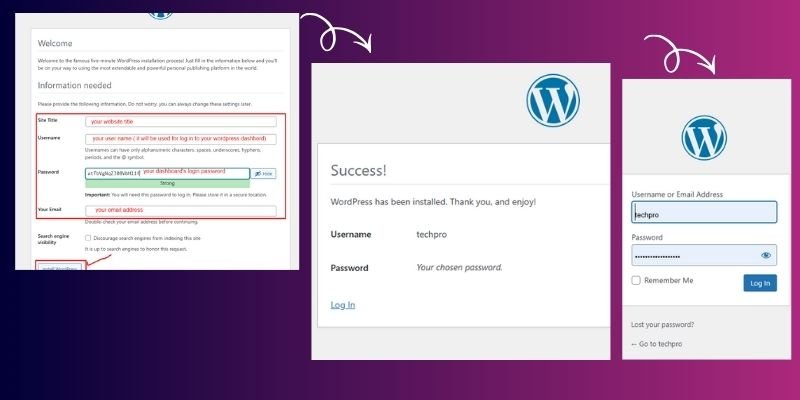
- Set Up Your WordPress Site Details
- You will need to enter your Site Title, Admin Username, Password, and Email Address.
- You can uncheck “Allow search engines to index this site” since it’s local and doesn’t need to appear on Google.
- Click Install WordPress.
- You will need to enter your Site Title, Admin Username, Password, and Email Address.
- You’re All Set! 🎉
- Once the installation completes, you’ll see a success message.
- Log in to your dashboard by going to http://localhost/mywebsite/wp-admin using the credentials you just created.
- Once the installation completes, you’ll see a success message.
Tip from experience: Save your admin username and password somewhere safe. Many beginners reinstall WordPress just because they forget their login details.
Why This Step Matters
This setup wizard is what turns your WordPress files and database into a working website. It’s like “starting the engine”; all the parts were installed earlier, but now you’re switching it on for the first time.
📝 Note for Beginners
Many people get confused between Database Details and WordPress Site Details, but they’re completely different things.
- Database Details (like database name, username, and host) belong to XAMPP; this is how WordPress connects to your local MySQL database.
- WordPress Site Details (like site title, admin username, and password) belong to WordPress itself; these are the login credentials you’ll use to access your site’s dashboard.
Consider it this way:
- The database stores your website’s data behind the scenes.
- The WordPress site details let you log in to manage that data.
Keeping this difference clear will save you a lot of confusion later.
Step 6: Log In and Configure Your Site
Congratulations! You’ve installed WordPress successfully!
Now it’s time to access your dashboard and make a few basic settings to prepare your local site for real-world use.
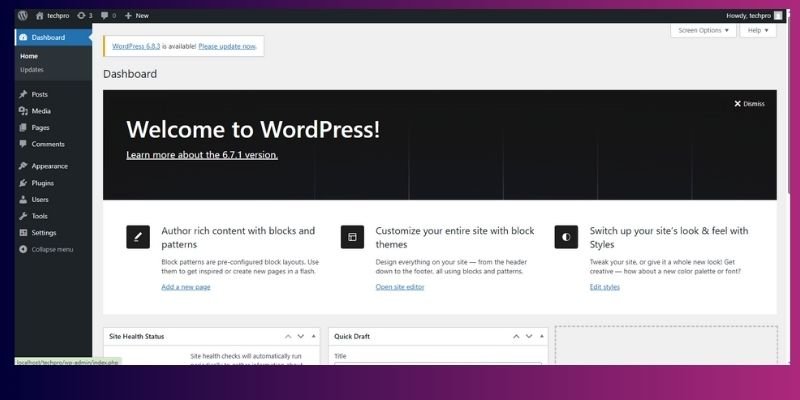
Here’s how to get started:
- Open Your Dashboard
- In your browser, go to http://localhost/mywebsite/wp-admin.
- Log in using the admin username and password you created earlier.
- This is your wordpress control room where you’ll manage everything from posts to plugins.
- In your browser, go to http://localhost/mywebsite/wp-admin.
- Set Up Permalinks
- Go to Settings → Permalinks.
- Select “Post name” and click Save Changes.
- Why this matters: It creates clean, SEO-friendly URLs like localhost/mywebsite/about-us instead of confusing ones like ?p=123. Even though your site is local, it’s good practice for your future live setup.
- Go to Settings → Permalinks.
- Install a Theme
- Head to Appearance → Themes → Add New.
- Choose a theme that matches your style or project goals, for example, Astra or GeneratePress (both are lightweight and beginner-friendly).
- Click Install, then Activate.
- Why this matters: Themes control your site’s design and layout. Installing one locally lets you safely test customization options.
- Head to Appearance → Themes → Add New.
- Add Essential Plugins
- Go to Plugins → Add New and install a few helpful tools
- Wordfence – adds basic security
- UpdraftPlus – helps with backups
- Rank Math SEO or Yoast SEO – helps optimize your content
- Wordfence – adds basic security
- Why this matters: Testing plugins locally ensures they won’t break your live site later.
- Go to Plugins → Add New and install a few helpful tools
- Tip from Experience
Even though you’re working locally, it’s smart to follow good habits now, use proper permalinks, secure your login, and stay organized. When you move your site online, these same settings will already be in place, saving you hours of rework.
Note: If your dashboard looks overwhelming at first, don’t worry. Every WordPress pro once started here, so explore slowly, click through menus, and you’ll quickly get comfortable managing your site.
Step 7: Common Mistakes to Avoid
Even on a local setup, small mistakes can cause big headaches. Keep an eye out for these common errors to save time and frustration.
- Forgetting to start Apache or MySQL.
- Using incorrect database credentials.
- Extracting WordPress to the wrong folder.
- Skipping version checks.
- Not backing up before testing plugins or themes.
Step 8:Troubleshooting Common Issues
Sometimes WordPress doesn’t work correctly on your computer.
Here are some easy ways to fix common problems quickly.
| Problem | Solution |
| Apache won’t start | Check for port conflicts; change Apache port |
| MySQL won’t start | Stop conflicting apps; restart XAMPP |
| Database connection error | Check the database name, username, password, and host |
| The browser shows a blank page | Ensure WordPress is extracted to the correct folder |
Real-life example: I once installed XAMPP on Windows 11 and forgot to start MySQL. WordPress showed a connection error. Starting MySQL solved it immediately.
Step 9: Tips for Beginners
Working with WordPress locally is easier when you follow a few smart practices. These tips will help you stay organised and troubleshoot problems faster.
- Keep XAMPP and WordPress updated.
- Enable debug mode to spot errors easily.
- Manage multiple local sites in separate folders.
- Test themes and plugins safely before going live.
Next Steps
Now that your local site is ready, you can:
- Create your first blog post or page.
- Test themes and plugins without worry.
- Learn to move from localhost to a live server.
- Start experimenting with SEO and content creation.
What will you create first on your localhost site, a blog, a portfolio, or a store? Share your ideas in the comments.
Installing WordPress Locally with XAMPP on Mac
Setting up WordPress on your Mac lets you test themes, plugins, and site changes safely before going live. Using XAMPP, a free local server, makes this easy and beginner-friendly.
Step 1: Download and Install XAMPP for Mac
- Go to the official XAMPP website and download the macOS version.
- Open the .dmg file and drag XAMPP to your Applications folder.
- Launch XAMPP from Applications > XAMPP.
Tip: Always install XAMPP in the default location to avoid permission issues.
Step 2: Start Apache and MySQL
- Open the XAMPP control panel.
- Click Start next to Apache and MySQL.
- Both should turn green, indicating they’re running.
Tip: If Apache doesn’t start, check for conflicting apps like Skype or change the default port (usually 80).
Step 3: Create a Database for WordPress
- Open your browser and go to http://localhost/phpmyadmin.
- Click Databases at the top.
- Enter a name for your new database (e.g., wordpress_mac) and click Create.
- Note the database name, username (root by default), and password (blank by default) for later use.
Step 4: Download WordPress
- Go to WordPress.org and download the latest version.
- Extract the downloaded .zip file.
- Move the extracted folder to /Applications/XAMPP/xamppfiles/htdocs.
- Rename the folder to something relevant, like mywebsite.
Step 5: Configure WordPress
- Open your browser and navigate to http://localhost/your-folder-name.
- Choose your language and click Continue.
- Enter your database details:
- Database Name: your database name
- Username: root
- Password: leave blank
- Database Host: localhost
- Table Prefix: wp_ (default)
- Database Name: your database name
- Click Submit, then Run the installation.
Step 6: Complete WordPress Setup
- Fill in your site title, admin username, password, and email.
- Click Install WordPress.
- After success, log in to your dashboard with the credentials you just created.
Extra Value Section
To make your local WordPress setup even more effective, here are some additional resources and tips to help you learn faster and avoid common issues.
- Troubleshooting FAQ
Even with a step-by-step guide, errors can happen. Here are solutions to frequent issues:
- Apache or MySQL won’t start: Check if ports 80 or 443 are blocked. Stop conflicting programs like Skype or change the port in XAMPP settings.
- Error establishing database connection: Double-check the database name, username, and password in wp-config.php.
- Blank page after installation: Enable debug mode by adding define(‘WP_DEBUG’, true); in wp-config.php to see errors.
- Cannot access localhost: Make sure XAMPP is running as administrator, and firewall settings allow connections.
- Video Tutorial
Sometimes watching the steps in action makes things easier. Look for a short, beginner-friendly WordPress on XAMPP walkthrough on platforms like YouTube to see each step in real time. Video tutorials make setup and troubleshooting simpler and faster.
- Advanced Tips
Once you’re comfortable, these advanced tips can improve your workflow:
- Improve XAMPP performance: Limit memory usage, disable unnecessary modules, or tweak PHP settings in php.ini.
- Local multisite setup: If you want to manage multiple local sites under one installation, enable WordPress Multisite. It’s a great way to test multiple projects without creating separate installations.
- Backup regularly: Use plugins or manual export to avoid losing progress.
Conclusion
By following this guide, you’ve learned how to install WordPress on localhost XAMPP and set up your own testing environment right on your computer. You now have a safe space to practice, try different themes, test plugins, and learn how WordPress works without any risk.
Take some time to explore your dashboard, create sample posts, and play with different settings. The more you experiment, the more confident you’ll become. Once you feel comfortable, you can move on to advanced setups like multisite or start preparing your site for live hosting.
You’ve done the hardest part, getting started. Keep building, keep learning, and soon you’ll be managing WordPress projects like a pro.
Frequently Asked Questions (FAQs)
Here are some common questions beginners often ask while setting up WordPress on localhost XAMPP. These answers will help you solve small issues and feel more confident as you learn.
Localhost means your own computer works as a server. XAMPP creates this local space where you can install and use WordPress safely without going online.
Apache isn’t running, or the port is already in use. Start Apache from the XAMPP control panel or change its port to 8080. Then try opening http://localhost:8080.
This happens when another app, like Skype or Teams, is using the same port. Close those apps or change Apache’s port number in settings, then restart XAMPP.
Put your WordPress folder inside xampp/htdocs. Example: C:xampphtdocsmywebsite. Then open http://localhost/mywebsite in your browser.
Apache isn’t processing PHP files correctly. Make sure Apache is running and WordPress files are in the htdocs folder. Restart XAMPP to fix it.
Open the wp-config.php file and check your database name, username, and password. Make sure MySQL is running and reload your page.
Do I need the internet to use WordPress on localhost?
No, you can work offline after installing XAMPP and WordPress. The Internet is only needed to download files or plugins.
Start Apache and MySQL in XAMPP, then visit http://localhost/your-folder-name in your browser. Your local site will load instantly.
Yes. Use plugins like All-in-One WP Migration or Duplicator to export your local site and import it to your hosting account.
Yes, your local WordPress site is private and only stored on your computer. Just remember to back up your files to avoid losing progress.
Yes, tools like LocalWP and MAMP simplify setup. They automatically handle server configuration and are beginner-friendly alternatives to XAMPP.


- Be Respectful
- Stay Relevant
- Stay Positive
- True Feedback
- Encourage Discussion
- Avoid Spamming
- No Fake News
- Don't Copy-Paste
- No Personal Attacks
- Be Respectful
- Stay Relevant
- Stay Positive
- True Feedback
- Encourage Discussion
- Avoid Spamming
- No Fake News
- Don't Copy-Paste
- No Personal Attacks
