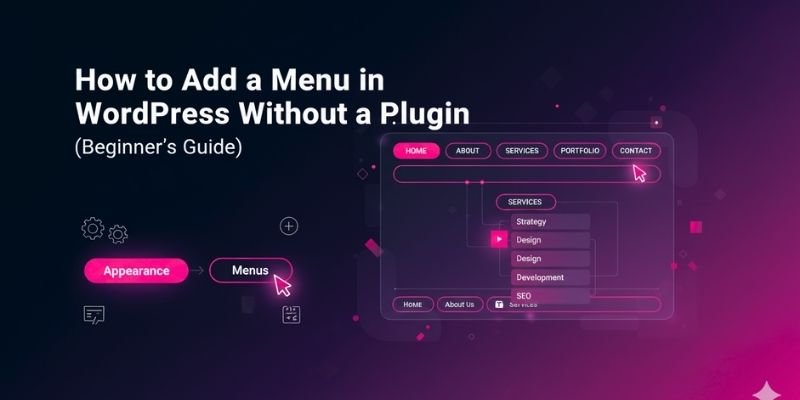
How to Add a Menu in WordPress Without a Plugin (Beginner’s Guide)
Published: 19 Nov 2025
Ever opened your WordPress dashboard and wondered, “Where do I even start to add a menu?” You’re not alone. Many beginners get lost trying to figure out navigation structures. Imagine visiting a website and not finding the link to its blog or contact page. Annoying, right? That’s why a menu is essential.
Nearly 70% of website visitors leave sites that are hard to navigate. If your WordPress site doesn’t have a proper menu, you could be losing traffic.
This guide will show you how to add a menu in WordPress without a plugin, step by step, so your visitors can easily find what they’re looking for and navigate your site smoothly.
What Is a WordPress Menu?
A WordPress menu is a navigation tool that helps visitors move around your website easily. It usually appears at the top of your site (header), but it can also be in the footer or sidebar. Menus can include:
- Pages (like About, Contact)
- Blog categories
- Custom links (like social media profiles)
Menus make your website organized and easy to use. Without a clear menu, visitors might get lost and leave your site quickly.
What Does a WordPress Menu Do and Why Should You Know This?
A WordPress menu helps visitors move through your site. It includes links to pages like Home, About, Blog, or Contact.
Why menus matter?
Imagine you walk into a store and there is no signboard. You won’t know where to go, right?
A website works the same way. A clean menu guides people so they do not feel lost.
Why beginners should use the built-in menu
The default WordPress menu is simple, safe, and easy. You don’t need coding or plugins.
Why it matters
A clear menu helps visitors stay longer on your site. A good structure also helps Google understand your site better.
Where Can You Find the Menu Settings in WordPress?
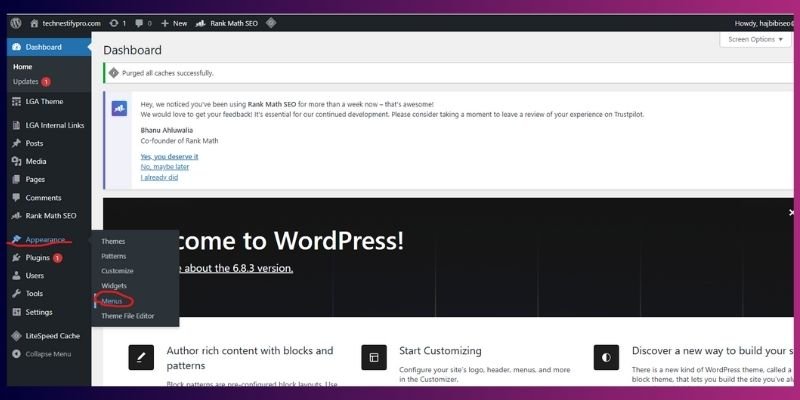
You can find all WordPress menu settings in one place. Go to Dashboard → Appearance → Menus to create, edit, or manage menus. Here, we are discussing the WordPress menu settings. But you can also read about all the essential WordPress settings to configure correctly.
Check Your Theme Menu Locations:
Some WordPress themes provide only one menu location, while others give 2–5. Common locations include:
- Header Menu
- Footer Menu
- Sidebar Menu
- Mobile Menu
Tip: Always assign your menu to a location after creating it, so it appears on your site.
Why it matters
If your theme supports multiple menus, you can place different menus in different areas for a better experience.
How Do You Create a New Menu in WordPress Without Any Plugin?
You can create a new menu in WordPress without a plugin by going to Appearance → Menus, adding your pages & posts, categories, or custom links, arranging them, and assigning the menu to your theme location.
Steps to Create Your First Menu
You can create a new menu in WordPress without a plugin by following these steps:
- Go to Appearance → Menus
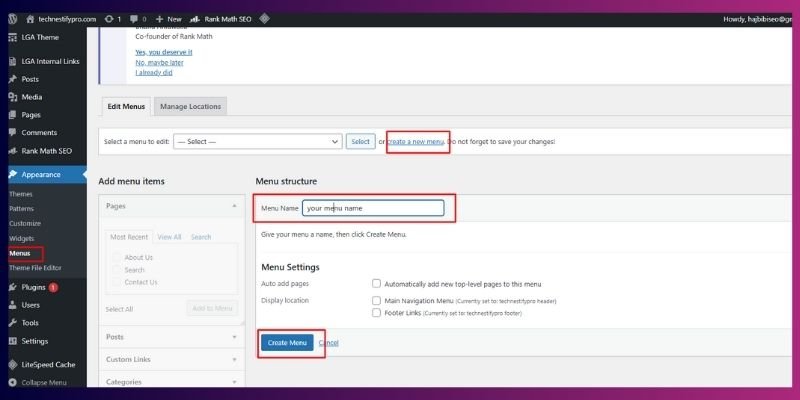
- Click Create a new menu
- Enter a name like Main Menu
- Select pages, posts, categories, or custom links
- Click Add to Menu
- Drag and drop items to arrange them
- Click Save Menu
Tip: Always give your menu a clear, descriptive name. It helps you stay organized if you create multiple menus.
Real-life example
If your site is about WordPress, you can add:
- Home
- WordPress Tutorials
- Plugins Guide
- Themes Guide
- Contact
Why it matters
A clear and simple menu helps visitors navigate your site easily, reducing bounce rates.
How to Assign This Menu to Your Theme
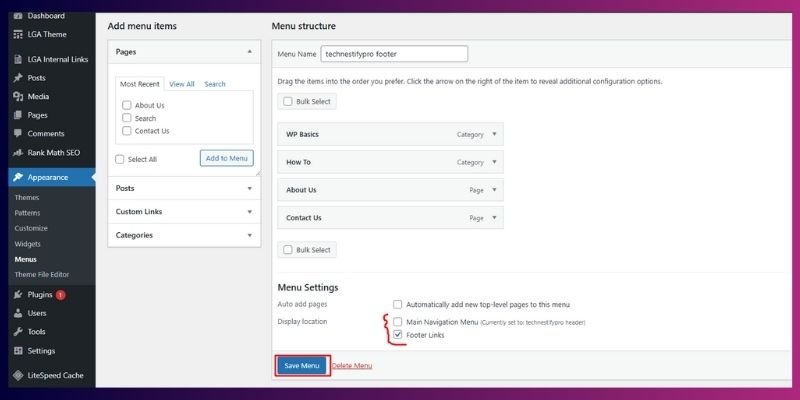
You can assign your menu to your theme so it appears on your site by following these steps:
- Scroll down to Menu Settings in the Menus page.
- Tick the box for Primary Menu (or your theme’s main menu location).
- Click the Save Menu.
If Your Menu Doesn’t Appear
- You may not have assigned the right location
- Your theme may use a different menu spot
- The browser or site cache may hide new changes
Why it matters
Assigning the menu tells WordPress where to display it. Without this, your menu won’t appear for visitors.
Pro Tip for Beginners
- Always preview your menu on desktop and mobile. Some themes show different menu styles for mobile.
- Keep your menu simple; avoid adding too many items at first.
How Can You Add Pages, Links, and Categories to Your Menu?
You can add pages, custom links, and categories to your WordPress menu by going to Appearance → Menus, selecting the items you want, clicking Add to Menu, and then saving the menu. In the sections below, we’ll look at each type in detail with simple step-by-step instructions.
How Do You Add Pages to Your WordPress Menu?
You can add pages to your WordPress menu by selecting them in the Menus settings and saving them.
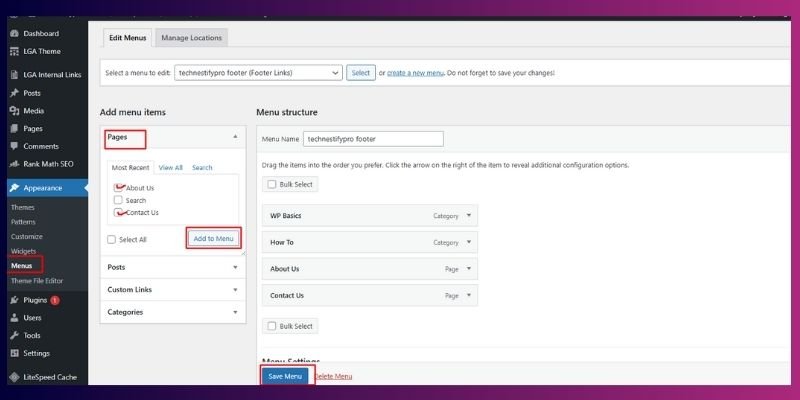
Steps:
- Go to Appearance → Menus.
- Check the box for each page you want to add.
- Click Add to Menu.
- Rearrange the items if needed by dragging them.
- Click the Save Menu.
Example:
If your site is about an agency, you might add Home, Services, Courses or Training, Portfolio, Blog, About us, Contact and so on..
Why it matters:
Adding pages to your menu makes it easy for visitors to navigate your site and quickly find important content.
How Do You Add Custom Links (External or Social Links) to Your Menu?
You can add custom links to your WordPress menu using the Custom Links option, which allows you to link to external pages, social media, or specific sections of your site.
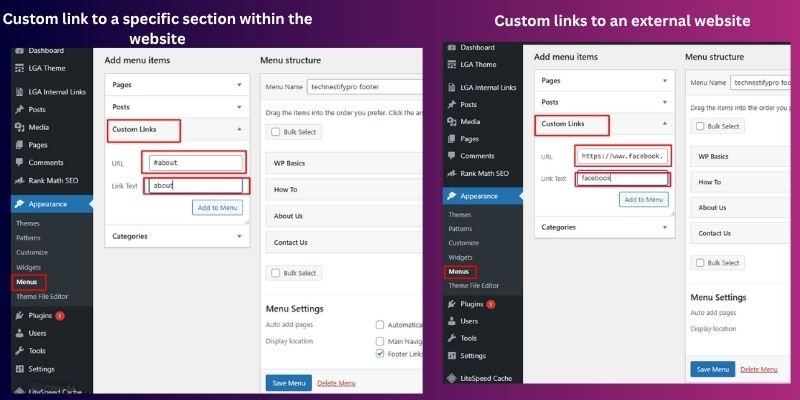
Use this when you want to add:
- Social media links (YouTube, Instagram, Facebook)
- Pages outside your website
- Specific sections on a page (e.g., #about, #services)
Steps:
- Go to Appearance → Menus.
- Click Custom Links from the left panel.
- Paste the URL in the URL field.
- For a page outside your site: full URL (e.g., https://example.com).
- For a section on the same page: #section-id (e.g., #about).
- For a page outside your site: full URL (e.g., https://example.com).
- Type the Link Text (the name visitors will see).
- Click Add to Menu.
- Click the Save Menu.
Tips:
- It is always a good idea to test the link to ensure that it works.
- Use section links for single-page websites to let visitors jump quickly to the relevant content.
Why it matters:
Custom links let you connect visitors to social media, external resources, or specific page sections, keeping your menu organized while improving navigation and user experience.
How Do You Add Categories to Your WordPress Menu?
You can add categories to your WordPress menu by selecting them in the Menus page and clicking Add to Menu, then saving the menu.
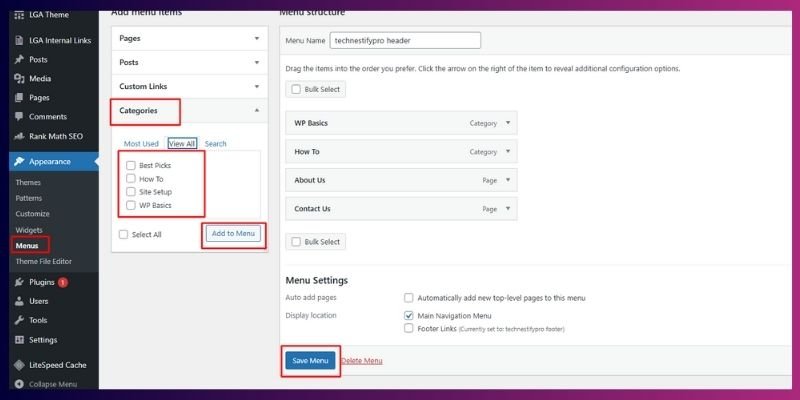
You can add categories to your WordPress menu to organize your blog and help visitors quickly find the content they want.
Why it’s useful:
This is especially helpful for blogs with multiple topics. Visitors can navigate directly to categories like WordPress Basics, SEO Tips, or Blog Writing.
Steps:
- Go to Appearance → Menus.
- Click Categories from the left panel.
- Select the category you want to add.
- Click Add to Menu.
- Click the Save Menu.
Extra Tip:
You can add non-clickable parent titles (like “Resources”) by using a Custom Link with # as the URL.
Why it matters:
Adding categories improves your site navigation, helps users find content easily, and signals to Google a clear content structure, boosting your SEO.
How Do You Add Non-Clickable Menu Titles in WordPress?
You can create a non-clickable menu title in WordPress by using a Custom Link with # as the URL and adding the menu text.
Use this when:
- You want a parent title for dropdown menus.
- You don’t want every menu item to link to a page.
- You want a section header like “Resources” or “Topics.”
Steps:
- Go to Appearance → Menus → Custom Links.
- Enter # in the URL field.
- Add the menu text (e.g., “Resources”).
- Click Add to Menu.
- Click the Save Menu.
Why it matters:
Non-clickable titles let you organize your menu visually without forcing a page link. This makes navigation cleaner, easier to understand, and more user-friendly.
Tip: Use clear, short titles for non-clickable menu items to make your navigation easy to understand.
How to Create a Dropdown Menu Without Any Plugin
You can create a dropdown menu in WordPress by dragging a menu item under another item to make it a sub-item.
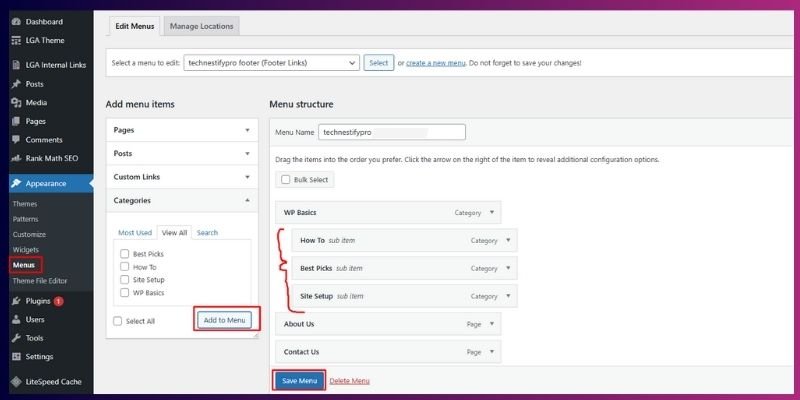
Steps:
- Go to Appearance → Menus.
- Drag the item you want to appear in the dropdown under the parent item.
- Move it slightly to the right until it indents; this makes it a sub-item.
- Click the Save Menu.
Example:
- Parent: Tutorials
Sub-item: WordPress Basics
Sub-item: SEO Guides
Tip: Keep dropdowns short (3–5 items) to make them easy for visitors to navigate.
Why it matters:
Dropdown menus make your site cleaner, organized, and easier for visitors to explore, improving user experience and navigation clarity.
What Should You Do If Your WordPress Menu Is Not Showing?
If your WordPress menu isn’t appearing, it’s usually because it’s not assigned to a location, your theme doesn’t support it, or caching is preventing updates.

Common Reasons:
- The menu is not assigned to a location.
- The theme does not support menus.
- The browser or site cache is not cleared.
- Page builder overrides the header.
How to Fix It:
- Reassign the menu to the correct location in Appearance → Menus → Menu Settings.
- Try switching temporarily to a default theme (like Twenty Twenty-Four) to check compatibility.
- Clear your browser and WordPress cache.
- If using a page builder, ensure it is not overriding the header/menu area.
Tip: After making changes, always refresh in an incognito window to verify the menu appears correctly.
Why it matters:
A missing menu frustrates visitors and makes navigation confusing, reducing engagement and hurting your site’s user experience.
How Do You Edit or Remove Items from Your WordPress Menu?
You can edit or remove menu items in wordpress by opening the menu settings, updating labels, rearranging items, or deleting them.
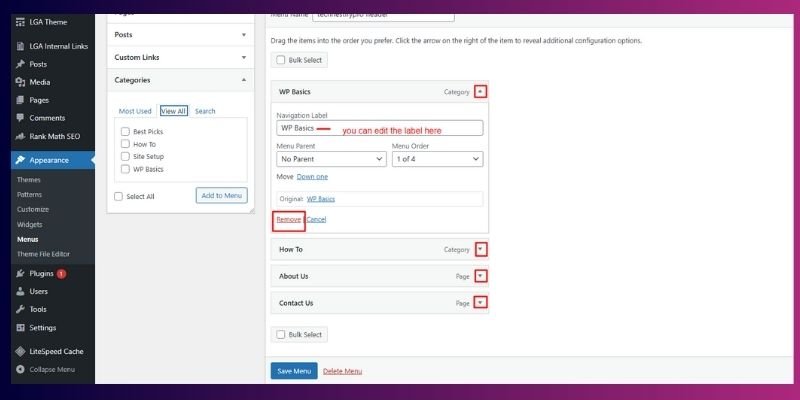
Steps:
- Go to Appearance → Menus.
- Click the small arrow next to the menu item you want to change.
- Edit the Navigation Label if you want to rename it.
- Drag the item up or down to change the order.
- Click Remove if you want to delete it from the menu.
- Click the Save Menu to keep the changes.
Tip: Use short labels. For example, “Tutorials” is easier to read than “WordPress Tutorials and Guides.”
Why it matters:
Your website grows over time, and your menu should grow with it. Updating menu items keeps navigation clear, helping visitors find content faster and improving their overall experience.
How to Style Your Menu Using Only Theme Options (No Plugins)
You can style your menu through the WordPress Customizer, where you can adjust colours, spacing, fonts, and other design elements without installing any plugin.
Steps:
- Go to Appearance → Customize.
- Open Menus or Header (this depends on your theme).
- Look for styling options such as:
- Text color
- Background color
- Font size
- Padding/spacing
- Menu alignment
- Text color
- Apply changes and click Publish.
Simple CSS Example (Optional):
If your theme allows custom CSS, you can use a small snippet like this:
.main-navigation a {
  color: #333;
}
.main-navigation a:hover {
  color: #0073aa;
}
This is optional and helps when your theme doesn’t give built-in styling controls.
Tip: Choose colours with good contrast. This helps visitors read your menu clearly on both desktop and mobile.
Why it matters:
A well-styled menu makes your site easier to navigate and gives your brand a clean, professional look. Good design also helps users stay longer on your site because everything feels organized and easy to follow.
How to Test Your Menu on Mobile
You can test your menu on mobile by checking it on your phone and using your browser’s mobile preview to make sure everything opens and fits properly.
How to Test:
- Use your actual phone
Open your website on your mobile device and try tapping each menu item. - Use the browser’s mobile view
- Right-click → Inspect
- Click the mobile icon
- Select a device (iPhone, Android, etc.)
- Refresh the page
- Right-click → Inspect
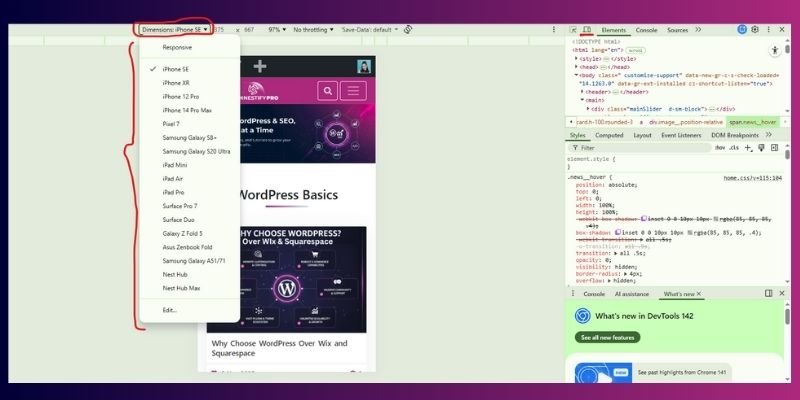
What to Check:
- The menu icon (hamburger) opens smoothly
- Dropdown items are easy to tap
- Labels are not too long
- No items overlap or disappear
- The menu doesn’t cover the entire screen unless intended
- The close (×) button works
Tip: If a dropdown item is hard to tap, increase spacing or shorten the label text.
Why it matters:
Most visitors browse from mobile. If your menu is hard to tap or doesn’t open correctly, people leave quickly. A smooth mobile menu improves user experience and keeps visitors engaged.
How to Make Your Menu Accessible
You can make your WordPress menu accessible by using clear labels, testing keyboard navigation, and ensuring dropdowns are easy to understand.
Tips to Improve Accessibility:
- Use clear names
Labels like “Home,” “Blog,” “Services,” and “Contact” help everyone understand where they’re going. - Avoid vague text
Text like “Click Here” or “More” confuses both users and screen readers. - Test with the Tab key
Press Tab on your keyboard and make sure you can move through each menu item without using a mouse. - Make dropdowns clear
Ensure sub-items are visible, spaced properly, and easy to navigate. - Use proper contrast
Text should be readable on all backgrounds, especially on mobile.
Tip: If someone with limited vision can read your menu without zooming, your accessibility level is already better than many sites.
Why it matters:
An accessible menu helps all users, including those with disabilities, navigate your site without confusion. It also aligns with Google’s EEAT and accessibility best practices, which strengthens trust and improves the overall experience on your site.
Do You Need a Plugin for Simple Menus?
No, you don’t need any plugin to create a normal WordPress menu.
You can easily build the following with the default WordPress menu system:
- Normal navigation menus
- Dropdown menus
- Custom links
- Category menus
- Basic styling options through the Customizer
When plugins are helpful:
You only need a plugin if you want:
- Mega menus with columns
- Menus with icons
- Advanced designs or complex layouts
- Special animation effects
Tip:
If your menu goals are simple, keep it native. WordPress already handles 90% of menu needs without extra tools.
Why it matters:
Using fewer plugins keeps your site faster, safer, and easier to manage. Most beginners install menu plugins without realizing WordPress already gives them everything they need for a clean and functional navigation system.
Advanced Tips (Optional)
These steps are for users who feel comfortable editing theme files.
How to Register a New Menu in functions.php
If you want an extra menu location (like a second footer menu), you can register it manually.
function my_custom_menu() {
    register_nav_menu('footer-menu', 'Footer Menu');
}
add_action('init', 'my_custom_menu');
This code tells WordPress:
“There is a new menu location called Footer Menu. Make it available in the dashboard.”
Tip: Always use a child theme before editing functions.php so your changes don’t disappear during theme updates.
Why it matters:
Custom menu locations give you more control over your website layout. This is helpful when your theme doesn’t offer enough menu spots by default.
How to Maintain Your Menu Over Time
Your menu is not “set and forget.” It needs small updates as your site grows.
Do this every few months:
- Remove dead or outdated links
- Add new pages, posts, or categories
- Reorder items to keep things simple
- Test how the menu looks on mobile
- Check that dropdowns still open smoothly
Real-life example:
If you publish a new category like Beginner SEO, make sure it appears in your menu. This helps new readers find content without searching through long lists of posts.
Why it matters:
A clean and updated menu improves both user experience and SEO. Search engines understand your site better, and visitors stay longer because everything is easy to find.
Conclusion
So guys, in this article, we’ve covered how to add a Menu in WordPress without a Plugin in detail. Creating a menu in WordPress without using a plugin is a simple skill, even if you’re just starting. You now know how to build it, style it, test it, and keep it updated as your site grows.
Try setting up your menu and adjusting it whenever your content changes. It keeps your site easy to use and helps visitors reach the right pages without confusion.
I personally recommend testing these steps on your own site right away; it’s the fastest way to see what works. If you’re unsure about anything, drop a comment and I’ll help you out.
FAQs
Yes, you can. WordPress already has a built-in menu system that handles everything you need for a simple menu. You don’t have to install anything extra.
Drag one menu item under another and move it slightly to the right. This creates a child item. WordPress will automatically turn it into a dropdown.
Most of the time, the menu isn’t assigned to a location like “Primary Menu.” Open the menu settings and select the correct spot. Once assigned, the menu will appear.
Yes, you can change colours, spacing, font size, and background using your theme’s Customizer. If you want minor tweaks, simple CSS works too. No plugin is needed.
Yes, they do. A clear menu helps Google understand your site structure and improves user experience. It also makes it easier for visitors to find your best pages.
Open your website on your phone or use your browser’s mobile view. Check if dropdowns open easily and if the icons work. Make sure the text doesn’t break the layout.
Yes, you can add any blog category from the “Categories” tab in the menu editor. This helps readers browse posts by topic. It’s a good idea for growing blogs.
This usually happens because of your theme’s animation delay. Try switching to a faster animation in the settings. If it still feels slow, the theme may need optimization.
Use simple, clear labels and avoid vague words. Test with the Tab key to see if keyboard navigation works. Good accessibility builds trust and supports Google’s EEAT signals.
Check it every few months. Remove outdated links, add new pages, and review the mobile view. A well-maintained menu keeps your site easy to explore.


- Be Respectful
- Stay Relevant
- Stay Positive
- True Feedback
- Encourage Discussion
- Avoid Spamming
- No Fake News
- Don't Copy-Paste
- No Personal Attacks
- Be Respectful
- Stay Relevant
- Stay Positive
- True Feedback
- Encourage Discussion
- Avoid Spamming
- No Fake News
- Don't Copy-Paste
- No Personal Attacks
