How to Migrate a WordPress Website
Published: 8 Dec 2025
Moving a website can feel stressful, especially when you’re worried about breaking something or losing your hard work. Many beginners get stuck the moment they hear words like “database,” “backup,” or “migration,” and that’s completely normal.
If you’re searching for how to migrate a WordPress website, you’re probably trying to switch hosting, change your domain, or move from a slow server to a better one, but you don’t want downtime or errors.
The good news? You don’t need to be a developer to do this safely. This guide will walk you through the process in a clear, step-by-step way so you understand what’s happening and why. By the end, you’ll feel confident about moving your site without breaking anything or losing data.
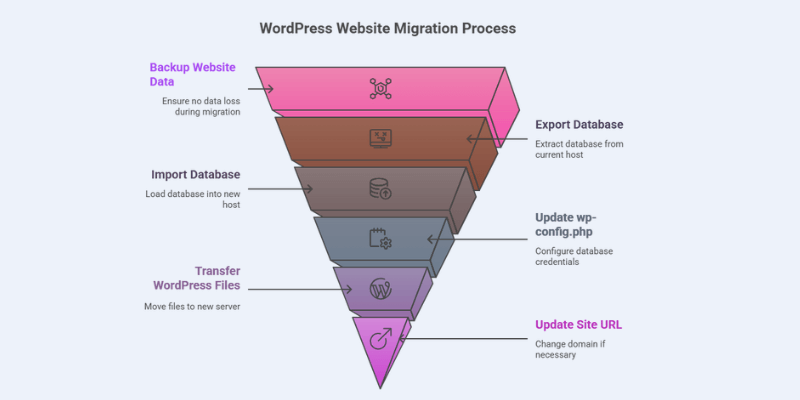
What Should You Do Before Migrating Your WordPress Website?
Always back up your website, verify hosting requirements, and gather login credentials before you begin. Follow these steps to avoid surprises:
Steps:
- Backup Your Site: Save your WordPress files and database. Use a plugin like UpdraftPlus or your hosting backup tool.
- Check Hosting Compatibility: Ensure the new host supports your WordPress version and the required PHP version.
- Collect Credentials: Have your old and new hosting logins ready.
- Optional Staging Site: Test migration safely on a staging site first.
- Lower DNS TTL: Reduces downtime when switching hosts.
Having a checklist ensures nothing is missed and reduces migration errors.
If you want to know about WordPress in detail, you can read our full blog on what is WordPress?
How to do a WordPress Website migration: easy methods
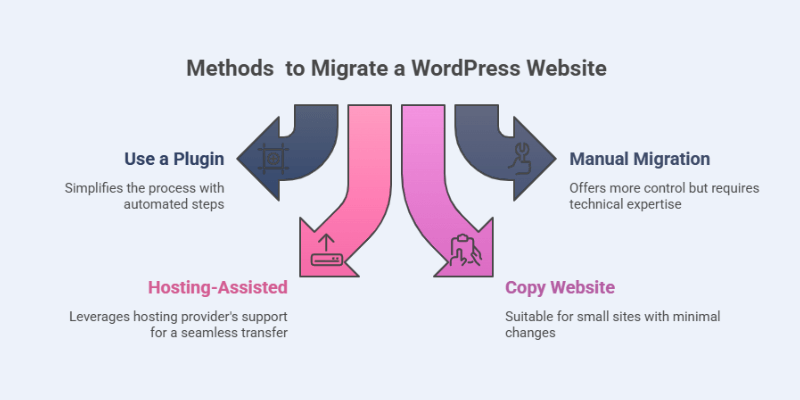
You can migrate a WordPress site using plugins, manual steps, hosting support, or by copying files. The right method depends on your site size and your comfort with technical steps.
Most WordPress users feel stressed about migration because they’re scared of breaking their site.
Now I’ll walk you through the easiest and safest approaches so even beginners can move their site without issues.
1. How to Migrate a WordPress Site Using a Plugin
Install a migration plugin → export your old site → import it on your new site → test your pages.
This is the most beginner-friendly method. You don’t need coding, database access, or technical knowledge.
Before choosing a migration tool, make sure you understand what a WordPress plugin is and how it affects your site.
Popular Plugins That Beginners Love
- Duplicator – Great for full-site copies, handles complex data well
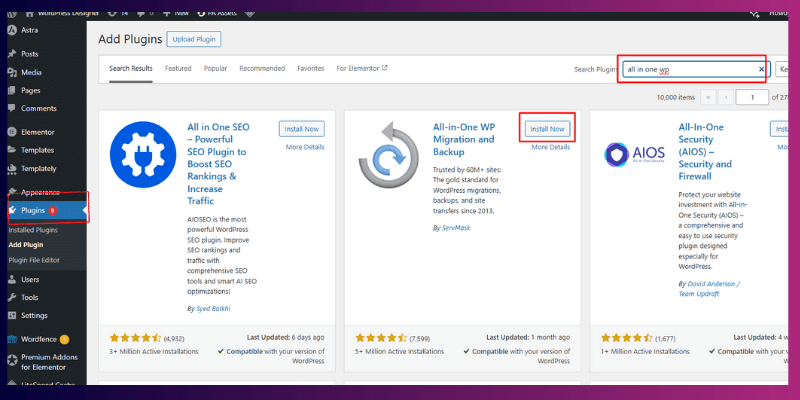
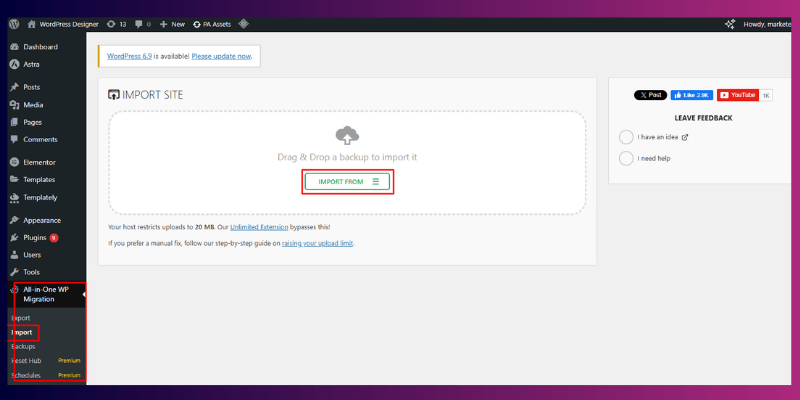
- All-in-One WP Migration – Very simple interface
- UpdraftPlus – Mainly for backups, but also supports migration
Step-by-Step Process
- Install the plugin on your old WordPress site
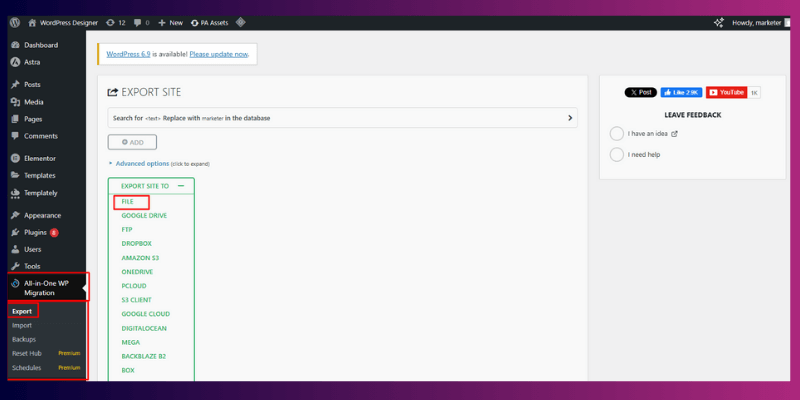
- Create an export package
- Install wordpress on your new host
- Install the same plugin on the new site
- Import the exported file
- Check pages, images, and links
Tips for Beginners:
- Large sites may require the premium version.
- Always test in a staging environment first.
- Keep backups ready before importing.
Plugin Comparison
| Plugin / Service | Effective Free Size Limit | Serialized Data Handling | Notes on WooCommerce / Large Sites Support | Free or Paid / Limitations |
| All-in-One WP Migration | 512 MB free | Yes | Basic support; may fail on larger sites | Free, with paid “Unlimited Extension” for bigger imports |
| Duplicator (Lite) | Depends on host limits | Yes | Better for medium–large sites, can avoid timeouts | Free, but Pro offers cloud storage, multisite support, and easier large-site migration |
| UpdraftPlus | Full backups allowed (files + DB) | Yes | Suitable for small/medium sites; may require manual post-import adjustment | Free for backup; full migration features are often in a paid add-on |
Example: It’s like downloading a zip file of your entire site and uploading it to your new host. No technical steps involved.
Pros or Advantages of Migrating a WordPress Site Using a Plugin
This process ensures that all elements of your website, including pages, images, and links, are properly transferred to the new host. It minimizes the risk of broken links or missing content during the migration. It simplifies the transition, making it accessible even for users with limited technical expertise.
- Very easy
- Quick
- Perfect for small and medium sites
Cons or Disadvantages of Migrating a WordPress Site Using a Plugin
However, this method may not be suitable for larger or more complex websites, as it can sometimes encounter issues with very large files or custom configurations. Some plugins may not fully support certain hosting environments, requiring manual adjustments to complete the migration successfully.
- Large sites may hit upload limits
- Some plugins require paid add-ons for bigger sites
Pro Tip: Before exporting, delete unused themes and plugins to reduce file size. Before using a migration plugin, make sure your theme is compatible. I’ve already published a guide explaining what a WordPress theme is and how it works.
TL;DR: Plugins give the simplest migration path. Perfect for beginners.
2. How to Migrate a WordPress Website Manually
Download your files → export your database → upload both to the new host → edit wp-config → update URLs.
Manual migration gives you full control and is ideal for large or custom websites.
Manual Migration Steps
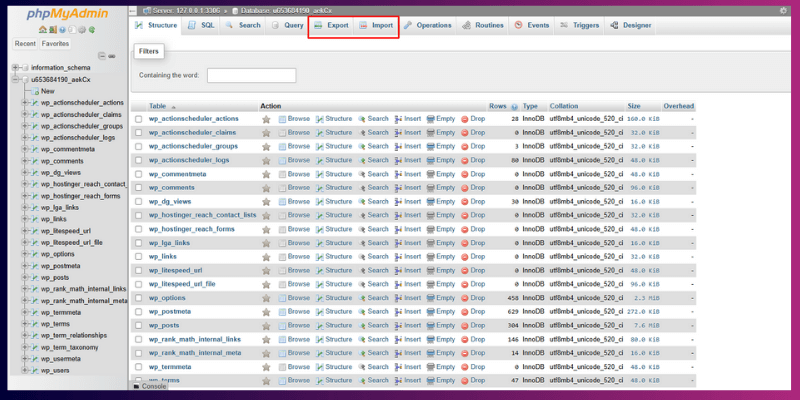
1. Export the Database
Go to phpMyAdmin → select your database → click “Export.”
2. Download WordPress Files
Use FTP or File Manager to download everything inside your website folder.
3. Upload Files to the New Host
Upload them to the new hosting server using FTP or File Manager.
4. Import the Database
Use phpMyAdmin on your new host → click “Import.”
5. Update wp-config.php
Change:
- DB name
- DB user
- DB password
- Host
6. Update URLs
Using WP-CLI:
wp search-replace ‘oldsite.com’ ‘newsite.com’ –all-tables
Example: This is like packing your house yourself, moving every box, and setting everything up exactly how you want.
Pros or Advantages of Migrating a WordPress Website Manually
It is ideal for large sites or complex setups. It allows you to monitor each step, ensuring data integrity and avoiding potential issues. Manual migration provides the flexibility to customize configurations and troubleshoot problems during the process, making it a preferred method for experienced users.
- Full control
- No size limits
- Works for any website
Cons or Disadvantages of Migrating a WordPress Website Manually
Manual migration requires a solid understanding of WordPress and server management. It can be time-consuming and risky for beginners, as even small errors may lead to downtime or data loss. Proper planning and backup are essential to ensure a smooth transition.
- Technical
- Mistakes can break the site
Pro Tip: Always keep a backup before touching your database.
TL;DR: Use manual migration if your site is large or if plugins can’t handle it.
3. How to Migrate a Website Using Hosting-Assisted Migration
Many hosting providers will migrate your WordPress website for free or for a small fee.
If you don’t want to deal with files, databases, or tools, this is the safest choice.
How Host-Assisted Migration Works
- They copy your files
- They import your database
- They check your plugins
- They ensure your site looks correct
What You Still Need to Do
- Update your DNS
- Test pages, menus, and forms
- Clear your cache and CDN
Hosts Known for Smooth Migration
- Hostinger – very beginner-friendly, offers guided migration tools and clear tutorials
- WP Engine – premium managed hosting with expert-level migration
- Kinsta – performance-focused hosting with automatic migrations
- SiteGround – great support team and solid migration tools
- Bluehost – good for beginners with simple migration options
WordPress Hosting Migration Comparison Table
| Hosting Provider | Migration Type | Beginner-Friendly Score | Migration Speed | WooCommerce Handling | Support Quality | Best For |
| Hostinger | Guided migration tool + manual support | ⭐⭐⭐⭐⭐ | Fast for small/medium sites | Good, supports orders & large media | ⭐⭐⭐⭐⭐ | Beginners moving from shared hosting |
| WP Engine | Expert-done migration | ⭐⭐⭐⭐ | Very fast | Excellent, optimized for big stores | ⭐⭐⭐⭐⭐ | High-traffic or enterprise sites |
| Kinsta | Hands-off automatic migration | ⭐⭐⭐⭐ | Very fast | Excellent, handles large DB easily | ⭐⭐⭐⭐ | Performance-focused sites |
| SiteGround | Migration plugin + support team | ⭐⭐⭐⭐ | Fast | Good, needs manual checks afterwards | ⭐⭐⭐⭐ | Users want strong customer support |
| Bluehost | Assisted migration + simple tools | ⭐⭐⭐⭐ | Medium | Decent, works fine for small shops | ⭐⭐⭐⭐ | New WordPress users setting up their first site |
Simple example:
It’s like hiring a moving team; they pack, move, and set everything in the new house while you relax.
Pro Tip: If your site uses WooCommerce, always test checkout after migration.
TL;DR: Let your host handle migration if you want a stress-free process.
4. How to migrate a WordPress website by copying it
You can duplicate your entire site by manually copying files and importing the database to a new server.
This method works like manual migration but focuses mainly on copying the WordPress folder and database and placing them on a new hosting environment.
How Copy-Based Migration Works
- Copy your entire WordPress folder
- Export your database
- Paste/upload the folder into the new hosting account
- Import the database into the new host
- Update wp-config.php
- Fix URL paths
Example: It is like copying a folder from one laptop to another.
Your site behaves the same as long as your database and URLs are correctly linked.
Pros of migrating a WordPress website by copying it
- Straightforward
- Good for local-to-live migration
- Useful for developers
Cons of migrating a WordPress website by copying it
- Can break if URLs aren’t updated
- Not ideal for beginners
Pro Tip: After copying, regenerate permalinks inside WordPress (Settings → Permalinks → Save).
TL;DR: Copy migration works well if you’re comfortable handling both files and databases.
Which WordPress Migration Method Should You Use as a Beginner?
If your site is small and you’re not technical, use a plugin.
If your site is large or you want full control, move it manually.
If you use a managed host, let them migrate it for you.
Most people feel stuck here because they don’t want to pick the wrong method and break their site.
It’s like choosing a travel route:
- A simple bus → plugin method (easy, guided, safe)
- Driving your own car → manual method (full control)
- Hiring a private car service → host-assisted method (they do it for you)
Here’s a quick breakdown:
Plugin Migration (best for beginners & small websites)
- Automated steps
- Easy to undo mistakes
- Works for blogs, portfolios, and small business sites
Manual Migration (best for large sites & advanced users)
- You handle files and the database
- Great for custom setups, heavy plugins, and big WooCommerce stores
Host-Assisted Migration (best for busy users)
- The hosting team moves everything
- Very low risk
- Ideal if you already use managed WordPress hosting
Pro Tip: If you’re unsure, check your site size:
Under 1GB → plugin is perfect.
1–5GB → plugin or manual.
Above 5GB → manual or host-assisted.
TL;DR:
- Small site? Use a plugin.
- Big/custom site? Go manual.
- Managed hosting? Let the host handle it.
How to Migrate WordPress Without a Plugin
You can migrate a WordPress website without a plugin. It’s more technical, so it’s best suited for users who are comfortable with phpMyAdmin, FTP, and WP-CLI.
If you’re a beginner, this may feel overwhelming because even a small mistake, like importing the database incorrectly, can break your site. But here are the full steps explained simply so you understand exactly how it works.
Step 1: How do you export your WordPress database manually?
You can export it from phpMyAdmin with one click.
- Log in to your hosting panel (cPanel, Plesk, DirectAdmin, or a custom dashboard).
- Open phpMyAdmin.
- Choose your WordPress database from the left.
- Click Export → Quick → SQL → Download.
This file contains all your posts, pages, settings, users, and WooCommerce orders.
Pro Tip: If your site is large, consider Custom Export and compress the output to reduce errors.
Step 2: How do you move WordPress files to the new host?
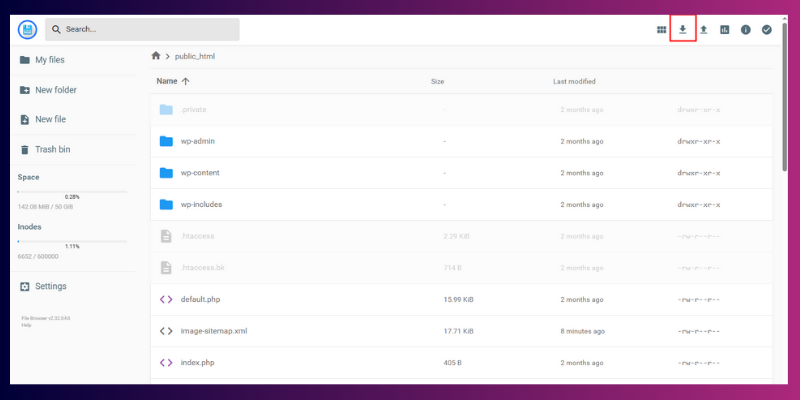
Use FTP or File Manager to download and upload your entire WordPress folder.
- Connect via FTP (FileZilla) or access the File Manager in your hosting control panel.
- Select all WordPress files: /wp-content/, /wp-admin/, /wp-includes/, plus index.php, .htaccess, etc.
- Download everything.
- Upload these same files to your new host’s public_html or the new site directory.
Example:
If your current hosting is slow, the download may take time. That’s normal; there are thousands of small PHP files.
Step 3: How do you import the database to the new host?
Use phpMyAdmin again to upload the SQL file.
- On the new host, create a new database.
- Open that database in phpMyAdmin.
- Click Import → Choose SQL file → Upload.
Pro Tip: If the SQL file is large, ask your host to increase the upload limit or use WP-CLI.
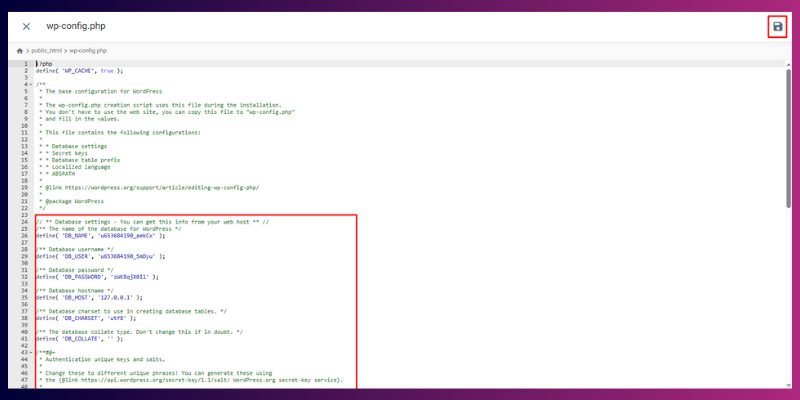
Step 4: How do you update the wp-config.php file?
Edit four database settings inside wp-config.
Explanation:
Open the wp-config.php file on your new hosting and update:
DB_NAME
DB_USER
DB_PASSWORD
DB_HOST
These must match the new hosting database details, or WordPress won’t connect.
Example: If DB_HOST changes from localhost to 127.0.0.1, your site may show a database connection error until corrected.
Step 5: How do you update old site URLs to match the new domain?
Use WP-CLI search-replace to update links safely.
Recommended Command:
wp search-replace ‘oldsite.com’ ‘newsite.com’ –all-tables
Why this step matters:
Without it, your images, menus, and internal links may still point to the old domain.
References:
Beginner-friendly note:
If you don’t have SSH or WP-CLI access, you can use a GUI tool like Better Search Replace (plugin), but that requires installing a plugin, so it technically isn’t a fully manual process.
Is manual migration safe for beginners?
Not really. Manual migration is powerful but risky because one mistake can break your website.
When to choose manual migration:
- You’re migrating a large WordPress site.
- You need full control over files and the database.
- You’re comfortable with hosting tools.
- You want to avoid plugin size limits.
When beginners should avoid it:
- You’re not familiar with databases.
- You have a WooCommerce store.
- Your hosting dashboard looks confusing.
TL;DR (Too Long; Didn’t Read)
- Yes, you can migrate WordPress without a plugin, but it’s technical.
- You’ll export the database, copy files, import the database, edit wp-config.php, and replace URLs.
- Good for developers, risky for beginners.
- If you’re new to WordPress, use a migration plugin instead — it’s safer and faster.
How To Move WordPress to a New Domain?
You can move WordPress to a new domain by backing up your site, transferring your files and database to the new hosting environment, updating your site’s URLs, and pointing your domain’s DNS to the new server. Many people also use migration plugins like Duplicator or All-in-One WP Migration to make the process faster and safer.
Steps to Move WordPress to a New Domain (Clear, Simple & Detailed)
These steps reflect how developers and hosting experts handle domain changes without losing SEO value or breaking the site.
1. Create a Full Backup
Before anything else, save your entire site files + database.
This protects you from failed transfers, broken URLs, or missing images.
You can back up using:
- Your hosting panel
- A plugin (UpdraftPlus, Duplicator, AIOWP Migration)
- FTP + phpMyAdmin manually
2. Move Your Files to the New Domain’s Hosting
Upload your WordPress files to the new server using:
- FTP (FileZilla)
- Hosting File Manager
- A migration plugin (if you prefer the easy route)
If you’re using Duplicator or AIOWP, they’ll handle this part automatically.
3. Import Your Database on the New Host
Create a new database → import your SQL backup inside phpMyAdmin. This restores your posts, pages, settings, and plugin data.
4. Update Connection Details in wp-config.php
Match the file to your new hosting environment by updating:
- Database name
- Database user
- Database password
- Database host
This ensures WordPress can connect properly.
5. Update WordPress URLs to the New Domain
Your site still thinks it’s on the old domain until you update the URL values. Your site must know its new home.
You can update URLs by:
- Going to Settings → General (if the dashboard is accessible)
- Editing the database (wp_options → siteurl & home)
- Using a plugin like Better Search Replace
- Using WP-CLI for large or complex sites
6. Replace Old URLs Inside Content
Internal links, images, and embedded media still point to the old domain unless updated. Use Better Search Replace or WP Migrate Lite to update all internal URLs in one go.
Example tools:
- Better Search Replace
- WP Migrate Lite
- WP-CLI search-replace command
7. Set Up 301 Redirects From Old Domain to New Domain
This is the part that protects your SEO. To keep your SEO safe, set up permanent redirects. A simple redirect rule in your old domain’s .htaccess or hosting panel ensures:
- Google indexes your new domain
- Users don’t hit broken pages
- You keep your rankings
- Pass link authority
- Avoid duplicate content
- Keep users from landing on old pages
.
8. Update DNS Settings for the New Domain
Point the domain to your new hosting provider. Update nameservers or A-records
Propagation usually takes a few hours.
9. Check the Site for Broken Links & Media
After migration, test your pages, images, menus, and plugins.
Best Practices
- Always test the new site on a temporary URL before switching DNS.
- Keep the old domain active until redirects are confirmed.
- If you run WooCommerce, test checkout and account pages carefully.
How Can You Safely Migrate a Large Website or WooCommerce Store?
You can move a large WordPress or WooCommerce site safely by using a staged migration. This method helps you handle large databases, large media libraries, and store important data without breaking your live shop.
Clear, Helpful Steps:
- Break the database and media files into smaller parts
Large sites often have heavy product images, order tables, and customer records. Moving everything in one go can be a failure. Breaking it into chunks prevents timeouts and data loss. - Create full backups of WooCommerce data
Save copies of orders, products, coupons, customer accounts, shipping zones, tax settings, and payment configurations.
This ensures no order or stock update goes missing during the move. - Move store-specific settings with care
Payment gateways, API keys, webhook URLs, and subscription settings may stop working after migration. Update them on the new hosting panel to avoid failed payments or missed notifications. - Use a staging site for testing
Test the full checkout flow on a staging domain, add a product to the cart, place a test order, check emails, and verify that stock reduces correctly.
This step helps you catch broken links, missing images, or plugin conflicts before you switch DNS. - Switch the live site only after testing
Once everything looks stable on staging, point your domain to the new server. This minimizes downtime and keeps your customers’ shopping experience smooth.
Tip: Staged migration lowers the chances of data errors and makes it easier to fix issues without affecting your live store.
How Can You Switch DNS During WordPress Migration with Minimal Downtime?
A careful DNS cutover plan ensures your site stays accessible while migrating, reducing downtime and avoiding traffic loss.
Step-by-Step DNS Cutover Plan:
- Lower TTL (Time-to-Live) Before Migration
Reduce your DNS TTL to a short interval (e.g., 300 seconds) at least 24–48 hours before switching. This ensures that changes propagate quickly and visitors reach the new server without delay. - Prepare Your New Server
Make sure all files, databases, SSL certificates, and configurations are fully ready on the new host. Test thoroughly on a staging site before updating DNS. - Switch DNS Gradually
Update your domain’s A record or CNAME to point to the new server. Keep monitoring traffic and server logs during propagation to catch any issues early. - Monitor and Verify
Use tools like WhatsmyDNS.net or DNSChecker.org to ensure DNS changes are propagating globally. Check site speed, forms, and WooCommerce functionality immediately after the switch. - Have a Rollback Plan
Keep your old server active for a short period and backup the original DNS settings. This allows you to revert quickly if any critical problem arises during migration.
Tips for Smooth Migration:
- Communicate planned downtime (if any) with users.
- Test SSL, caching, and internal links after the switch.
- Use a staged migration to reduce risk.
What Should You Check After Migrating Your WordPress Site?
After moving your site, review your pages, links, forms, images, SSL setup, caching, and overall speed to make sure everything works the way it should.
Clear, Helpful Steps:
- Scan all important pages and links
Open key pages such as the homepage, blog posts, product pages, and contact page. Ensure that no link displays a 404 error. - Check every form on your site
Test contact forms, signup forms, login fields, or checkout forms if you run a shop. Confirm emails are being sent and received correctly. - Review media files
Some migrations miss image paths. Browse through your pages and confirm all images, videos, and featured images load correctly. - Confirm SSL and security
Your site should load with HTTPS. If not, force HTTPS from your host or use a simple search-and-replace to fix mixed-content issues. - Verify caching and performance settings
Re-enable caching plugins, CDN settings, or server-level caching.
Caching often resets during migration, which can slow the site down. - Check your speed and stability
Use tools like Core Web Vitals, Lighthouse, or PageSpeed Insights to confirm your site loads smoothly and stays stable under traffic. - Monitor logs for errors
Look for PHP errors, database warnings, or plugin conflicts in your hosting panel. This helps you spot hidden issues early.
Tip: Keep your complete backup until you confirm everything is stable. It gives you a safe restore point if something goes wrong.
What Are the Most Common WordPress Migration Mistakes?
Migrating WordPress can go wrong if you skip backups, forget to update URLs, ignore DNS settings, or fail to test key features like WooCommerce or forms.
Common Mistakes to Watch For:
- Forgetting Backups
Without a complete backup, any error during migration can lead to permanent data loss. Always back up both your database and files. - Broken URLs
Not updating internal links and media paths can result in 404 errors, poor user experience, and SEO issues. - Ignoring DNS TTL (Time-to-Live)
DNS settings affect how quickly visitors reach your new site. Ignoring TTL can cause unexpected downtime or delays in traffic. - Not Testing WooCommerce or Forms
For e-commerce sites, untested checkout, payment gateways, or order histories can result in lost sales and frustrated customers. - Skipping SEO Checks
Failing to check redirects, meta tags, and structured data may cause a drop in search rankings and organic traffic. - Plugin or Theme Conflicts
Some plugins or custom themes may break after migration. Testing them on a staging site first helps avoid surprises.
Tip: Use a migration checklist to ensure that every critical step from backups to SEO verification is completed. This prevents errors and keeps your site fully functional.
References for More Details:
Troubleshooting & Advanced Questions
Even after moving your site carefully, a few things can still go wrong. Pages may look different, images may break, or the site might feel slower than before. This section covers the most common problems people face during migration and how you can fix them quickly without getting lost in technical steps.
1. How do I move my WordPress site to a new host without breaking it?
Backup your site first. Move files and the database carefully. Test on a staging site before going live. Update URLs and check links after migration.
2. What is the easiest way to migrate WordPress for beginners?
Use a migration plugin like All-in-One WP Migration or Duplicator. Follow its step-by-step guide. No coding needed. Always keep a backup.
3. Why does my site look different after migration?
Some files or themes may not have moved correctly. Clear your cache and refresh permalinks. Verify your theme and plugin files are intact.
4. How do I fix broken images after moving my WordPress site?
Update URLs if they still point to the old domain. Make sure the uploads folder is fully copied, clear the site and browser cache.
5. Do I need to change anything in WordPress after switching hosting?
Check your site URL, permalinks, and caching settings. Update DNS if needed. Ensure PHP version and server settings match your old host.
6. How do I move WordPress if my database is too large?
Export the database in smaller chunks. Compress large media folders. Test migration on a staging site. This reduces errors and timeouts.
7. What should I do if my permalinks stop working after migration?
Go to Settings → Permalinks and click Save. Clear cache. Check your .htaccess file and hosting support for pretty permalinks.
8. Can I migrate WordPress without putting the site into maintenance mode?
Yes, use a staging site and move files carefully. Keep the live site accessible. Switch the domain only after everything is ready.
9. Why is my site slow after migrating to a new host?
Check PHP version, caching, and server resources. Enable object caching if possible. Test with tools like Lighthouse and optimize where needed.
10. How do I move a WooCommerce store without losing orders?
Backup the site and export recent orders. Put the store in “hold stock” mode. Test checkout on a staging site before going live.
Extra Tips and Best Practices
- Always Backup First – Save your files and database before doing anything.
- Use a Staging Site – Test the migration there before going live.
- Check PHP and WordPress Versions – Make sure the new host matches your site requirements.
- Keep Plugins Updated – Outdated plugins can cause migration issues.
- Lower DNS TTL – Helps reduce downtime when switching servers.
- Move in Chunks for Large Sites – Break media and database files into smaller parts.
- Update URLs Carefully – Use search-replace tools or WP-CLI to fix links.
- Test Forms and WooCommerce – Ensure orders, payments, and subscriptions work.
- Check SSL and Caching – Make sure security and speed stay intact.
- Keep Backups Until Everything Works – Don’t delete old files too soon.
- Avoid Skipping Steps – Every small step prevents big errors.
- Communicate Planned Downtime – Inform visitors if some downtime is expected.
Conclusion
By following this guide, you now know how to migrate a WordPress website safely and efficiently. You’ve learned how to back up your site, move files and databases, update URLs, and check everything after migration. You also know how to avoid common mistakes and reduce downtime.
With these steps, you can confidently move any WordPress site, whether it’s a small or a large WooCommerce store. Next, try practising on a staging site to build your skills. You can also explore advanced tools for faster migrations or deeper SEO checks to keep your site strong after the move.
Remember, careful planning and testing make every migration smoother. Your WordPress site is ready for a fresh start!
FAQs
Yes, you can move your site manually using tools like phpMyAdmin, FTP, and WP-CLI. It’s more technical, so beginners might find it tricky. Always back up your site first. If unsure, using a plugin is safer and faster.
It depends on your site size. Small blogs may take 30–60 minutes. Larger sites or WooCommerce stores can take several hours. Always plan for extra time to test everything after the move.
If you update URLs, set up proper 301 redirects, and keep internal links correct, your SEO should stay intact. Check Google Search Console after migration. Avoid changing URLs unnecessarily.
Absolutely. Backups protect you from mistakes or accidental data loss. Save both your database and files. Keep backups on your computer or cloud storage.
Break your database and media into smaller parts. Backup all orders, products, and payment settings. Test on a staging site before going live. Reconfigure payment gateways on the new host.
Plan a DNS cutover to reduce downtime. Keep a rollback backup ready. Test changes on a staging site first. This prevents unexpected outages for your visitors.
You can, but plan carefully. A faster or more reliable host can improve performance. Make sure to transfer all files, databases, and emails. Test the site fully before pointing your domain to the new host.
A critical error usually means something went wrong with the files or database. Check your wp-config.php for the correct database info. Make sure your new host supports the same PHP version. Turn on debug mode to see the exact problem. Fixing the database or file paths often solves it.
Without access, migration is tricky. You need to copy both files and the database manually. If that’s not possible, ask your hosting provider for access. Otherwise, you may need to rebuild your site on the new host. Planning ahead can prevent big headaches.
Yes, it can change depending on your new host. Server setup, caching, and PHP versions all affect speed. Test your site after migration to see if it’s slower. Enable caching once everything works. Keep monitoring performance for a few days.


- Be Respectful
- Stay Relevant
- Stay Positive
- True Feedback
- Encourage Discussion
- Avoid Spamming
- No Fake News
- Don't Copy-Paste
- No Personal Attacks
- Be Respectful
- Stay Relevant
- Stay Positive
- True Feedback
- Encourage Discussion
- Avoid Spamming
- No Fake News
- Don't Copy-Paste
- No Personal Attacks
