Understanding WordPress Dashboard: A Complete Walkthrough
Published: 11 Nov 2025
The WordPress Dashboard is the control centre of your website. From here, you can create posts and pages, upload media, install themes and plugins, manage comments, and adjust site settings, all without needing to code. Think of it as the driver’s seat of your website.
If you’ve just installed WordPress, the dashboard might feel overwhelming at first glance. You’re not alone! So, don’t worry, the dashboard is actually beginner-friendly once you know what each section does.
In this guide, I’ll walk through the WordPress Dashboard step by step, cover every important feature, and share tips so you can manage your site confidently like a pro.
1. What is the WordPress Dashboard?
The Dashboard (also called WordPress Admin Area) is the back-end of your site. Only logged-in users with permission (like admins and editors) can access it.
You can reach it by visiting:
yourwebsite.com/wp-admin
Think of it as your mission control panel, where you can:
- Write posts & pages
- Manage media files
- Customize appearance
- Add plugins for extra features
- Control user roles
- Monitor site health and updates
2. Logging In and First Look
To access your dashboard:
- Go to yourwebsite.com/wp-admin
- Enter your username/email + password
- Click Log In
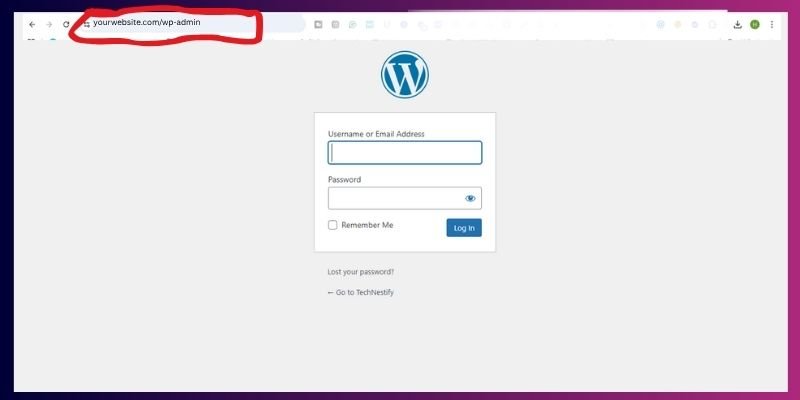
And you’ll land on the Dashboard screen. This is your control panel, where everything about your site is managed.
Pro Tip: Bookmark this page to save time.
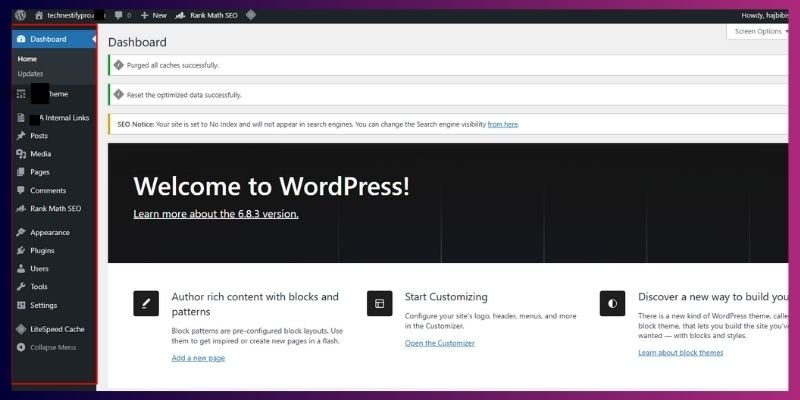
3. WordPress Dashboard Home Screen
Once you log in, you’ll see the Home screen.
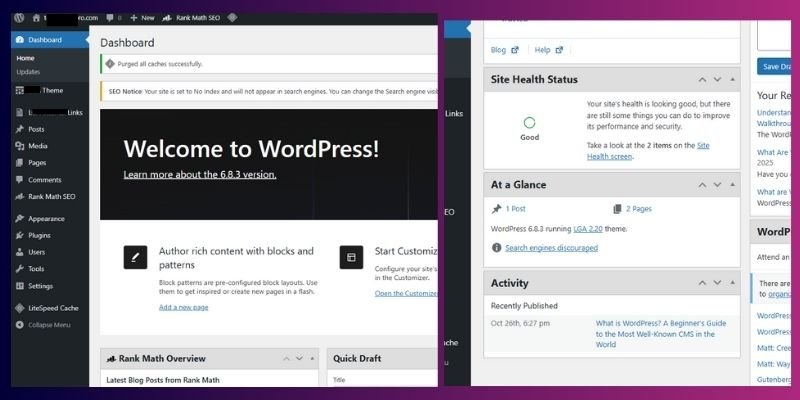
Key widgets here:
- Welcome Panel → Quick links to create a post, customize your site, or add widgets.
- At a Glance → Shows total posts, pages, comments, WordPress version, and active theme.
- Quick Draft → Start writing a post idea without opening the full editor.
- Activity → Shows recent posts, comments, and pending moderation.
- Site Health Status → Alerts about performance, updates, or security issues.
Tip: You can rearrange these widgets by drag-and-drop or hide them using “Screen Options” (top right corner).
4. The Admin Toolbar (Top Bar)
That black bar at the very top of your screen is the Admin Toolbar. It gives you quick shortcuts to:
- Visit your live site
- Add new posts, media, or users
- Access plugin/theme settings
- View updates or notifications
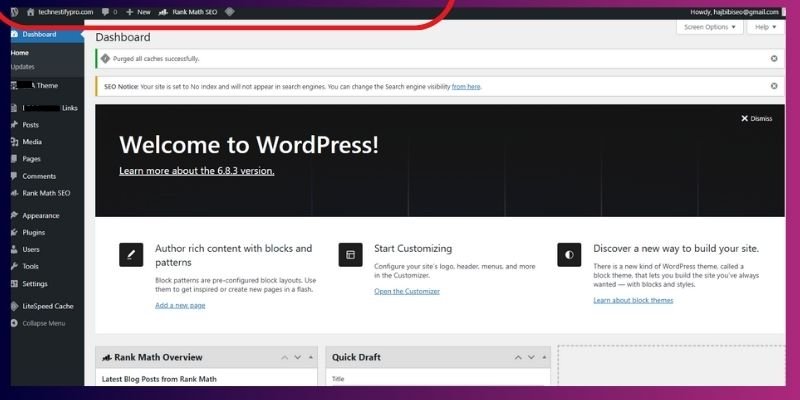
Think of it as a quick-access menu, no matter where you are in WordPress.
5. The Main Navigation Menu
On the left side, you’ll see the main menu. Here’s what the key items do:
- Dashboard – Home + Updates
- Posts – Blog posts management
- Media – Upload/manage images, videos, files
- Pages – Static pages (About, Contact)
- Comments – Moderate visitor feedback
- Appearance – Themes, menus, widgets, customization
- Plugins – Add functionality to your site
- Users – Manage roles (Admin, Editor, Author, etc.)
- Tools – Import/export tools
- Settings – Control site basics (permalinks, reading, writing)
Tip: Collapse the menu with the arrow at the bottom to save space.
6. Creating and Managing Content
This is where beginners spend most of their time.
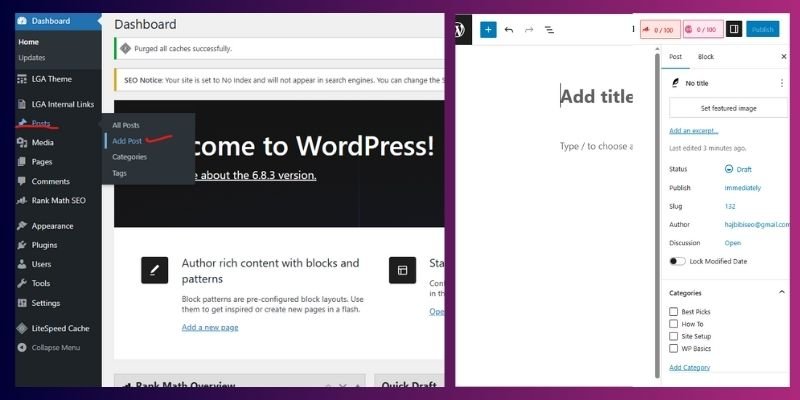
Steps to create a post:
- Go to Posts → Add New
- Add a title, write your content, and insert images
- Assign categories and tags
- Click Publish
Categories = broad topics (e.g., Travel), Tags = specific keywords (e.g., Europe, Packing).
Example: A food blog could use the category “Recipes” and tags like “Pasta” or “Desserts.”
7. Media Library
Here you can upload and organize your images, videos, and files.
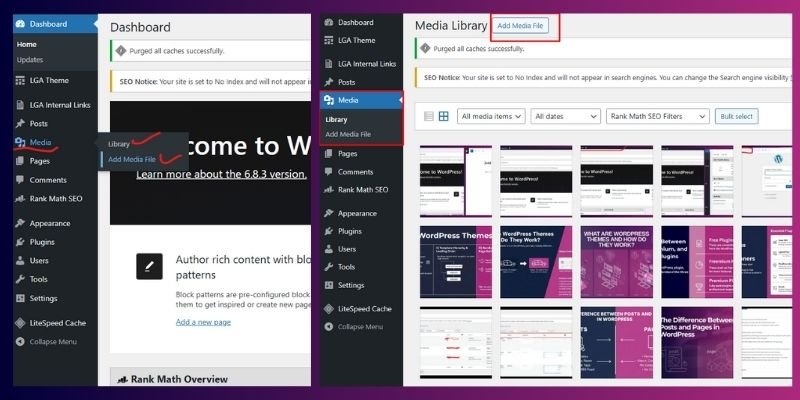
- Drag and drop files to upload
- Add alt text for SEO and accessibility
- Edit image sizes or crop directly in WordPress
Best practice: Keep file sizes small for faster site speed.
8. Pages
Unlike posts, pages are for static content (e.g., About, Contact, Services).
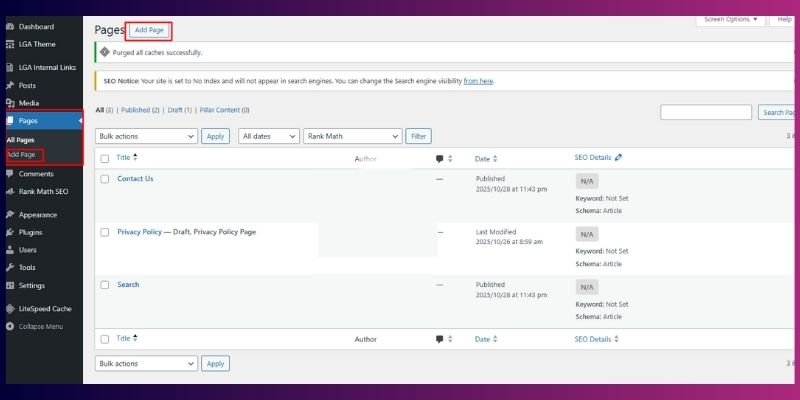
- Create via Pages → Add New
- Use page builders or blocks for design flexibility
- Add to your site menu for easy navigation
9. Comments
This is where you can manage visitor interactions.
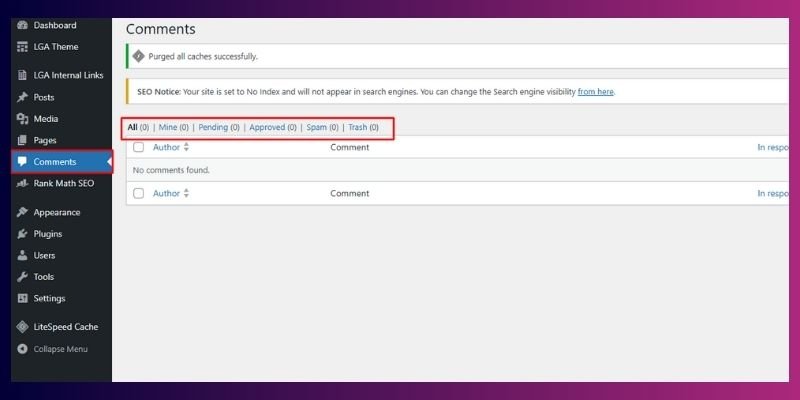
- Approve, reply, or delete comments
- Mark spam comments
- Encourage discussions to build community
Tip: Install an anti-spam plugin like Akismet to reduce junk comments.
10. Appearance Settings
Here you can change the look of your site:
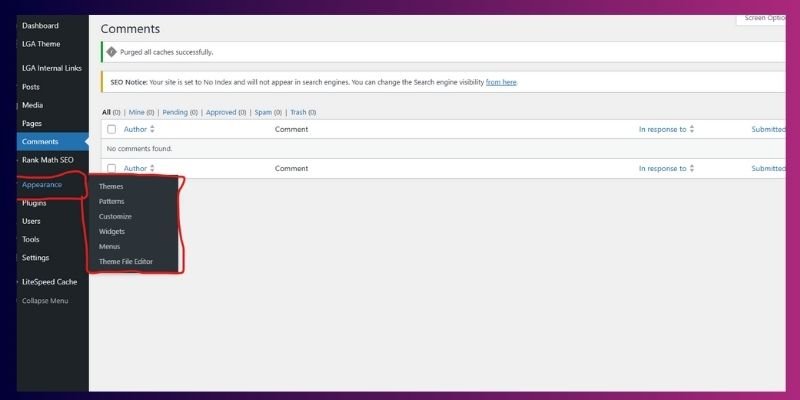
- Themes →Install and activate new designs
- Customize → Live preview your site and tweak design
- Widgets → Add features (like a search bar or recent posts)
- Menus → Organize site navigation
11. Plugins
Plugins add extra functionality. They are like apps for WordPress; they let you add new features without coding. But with 60,000+ free plugins available, choosing the right ones matters.
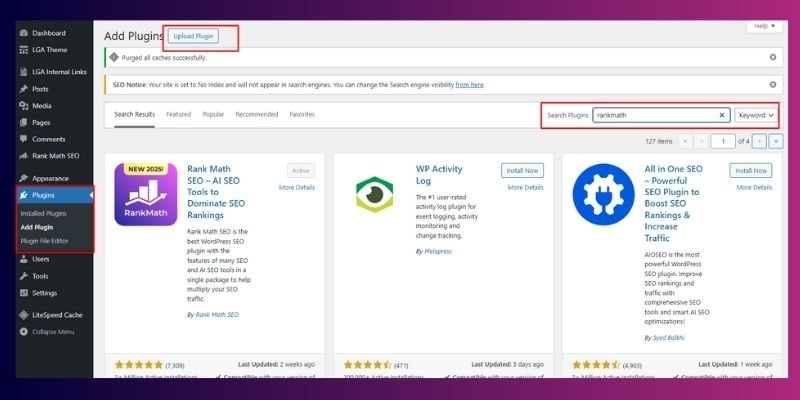
Here are some essential plugins for beginners:
- Yoast SEO / Rank Math → Optimize your site for search engines.
- Elementor / Spectra → Build beautiful, custom pages with drag-and-drop.
- WooCommerce → Add eCommerce functionality to sell products online.
- UpdraftPlus → Automatically back up your site for safety.
- Wordfence Security → Protect your site from hackers and malware.
- WP Rocket / W3 Total Cache → Speed up your site with caching.
- MonsterInsights → Connect Google Analytics and track traffic easily.
Tips for choosing plugins safely:
- Check reviews & last updated date.
- Only install from the official WordPress directory or trusted developers.
- Avoid installing too many plugins (it slows down your site).
Only install trusted plugins to keep your site secure and fast. (See official plugin guide)
12. Users & Roles: Managing Access in WordPress
WordPress allows multiple people to work on the same website without sharing one login. Each role comes with different permissions:
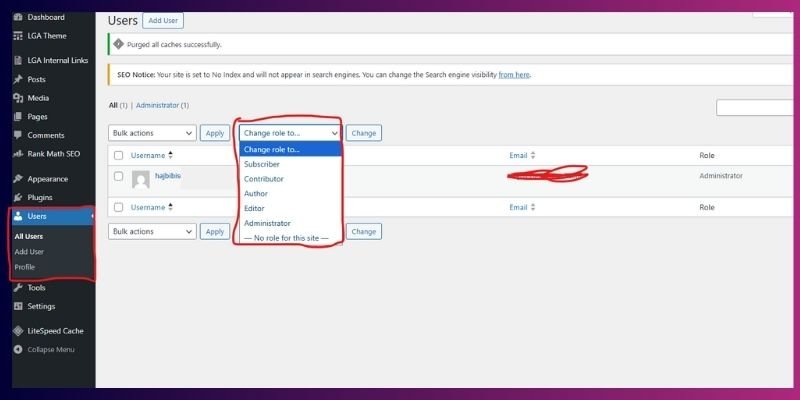
- Administrator → Full control (install plugins, change settings, manage all content).
- Editor → Can publish, edit, and delete any content, including posts from others.
- Author → Can write, edit, and publish their own posts only.
- Contributor → Can write and edit drafts but cannot publish without approval.
- Subscriber → Can only manage their profile and read restricted content.
Why this matters:
- Use Administrator only for site owners or developers.
- Assign Editor/Author roles to content creators.
- Limit permissions to reduce risks of accidental changes or security breaches.
Advanced tip: You can also create custom roles with plugins like User Role Editor if you want finer control (e.g., giving someone access to comments but not posts).
See the WordPress user roles guide for more details.
13. Tools
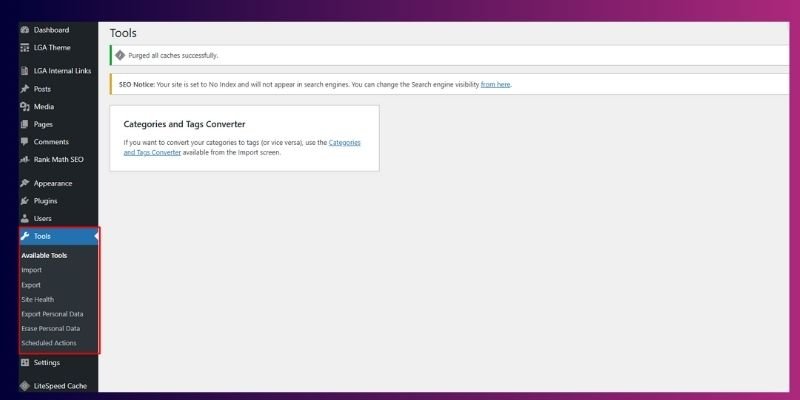
- Import/Export → Move your posts, pages, and media between WordPress sites.
- Site Health → Check your website’s performance and security status.
- Export Personal Data → Download user data to stay GDPR compliant.
Tip: Beginners may not use these every day, but they’re very useful as your site grows.
14. Settings Walkthrough
The Settings menu controls your site’s basics:
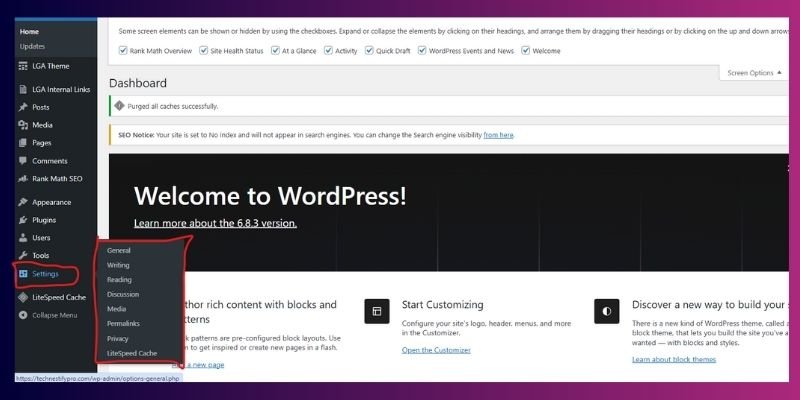
- General – Site title, tagline, timezone
- Writing – Default post category, post format
- Reading – Homepage display (latest posts vs static page)
- Discussion – Comment settings
- Media – Default image sizes
- Permalinks – URL structure (recommended: Post Name for SEO)
- Privacy – Assign a privacy policy page
Best practice: Change permalinks before publishing content.
15. Screen Options & Customization
At the top right of most dashboard pages, you’ll notice a small “Screen Options” tab. This lets you:

- Show or hide dashboard widgets
- Choose how many posts/pages are shown in a list
- Personalize your workspace for easier navigation
Example: If your “Posts” list feels too long, reduce it to 10 items per page for a cleaner view.
Tip: Spend a few minutes adjusting Screen Options; it makes your dashboard less disorganized and more beginner-friendly.
16. Troubleshooting Common Issues
Beginners may run into small problems while using WordPress. Here are quick fixes for the most common ones:
- Can’t log in? → Double-check your login URL (/wp-admin). If you forgot your password, reset it via email.
- Dashboard looks broken? → Clear your browser cache, or temporarily disable conflicting plugins.
- Too many menu items? → Some plugins add extra menus. Deactivate any plugins you don’t really need.
Tip: If nothing works, switch to a default theme (like Twenty Twenty-Four) and re-enable plugins one by one to find the issue.
Mini Troubleshooting Checklist (Step by Step):
- Clear your browser cache and refresh.
- Deactivate recently added plugins.
- Switch to a default WordPress theme.
- Update WordPress, themes, and plugins.
- Contact your hosting support if problems continue.
17. Pro Tips for Beginners
Starting with WordPress can feel overwhelming, but these simple habits make a big difference:
- Explore daily → Spend at least 15 minutes clicking through menus to learn what each option does.
- Stay updated → Always keep WordPress, themes, and plugins updated to avoid bugs and security risks. Learn how to update safely.
- Backup regularly → Use a plugin like UpdraftPlus or your hosting backup to secure your site.
- Secure your login → Use strong passwords, enable two-factor authentication, and follow wordpress security best practices.
Tip: Small, consistent steps are better than big, complicated changes. Build good WordPress habits early.
Conclusion
So guys, in this article, we’ve covered Understanding WordPress Dashboard in detail.
My personal recommendation is to spend time exploring each menu instead of trying to learn everything in one go, as it makes the process less overwhelming and more practical. Now it’s your turn: log in, experiment, and take control of your site with confidence.
Mastering the dashboard is the first step toward mastering WordPress. Think of it as the driver’s seat of your website. Once you’re comfortable here, you can go anywhere.
Remember, every expert once started as a beginner, and you’re already moving in the right direction, wishing you all the success on your WordPress journey!
FAQs
The WordPress Dashboard is your website’s control panel. It’s where you create posts, upload images, manage plugins, and change settings. Think of it as the “driver’s seat” of your site.
Pro Tip: Spend 10 minutes exploring menus, and you’ll get comfortable quickly.
Go to yourwebsite.com/wp-admin and enter your username and password. If you forget, click “Lost your password?” to reset it.
Pro Tip: Bookmark the login link so you don’t forget it.
Some hosting providers or plugins add extra menus and options. That’s normal, your dashboard may not look exactly like someone else’s.
Pro Tip: Focus on the basics first (Posts, Pages, Media).
Posts are for blog articles that update regularly. Pages are for static content like “About Us” or “Contact.”
Pro Tip: Use categories and tags with posts, but not with pages.
Yes! Use “Screen Options” at the top to hide or show widgets. You can also install plugins to make it simpler or more advanced.
Pro Tip: Hide widgets you don’t use to keep things clean.
Plugins add extra features to your site, like SEO tools, contact forms, or online stores. Beginners usually need just a few, like an SEO plugin and a security plugin.
Pro Tip: Only install plugins from trusted sources like WordPress.org.
Yes, WordPress is beginner-friendly. Just avoid clicking “Delete” or changing advanced settings until you know what they do.
Pro Tip: Always make a backup before making big changes.
Stick to the main menus (Posts, Pages, Media) at first. Rearrange widgets on the dashboard to keep things simple.
Pro Tip: Collapse the sidebar menu (arrow at bottom) for more space.
Sometimes it’s hidden under “Screen Options” or added by a plugin. If it’s still missing, check your user role. Admins see more than Authors or Subscribers.
Pro Tip: Search your issue in the WordPress.org forums; they cover everything.
Not always, but it’s good to log in regularly. You’ll catch updates, comments, and new activity faster.
Pro Tip: Enable email notifications for updates so you don’t miss anything.


- Be Respectful
- Stay Relevant
- Stay Positive
- True Feedback
- Encourage Discussion
- Avoid Spamming
- No Fake News
- Don't Copy-Paste
- No Personal Attacks
- Be Respectful
- Stay Relevant
- Stay Positive
- True Feedback
- Encourage Discussion
- Avoid Spamming
- No Fake News
- Don't Copy-Paste
- No Personal Attacks
